Note: This guide is written for home gardeners, small backyard orchard owners, and anyone who has ever looked at a young apple tree leaning sideways and thought, “Well, that seems dramatic.” Staking an apple tree is simple, but doing it the wrong way can slow root growth, scar the trunk, or turn your promising little tree into a bark-bruised garden noodle.
Learning how to stake an apple tree is really about balance. The goal is not to strap the tree down like it is preparing for a hurricane. The goal is to give it enough support to stay upright while still allowing gentle movement. That slight sway helps the trunk strengthen and encourages the roots to anchor firmly in the soil.
Some apple trees need only temporary staking for one growing season. Others, especially dwarf apple trees on weaker rootstocks, may need a permanent stake or trellis because they can produce more fruit than their small root system can safely hold. In other words, dwarf trees are adorable, productive, and occasionally overachievers who need a sturdy adult nearby.
This step-by-step guide explains when staking is necessary, what materials to use, where to place the stake, how to tie the tree without damaging bark, and when to remove or adjust support. By the end, your apple tree should stand tall, grow strong, and avoid the awkward “leaning tower of fruit” phase.
Why Stake an Apple Tree?
Staking gives a young apple tree temporary or long-term support while it establishes roots and develops a strong trunk. It is especially useful when a tree has a small root ball, a thin trunk, a heavy top, or is planted in a windy location. Staking can also protect newly planted trees in busy yards where pets, children, lawn equipment, or enthusiastic weekend gardeners may bump into them.
However, staking is not always required. A strong, well-planted apple tree with a firm root system may do better without extra support. Trees that are tied too tightly or supported for too long can become dependent on the stake. Their trunks may stay weaker, and ties can cut into the bark as the trunk expands.
Temporary Staking vs. Permanent Support
Before you begin, determine what kind of apple tree you have. A standard or semi-standard apple tree may need support only during establishment. A dwarf apple tree, especially one on a very dwarfing rootstock, often needs a permanent stake, post, or trellis because the mature fruit load can bend the trunk or even break the tree.
Think of temporary staking as training wheels. Think of permanent dwarf-tree support as a good orchard insurance policy. Apples are wonderful, but a tree overloaded with fruit can behave like a shopper trying to carry twelve grocery bags in one hand.
Tools and Materials You Will Need
- One sturdy wooden or metal stake for most small apple trees
- Two or three stakes for larger, top-heavy, or wind-exposed trees
- A rubber mallet, sledgehammer, or post driver
- Wide, soft tree ties, canvas straps, rubber ties, or flexible garden tape
- Scissors or pruning shears for trimming tie material
- Mulch for the planting area
- Watering can, hose, or drip irrigation system
- Gloves for hand protection
Avoid thin wire, fishing line, narrow rope, zip ties, or twine wrapped directly around the trunk. These materials may look harmless at first, but as the tree grows, they can cut into the bark and cause girdling. Girdling is when a tie or wire restricts the flow of water and nutrients under the bark. In tree language, that is not a minor inconvenience; it is a slow-motion disaster.
How to Stake an Apple Tree: 9 Steps
Step 1: Decide Whether the Apple Tree Actually Needs Staking
Start by gently testing the tree. After planting, hold the trunk and move it slightly. If the root ball shifts in the soil, if the trunk bends sharply, or if the site is exposed to strong wind, staking is a good idea. If the tree stands upright and the root ball feels stable, it may not need staking at all.
Staking should solve a specific problem. Good reasons include a newly planted bare-root tree, a container-grown tree with a small or loose root system, a dwarf apple tree that will need long-term support, or a tree planted where wind regularly pushes it off center.
Do not stake just because the tree is young. Young trees are not porcelain figurines. They need some natural movement to develop strength.
Step 2: Choose the Right Stake for Your Tree Size
For many backyard apple trees, a wooden stake about 2 inches by 2 inches is strong enough. Metal fence posts, steel conduit, or sturdy orchard posts can also work. The stake should be tall enough to support the trunk while leaving the upper canopy free to move.
For dwarf apple trees, choose a longer and stronger post. Many dwarf trees benefit from an 8- to 10-foot support post set deeply into the ground. The post should be durable because the tree may need it for many years or even for its entire life.
For semi-dwarf apple trees, a 6- to 8-foot stake is often adequate during the early years. The exact height depends on the tree’s rootstock, variety, planting site, and expected mature size.
Step 3: Place the Stake Before or Immediately After Planting
The best time to stake an apple tree is at planting. Installing the stake early reduces the chance of damaging roots later. If possible, drive the stake into the ground before fully backfilling the planting hole. This helps you avoid spearing the root ball by accident, which is a bit like helping someone move into a house and immediately punching a hole in the plumbing.
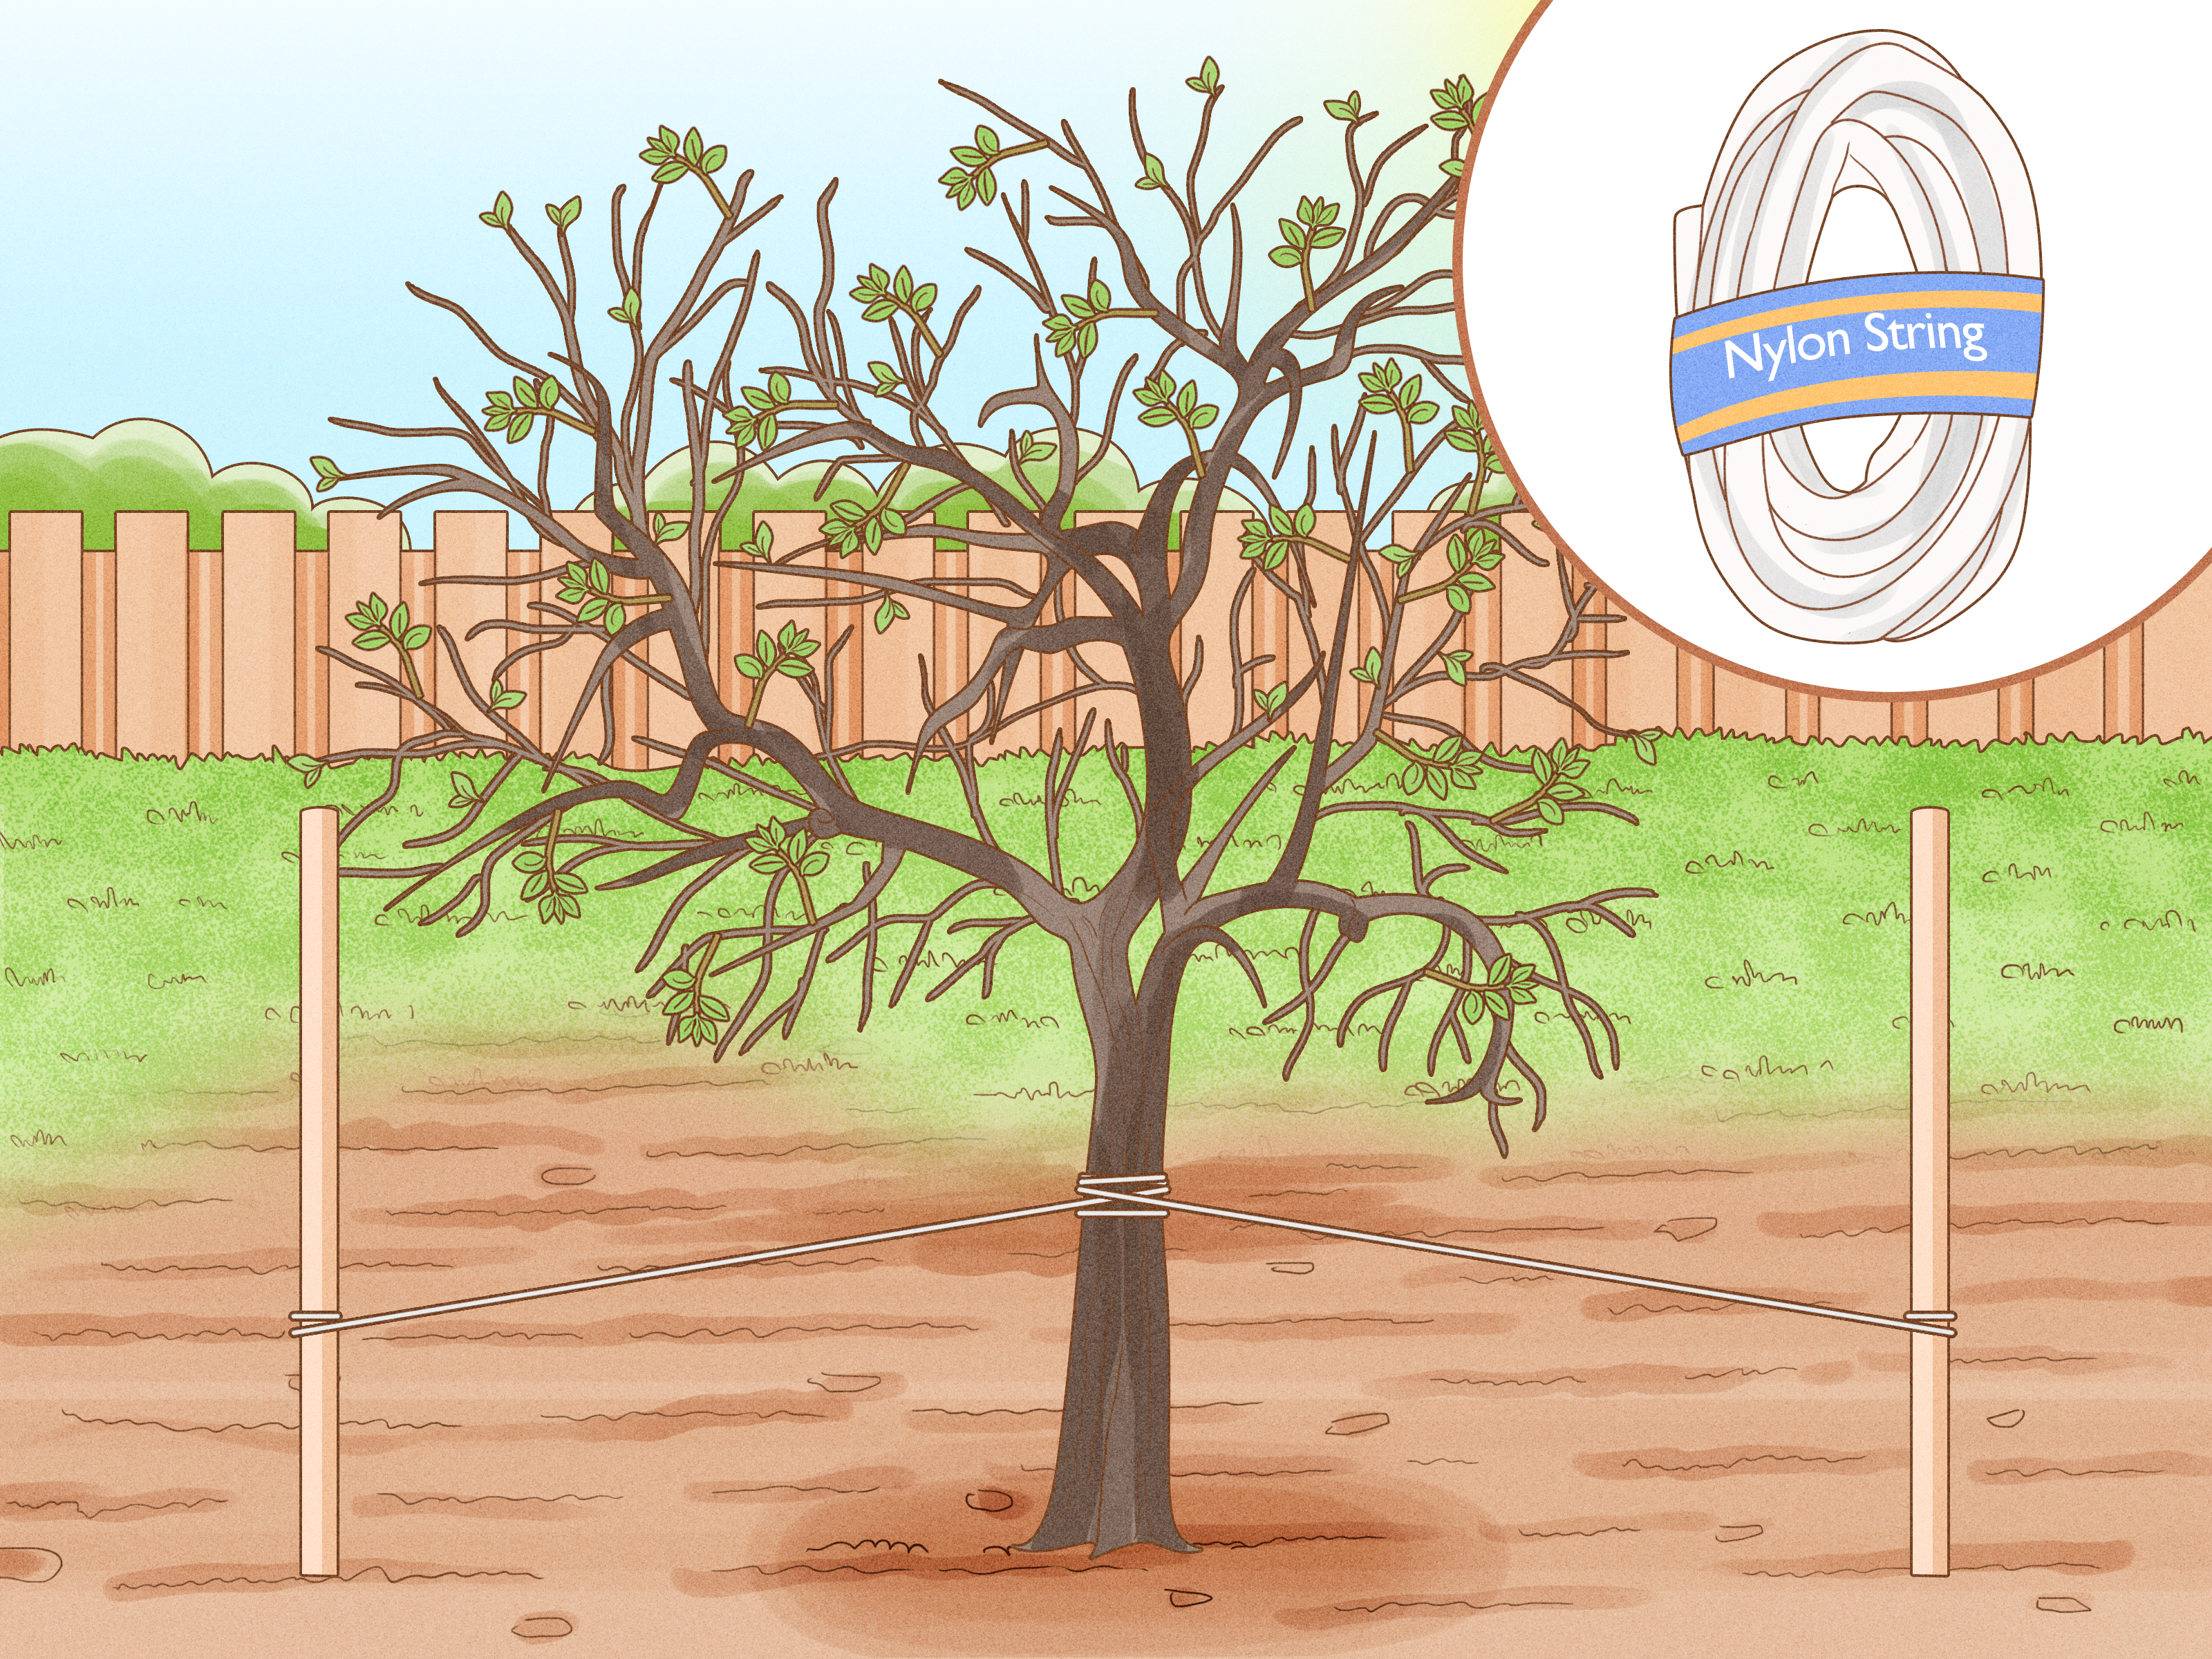
Place the stake just outside the root ball, not through it. If your area has a prevailing wind direction, position a single stake on the windward side so the tree is supported against the strongest push. In very windy sites, two stakes placed opposite each other may provide better balance.
Step 4: Drive the Stake Deeply into Firm Soil
A stake that wobbles is not support; it is garden decoration. Drive the stake at least 18 to 24 inches into firm, undisturbed soil. For taller dwarf-tree support systems, setting the post 2 to 3 feet deep is often better.
The stake should stand straight and firm. After driving it in, push on it with your hand. If it rocks easily, drive it deeper or use a stronger post. Apple trees can live for decades, so the support system should not give up after the first thunderstorm.
Step 5: Position the Tree Straight, But Not Stiff
Before tying the tree, step back and look at it from several angles. The trunk should be upright, and the graft union should remain above the soil line. The graft union is the swollen area near the lower trunk where the fruiting variety was joined to the rootstock. For dwarf apple trees, keeping this union above the soil helps preserve the dwarfing effect.
Do not pull the tree unnaturally straight if the trunk has a slight curve. Young trees are living plants, not fence posts. Aim for a natural upright position with the root ball stable in the soil.
Step 6: Tie the Apple Tree with Soft, Flexible Material
Use wide, soft ties that will not cut into the bark. Good options include rubber tree straps, canvas tree ties, flexible nursery tape, or strips of soft cloth. The tie should hold the tree upright without squeezing the trunk.
A figure-eight tie works well. Loop the tie around the stake, cross it between the stake and trunk, and then loop it around the tree. This creates a cushion between the trunk and the stake, reducing rubbing. The tie should be snug enough to prevent the tree from tipping but loose enough for the trunk to move slightly.
Never tie the trunk tightly against the stake. If the tree cannot move at all, it may develop a weaker trunk. A little sway is not a flaw; it is strength training.
Step 7: Tie Low on the Trunk, Not High in the Canopy
One of the most common staking mistakes is tying too high. When a tree is tied near the top, the trunk may become rigid below the tie and floppy above it. That creates poor movement and can lead to weak growth.
For temporary staking, tie the tree low enough that the top can still move. A common guideline is to place the tie around one-third to one-half of the way up the trunk, depending on where support is needed. If the tree still bends too much, adjust the tie slightly higher, but avoid locking the entire canopy in place.
For dwarf apple trees with permanent support, ties may be added or adjusted as the central leader grows. The goal is to guide the leader upward while preventing fruit weight from pulling the tree sideways.
Step 8: Water, Mulch, and Check the Support Regularly
Staking does not replace proper aftercare. A newly planted apple tree needs consistent moisture while roots establish. Water deeply after planting and continue watering during dry spells, especially in the first few growing seasons.
Add a 2- to 3-inch layer of mulch around the tree, extending it in a broad ring. Keep mulch a few inches away from the trunk. A mulch volcano piled against bark may look tidy for about five minutes, but it can trap moisture, invite pests, and encourage rot.
Check the tie every few weeks during the growing season. Apple trunks expand quickly when conditions are good. If the tie becomes tight, loosen or replace it. Also check after storms, heavy rain, or strong winds. A support system should help the tree, not become a medieval gardening device.
Step 9: Remove Temporary Stakes at the Right Time
For most newly planted apple trees, temporary stakes should be removed after the first growing season or after about one year. If the tree can stand upright and the root ball no longer shifts, it is time to let the tree support itself.
If the tree still cannot stand after a year, inspect the planting depth, root health, soil drainage, and tie placement. Leaving temporary stakes on for years rarely fixes the underlying issue. In fact, it can create new problems by weakening the trunk or girdling the bark.
The exception is a dwarf apple tree that requires permanent support. In that case, keep the main support post or trellis, but continue checking ties. Even permanent support should be maintained thoughtfully, not ignored until the tree starts wearing its straps like an outgrown belt.
Common Apple Tree Staking Mistakes to Avoid
Using Wire Directly Around the Trunk
Wire can cut through bark as the tree moves in the wind. If wire must be used as part of a support system, it should never touch the trunk directly. Use a wide protective sleeve or, better yet, choose a flexible tree tie designed for the job.
Tying the Tree Too Tightly
A tight tie may keep the tree straight, but it also prevents natural movement. The trunk needs to flex. Trees respond to movement by building strength, much like muscles respond to exercise.
Leaving Temporary Stakes Too Long
Temporary means temporary. A stake forgotten for several years can scar bark, restrict growth, or create a weak trunk. Make a calendar reminder if needed. Your future apple harvest will thank you.
Staking Every Tree Automatically
Not every apple tree needs support. Over-staking is common because it feels helpful, but the best support is the least support that solves the problem.
Ignoring the Rootstock
Rootstock matters. Dwarf apple trees often need more support than standard trees. Before planting, read the nursery tag or ask the supplier which rootstock your tree is on. That small detail can determine whether your tree needs one year of staking or a lifetime of structural support.
Best Time to Stake an Apple Tree
The best time to stake an apple tree is when you plant it, usually in early spring or fall depending on your climate. Spring planting gives the tree a growing season to establish roots before winter. Fall planting can also work well in many regions because cooler weather reduces stress and roots may continue growing while soil temperatures remain mild.
If an existing young apple tree begins leaning after wind, rain, or soil settling, you can stake it as soon as you notice the problem. Straighten it gently. Do not yank the trunk or force roots into a new position. If the root ball has lifted, press soil firmly around the roots, water deeply, and stake the tree to stabilize it.
How Long Should an Apple Tree Be Staked?
For a standard young apple tree, one growing season is usually enough. For semi-dwarf apple trees, support may be needed for several years, especially while the trunk and branch framework develop. For dwarf apple trees, long-term or permanent support is often recommended because the tree’s small root system may not anchor a heavy crop securely.
The simple test is this: remove or loosen the tie and observe the tree. If it stands upright and the root ball stays firm, temporary support can come off. If it leans dramatically or the root ball moves, investigate why before simply tying it back up.
Should You Use One Stake, Two Stakes, or a Trellis?
A single stake is usually enough for a small backyard apple tree. Two stakes are useful for larger trees, windy sites, or trees with heavier tops. Three stakes may be used for storm-damaged or unstable trees, but they are usually unnecessary for a typical home orchard planting.
A trellis is a better option for high-density plantings, espalier apple trees, and many dwarf apple trees. Trellises distribute support across posts and wires, making them excellent for training branches and managing fruit load.
If you are growing one apple tree in a backyard, a sturdy stake may be all you need. If you are planting several dwarf apple trees in a row, a trellis system may be more practical and attractive.
Extra Care After Staking an Apple Tree
Prune Lightly in the First Year
A newly planted apple tree needs leaves to produce energy. Remove broken, damaged, or competing branches, but avoid heavy pruning unless you are following a specific training system. The first year is about establishment.
Protect the Trunk
Young apple bark is vulnerable to mower damage, string trimmers, rabbits, deer, and sunscald. Use tree guards when needed, but check them regularly. Like ties, guards can cause problems if they trap moisture or become too tight.
Thin Fruit on Young Trees
If a young apple tree flowers and sets fruit early, thin the fruit heavily or remove it altogether in the first year or two. This allows the tree to focus on roots, trunk strength, and branch structure. Yes, sacrificing baby apples hurts emotionally. But it is better than letting a young tree exhaust itself trying to produce a heroic snack.
Real-World Experiences: What Gardeners Learn When Staking Apple Trees
Experience has a way of teaching lessons that instruction sheets politely hint at. One of the first things many home gardeners discover is that a loose tie feels wrong at first. After all, if the tree is leaning, the instinct is to tighten the strap until the trunk stands perfectly still. But after a few months, the difference becomes clear. Trees with a little movement often develop sturdier trunks, while trees tied like flagpoles may remain thin and dependent.
Another common experience is underestimating wind. A young apple tree may look stable on planting day, especially in calm weather. Then the first spring storm arrives, and suddenly the tree is performing a dramatic bow toward the neighbor’s fence. In windy yards, it is better to install a simple support early than to straighten a loosened root ball later. The key is not overbuilding the system. A well-placed stake and a soft tie usually solve the problem without turning the orchard into a construction site.
Dwarf apple trees teach a different lesson: fruit is heavy. A tiny tree covered with apples looks charming until the branches sag and the trunk begins to lean under the load. Gardeners often learn after the first good crop that dwarf trees are productive because of their rootstock, but that same rootstock may not provide the anchorage of a full-sized tree. A permanent post or trellis can prevent years of leaning, cracking, and emergency branch rescue.
Many growers also learn to check ties more often than they expected. In warm weather with good watering, an apple tree can thicken quickly. A strap that looked roomy in April may become tight by August. The safest habit is to inspect the support whenever you water, mulch, prune, or walk by with coffee while admiring your future pie supply. If the tie is rubbing, cutting, or trapping moisture, adjust it immediately.
Mulch placement is another practical lesson. New gardeners often pile mulch high around the trunk because it looks neat and generous. Unfortunately, mulch against bark can invite rot, insects, and disease. The better approach is a wide, flat mulch ring with open space around the trunk. Picture a donut, not a volcano. The tree wants the donut.
Finally, gardeners learn that removing a temporary stake can feel risky. After caring for a young apple tree for a year, taking away the support may seem like sending a child to school alone for the first time. But if the root system is firm and the trunk stands well, removing the stake is a sign of success. The tree is ready to handle normal wind, grow naturally, and become the self-supporting apple producer you planted it to be.
Conclusion
Staking an apple tree is not complicated, but the details matter. Use a strong stake, place it outside the root ball, tie the trunk with soft flexible material, and allow gentle movement. Remove temporary support after the tree is established, but give dwarf apple trees the long-term structure they need to carry fruit safely.
The best apple tree support system is the one that matches the tree’s size, rootstock, planting site, and growth habit. Done correctly, staking protects the tree without babying it. Done poorly, it can damage the trunk or delay strong root development. Keep the support practical, check it often, and let the tree do what apple trees do best: grow, flower, fruit, and make you wonder whether you should learn pie crust next.