Cheesecake is the ultimate baking paradox: it’s a cake that behaves like a custard, a dessert that looks “wrong” right up until it’s perfect, and the only thing you’ll pull from the oven while thinking, “Surely this is soup?” Spoiler: it’s not soup. It’s just cheesecake doing cheesecake things.
If you’ve ever overbaked one into a crumbly, cracked, slightly eggy brickor underbaked it into something that could be served with a strawyou already know the doneness line is thin. The good news: once you learn the signs, you can nail it consistently. The even better news: you don’t need mystical cheesecake intuition. You need three tests, a calm hand, and permission to accept a little jiggle.
Why Cheesecake Doneness Is So Confusing (and Why That’s Normal)
Most cakes are “done” when a toothpick comes out clean. Cheesecake laughs at toothpicks. Because it’s a custard-style filling (cream cheese + eggs), it sets as proteins coagulate and the mixture gently firms up. But the center shouldn’t bake until fully solid in the oven. If it does, you’ve usually gone too farleading to cracks, grainy texture, or a dry, dense slice that makes you wonder if you accidentally baked drywall.
Also: cheesecake keeps cooking after it leaves the oven. That carryover heat is the secret weapon of great textureand the reason you can pull it while the center still looks slightly underdone. The goal is set edges, softly set center, then let time and cooling finish the job.
The Big Three Doneness Tests (Test Kitchen Approved)
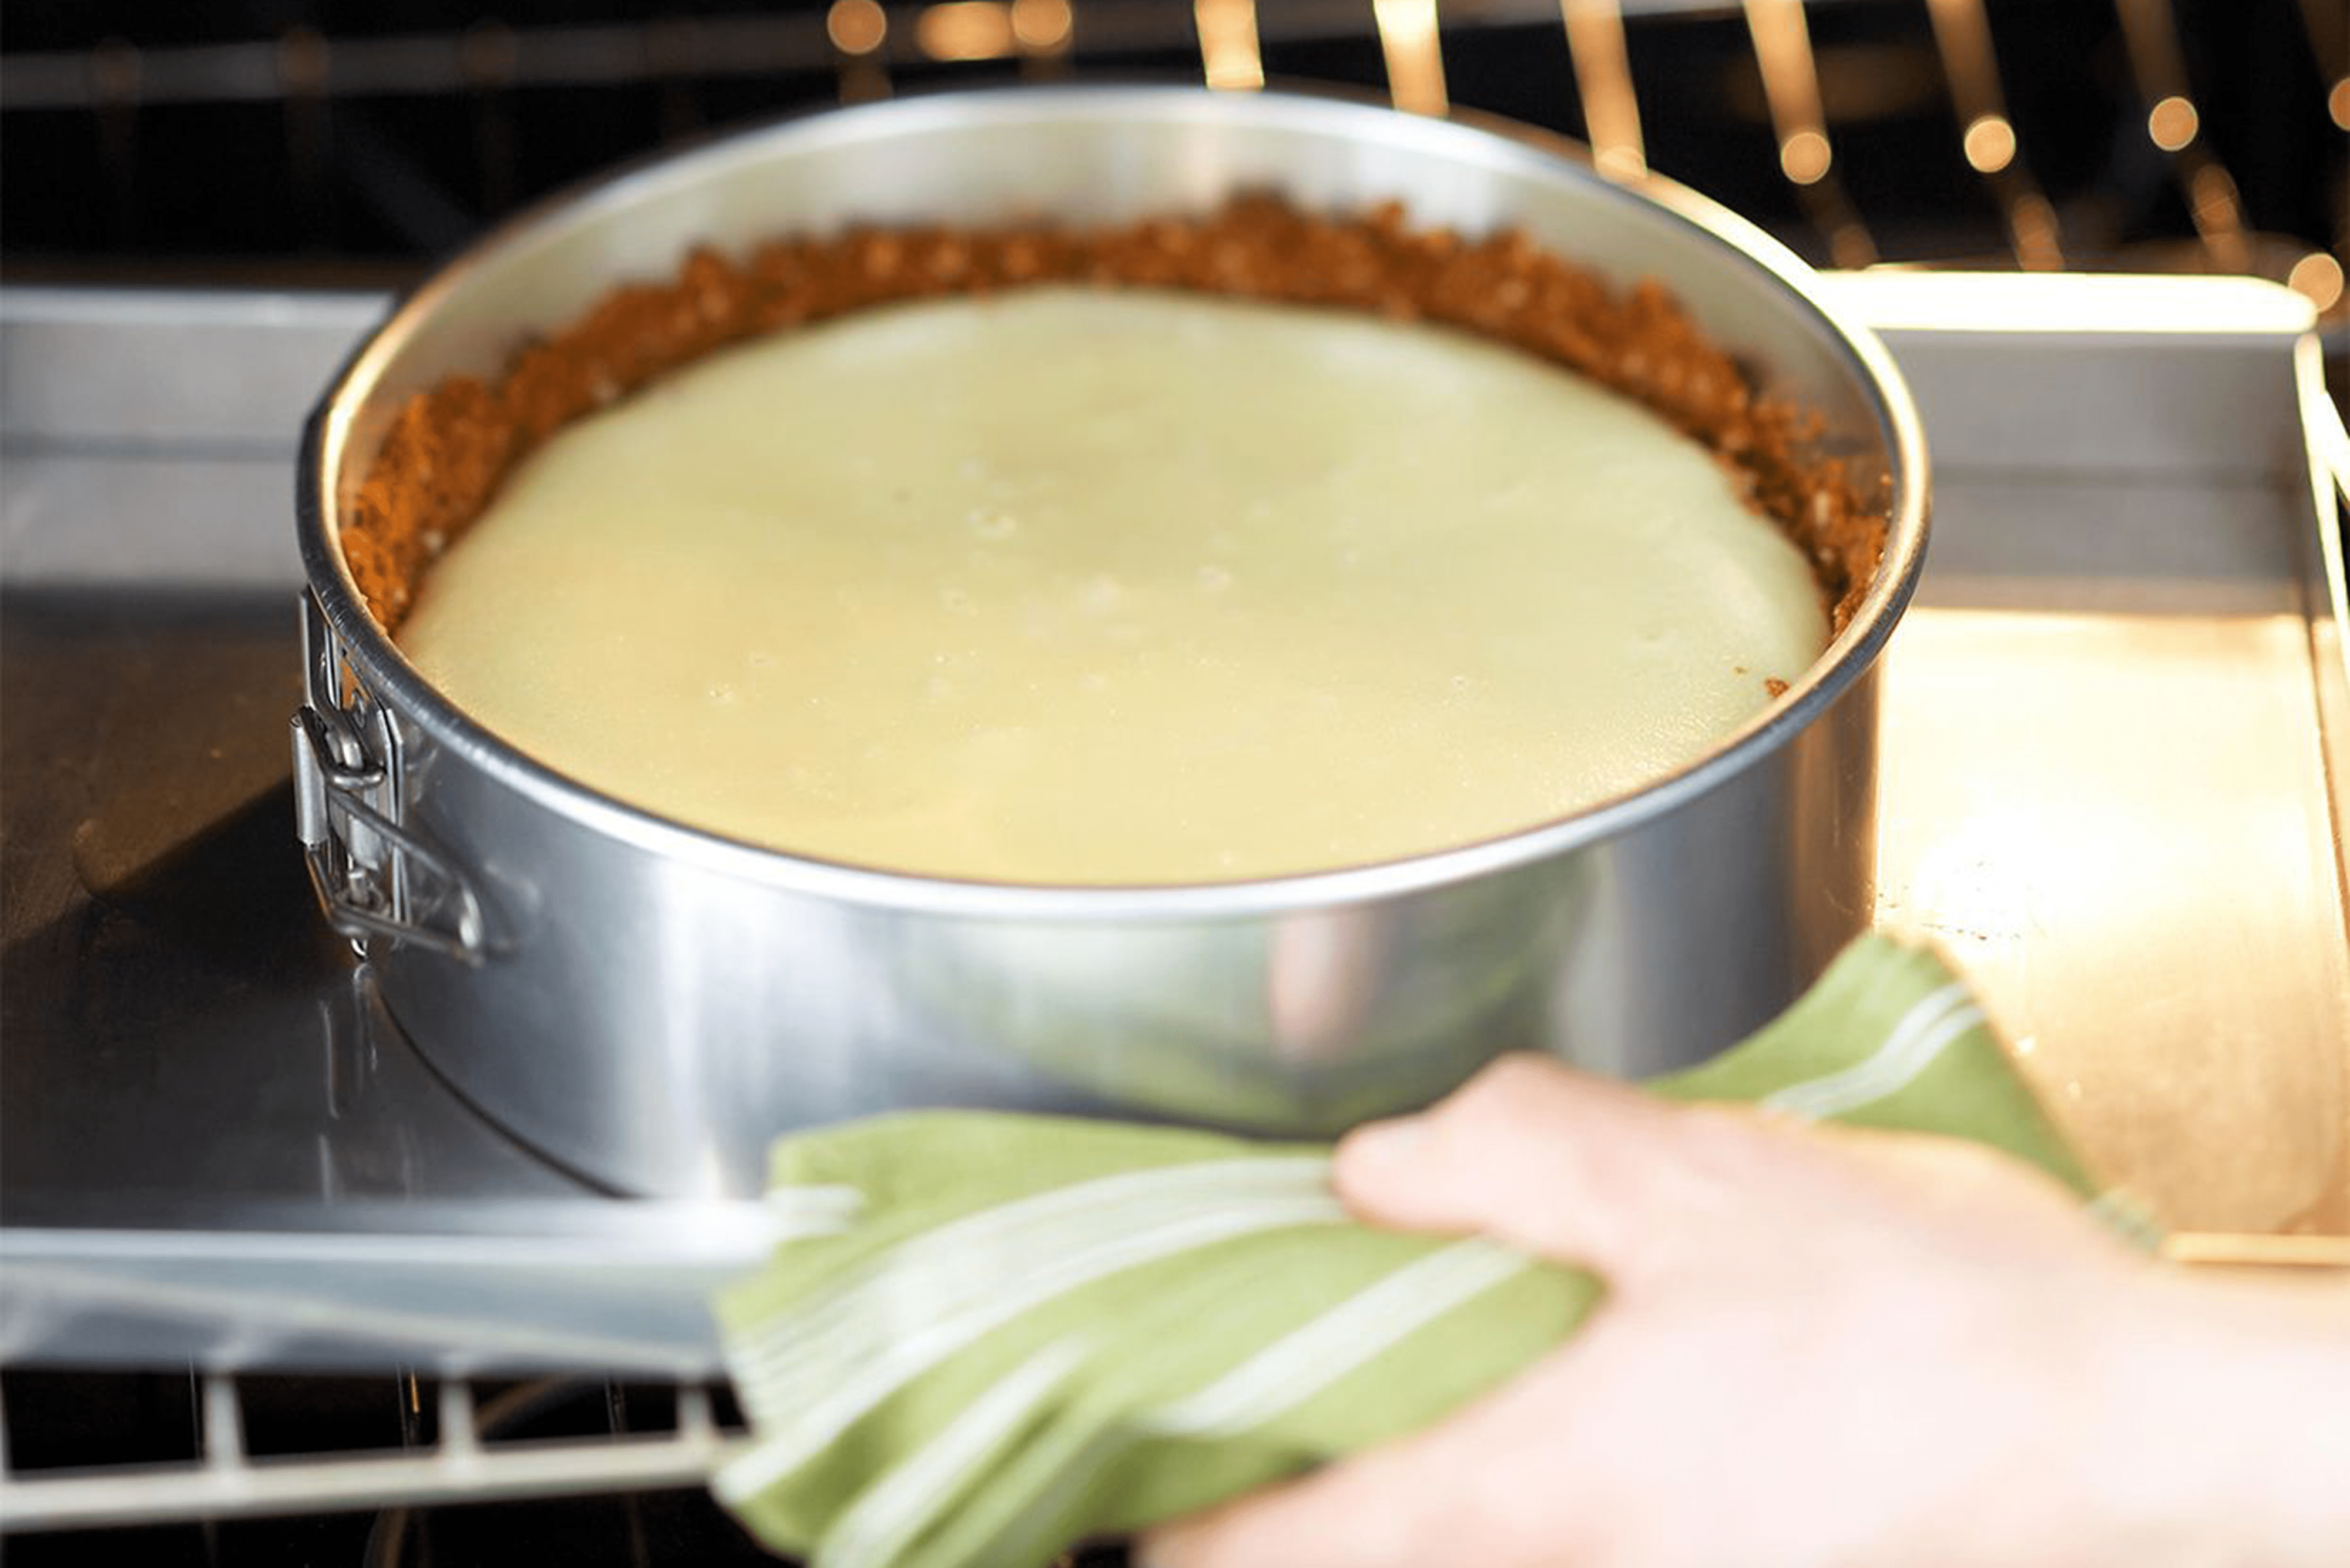
1) The Jiggle Test (Your Most Reliable No-Tools Option)
This is the classic method, and yes, it’s supposed to jiggle. Here’s what you’re looking for:
- Edges: set and slightly puffed, no longer shiny-wet.
- Center: a smaller circle (about 2–3 inches, depending on size) that jiggles like Jell-Onot like a sloshy wave.
- Whole cake: should not ripple from edge to edge when you gently nudge the pan.
How to do it without causing drama: Put on oven mitts, gently tap the side of the pan or slightly shake the rack (don’t yank the pan forward like you’re starting a lawn mower). Watch the center. If it wobbles as one soft mass, great. If it looks liquidy, keep baking.
2) The Touch Test (Fast, Surprisingly Accurate)
If you’re gentle, you can lightly touch the center surface (yes, really). A properly baked cheesecake should feel mostly firm with a slight givelike pressing the top of a set pudding, not like poking a water balloon.
Tip: This works best when the top is un-topped (no sour cream layer yet) and when you’re not pressing like you’re checking an avocado at the grocery store. A light fingertip tap is enough.
3) The Temperature Test (The “I Want Certainty” Method)
If you love repeatable results, an instant-read thermometer is your best friend. It turns cheesecake doneness from a guessing game into a reading.
General target: most baked cheesecakes are pulled when the center is roughly in the 150–155°F range, depending on the recipe and desired texture. Some styles are intentionally pulled a bit lower because carryover cooking raises the temperature after baking.
Downside: It can leave a small hole on top. Upside: toppings exist. So does whipped cream. You’ll be fine.
Exactly How to Use a Thermometer on Cheesecake (Without Lying to Yourself)
Thermometer technique matters. A wrong placement can give a “done” temp even when the center is still underbaked.
- Use an instant-read digital thermometer (fast and accurate).
- Insert into the center, about 2 inches deep (or halfway down if your cheesecake is shorter).
- Avoid hitting the crust or panmetal and crust run hotter and can give a false reading.
- Hold steady until the temperature stabilizes.
What number should you trust?
- Ultra-creamy, soft-set center: many recipe developers aim for a lower pull temp (mid-140s to ~150°F) and rely on carryover cooking to finish.
- Classic creamy-but-sliceable: often lands around 150–155°F in the very center.
- Firm, very set slices: higher temps can work, but texture often starts to suffer (more likely to crack and feel dry or grainy).
Food-safety note, in plain English: Cheesecake contains eggs. Many food-safety guidelines for “egg dishes” cite higher safe minimum internal temperatures than what some baking sources use for cheesecake doneness. If you’re serving someone pregnant, elderly, immunocompromised, or you simply want the most conservative approach, consider using pasteurized eggs/egg products and/or baking to a higher end temperatureunderstanding the texture may be firmer. (And as always, follow the recipe you trust most.)
Visual Clues: What a Done Cheesecake Looks Like
Cheesecake doesn’t get “golden brown and springy” the way many cakes do. Instead, look for these subtle cues:
- Edges are set: they look slightly puffed, not glossy-wet.
- Center still has a sheen: not raw-looking, but not matte-dry either.
- Minimal browning: most New York–style cheesecakes should be pale or lightly golden, unless you’re intentionally browning the top.
- Small cracks can happen: a tiny crack near the edge isn’t the end of the world, but major cracks often mean overbaking or cooling too quickly.
Doneness Changes by Cheesecake Style (Don’t Use One Rule for All)
New York–Style / Classic Baked Cheesecake
This is the “jiggle test poster child.” You want the center to wobble slightly and the edges to be set. Overbaking tends to create a drier texture and cracks.
Basque “Burnt” Cheesecake
Basque cheesecake is intentionally darker on top and can be looser inside. It may look more wobbly than classic cheesecake when you pull it. The thermometer can be especially helpful here because visual cues are different (and the top is already deeply browned).
Mini Cheesecakes
Smaller portions bake faster and set more quickly. The center jiggle zone is tiny, so go by a combination of slight wobble + set edges, and start checking early.
No-Bake Cheesecake
No-bake cheesecake doesn’t use oven doneness cues at all. It’s “done” when chilled and fully setusually after several hours (often overnight). Different beast, different rules.
The Step Everyone Skips: Cooling Is Part of “Done”
Even if you pull your cheesecake at the perfect moment, you can still sabotage it with a dramatic temperature change. Cheesecake likes a slow cooldown.
Our test-kitchen cooling routine:
- Turn off the oven when the cheesecake hits the doneness cues (set edges, slight center jiggle).
- Crack the oven door and let it sit inside for about 1 hour.
- Move to a rack and cool at room temp until it’s no longer warm (often another 1–2 hours).
- Chill thoroughlyat least 6 hours, ideally overnight, before slicing.
This slow cooling reduces cracks and helps the custard set into that clean, creamy slice you actually wanted in the first place.
Common “Is It Done?” Scenarios (and What to Do)
“The center is jiggly… but the whole thing jiggles.”
That usually means it needs more bake time. Keep baking in short increments (5–10 minutes), then re-test. You want only the center to wobble, not the whole cheesecake.
“The top is browning, but the center isn’t set.”
Tent the top loosely with foil and keep baking. Browning is mostly cosmetic for classic cheesecaketexture matters more.
“It looks set, but it cracked.”
Cracks can happen from overbaking, overmixing (too much air), skipping a water bath, or cooling too fast. The cheesecake is still edible, and toppings exist for a reason. Consider it a “rustic design feature.”
“My recipe says ‘knife comes out clean.’ Is that true?”
It’s not the most reliable test for cheesecake, and poking it can encourage cracking. If you must test, use the jiggle/touch approachor a thermometer if you want certainty.
Cheesecake Doneness Cheat Sheet
- Best overall sign: edges set, center jiggles like Jell-O.
- Too raw: center looks liquidy/sloshy, whole cake ripples.
- Too baked: puffed edges + dry top + big cracks + little to no jiggle.
- Thermometer-friendly target: center often pulled around 150–155°F for a creamy set (recipe-dependent).
- Don’t skip: slow cooling and a long chill before slicing.
Conclusion: The Secret Is Not “No Jiggle”It’s the Right Jiggle
Perfect cheesecake isn’t about baking until everything looks firm. It’s about pulling at that sweet spot when the edges are set and the center still has a gentle wobblethen letting residual heat and slow cooling do the rest. Use the jiggle test for confidence, the touch test for a quick double-check, and a thermometer when you want the baking equivalent of GPS navigation.
Once you make peace with the fact that “done” cheesecake still moves a little, you’ll stop overbaking out of fearand start serving slices that are creamy, smooth, and worthy of a dramatic fork drop.
Test Kitchen Experiences: 7 Very Real Lessons That Taught Us to Trust the Process (and the Jiggle)
1) The “It’s Still WigglingPanic!” moment is basically a rite of passage. The first time you bake cheesecake, the center wobble looks like a mistake. You’ll stare through the oven door like you’re watching a medical drama. But once you’ve chilled a properly baked cheesecake and sliced into a clean, creamy interior, you realize the jiggle wasn’t a warningit was a promise.
2) Overbaking doesn’t always look like “burnt.” A cheesecake can be pale and still overbaked. The texture tells the truth later: grainy, slightly dry, and less lush. In our test-kitchen-style trials, the biggest “oops” batches weren’t scorchedthey were simply baked until the center stopped moving completely. Cheesecake is one of the few desserts where a little under-appearance is your friend.
3) Carryover cooking is not a theory. It’s a plot twist. Pull a cheesecake when it’s perfectly “almost set,” and it continues to firm up while it cools. Ignore carryover cooking and chase a fully set center in the oven, and you’ll overshoot. The oven is not the finish line; the cooldown is part of the race. (Cheesecake is a marathon dessert. It requires emotional endurance.)
4) The water bath isn’t just for fancy people. The first time you skip it, you might still get an edible cheesecake. The second time, you’ll wonder why the edges baked like they were in a heatwave while the center acted like it was on vacation. A water bath moderates the heat and makes doneness cues more predictableespecially if your oven runs hot or has temperature swings.
5) “Just one more 10 minutes” is where cracks are born. Cheesecake cracks often happen right after a baker gets impatient. You’re close, you want certainty, you add time “just to be safe,” and suddenly the top tightens, the edges puff, and a crack appears like a tiny fault line. The irony: a cracked cheesecake usually tastes fine. The tragedy: you didn’t need that extra time. Next time, check early and trust the wobble.
6) The thermometer is the ultimate confidence boosterif you use it correctly. We’ve seen bakers insert a thermometer, hit the crust, read a higher temperature, and declare victory. Then the center sinks later because it wasn’t actually done. When you probe the true center to the right depth and avoid the pan, the thermometer becomes the calm friend who says, “You’re good. Step away from the oven.”
7) The best cheesecake is made the day before. This is the most underrated “experience tip.” Cheesecake doesn’t just chill; it improves. The texture becomes more cohesive, slicing gets cleaner, and flavors settle into something smoother and more balanced. If you’ve ever tried to slice a warm-ish cheesecake and ended up with a creamy landslide, you’ve learned this lesson the hard way. Overnight chilling turns chaos into clean wedges.
Bottom line from our test kitchen: The perfect cheesecake isn’t the one that looks the most “done” in the ovenit’s the one that sets beautifully after a slow cool and a long chill. If you can master the calm confidence to pull it at the right jiggle, you’ll bake cheesecakes that look bakery-level… even if you were secretly sweating the whole time.