

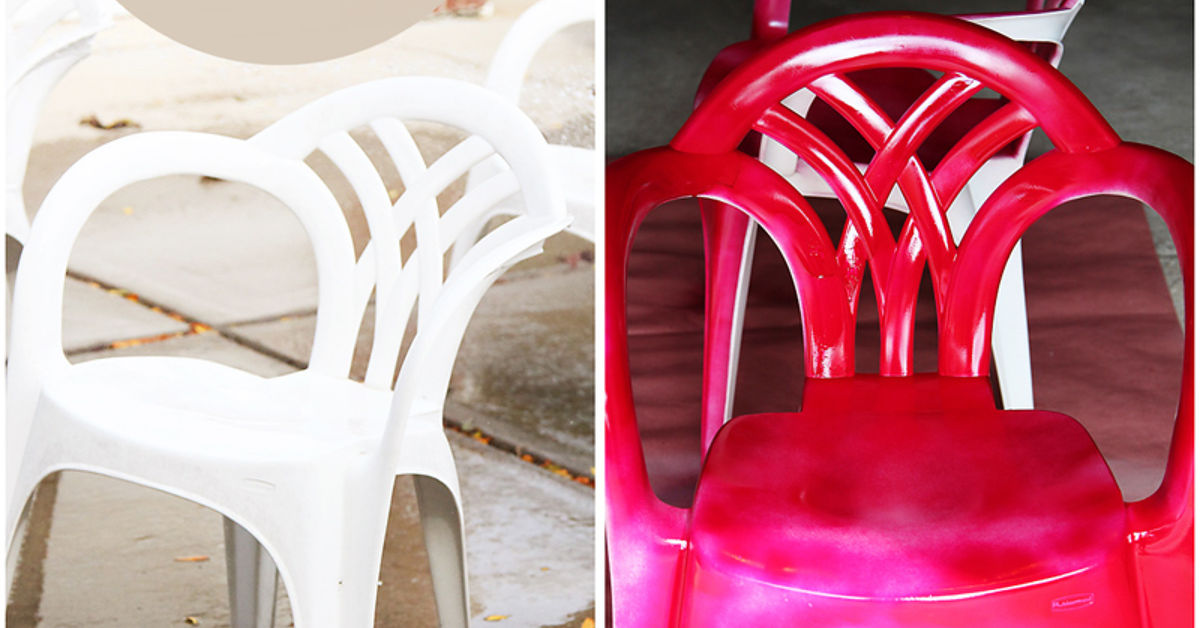
Plain white plastic chairs are practical, affordable, and almost impressively good at disappearing into the background. They hold people, survive surprise rainstorms, and stack neatly in a corner. Unfortunately, after a few seasons outdoors, they may also look faded, chalky, stained, or about as exciting as an unplugged refrigerator.
The good news is that you do not need to replace them. With careful preparation and spray paint made to bond with plastic, ordinary patio chairs can become colorful statement pieces. A set of tired white chairs can turn into cheerful turquoise seating, sleek matte-black furniture, a coordinated collection of earthy neutrals, or a playful mix of sunset-inspired colors.
This plastic chair makeover is relatively inexpensive, beginner-friendly, and flexible enough to suit patios, balconies, porches, craft rooms, playrooms, and casual dining areas. The secret is not spraying more paint. The secret is preparing the surface properly, choosing a compatible product, applying several light coats, and allowing the finish to cure before anyone sits down wearing their favorite white pants.
Why Spray Paint Plain White Plastic Chairs?
Plastic patio chairs often remain structurally useful long after their appearance begins to decline. Sunlight can fade the original color, airborne dirt can settle into textured areas, and outdoor storage can leave gray streaks or stubborn marks. Painting gives those chairs another useful chapter instead of sending them directly to the curb.
Spray paint is especially convenient for molded furniture because it can reach curves, narrow openings, edges, legs, and decorative details without leaving obvious brush marks. It also makes it easier to create an even finish on chairs with slatted backs or rounded surfaces.
A makeover offers several practical benefits:
- It costs less than replacing an entire matching set.
- It lets you coordinate furniture with cushions, planters, rugs, or exterior paint.
- It can disguise discoloration that ordinary cleaning no longer removes.
- It keeps usable furniture in service longer.
- It provides a manageable weekend DIY project with a dramatic visual payoff.
There is also a creative advantage: cheap furniture feels much less ordinary when it is wearing a color chosen specifically for your space.
Choose the Right Spray Paint for Plastic Chairs
Not every aerosol paint is suitable for plastic. Standard paint may appear to cover the chair at first but later scratch, peel, or flake because it never formed a strong bond with the slick surface.
Look for spray paint whose label specifically lists plastic, resin, PVC, or outdoor plastic furniture as an approved surface. Products described as plastic-bonding paint or paint-and-primer formulas are often convenient for this project. Some products are designed to adhere directly to plastic, while others require a separate plastic primer. The instructions on the can should settle the debate.
Consider the Chair’s Flexibility
Rigid plastic is generally easier to coat than soft, rubbery, or highly flexible plastic. A flexible chair bends slightly when someone sits down, and that movement places stress on the finish. Test the paint in a hidden area before committing to the whole chair. If the test patch remains tacky, scratches off easily, or cracks when the plastic flexes, choose another coating system.
Select an Appropriate Finish
Gloss finishes are easy to wipe clean and produce a bright, polished appearance, but they can highlight scratches and surface flaws. Satin offers a softer sheen and is forgiving on older furniture. Matte paint creates a modern look, although dust and marks may be more noticeable on some colors.
For outdoor chairs, select a formula labeled for exterior or indoor-outdoor use. A beautiful color is not much of a victory if it becomes a peeling art installation after the first wet weekend.
Tools and Materials
Gathering everything before starting prevents the classic DIY problem of discovering that the gloves are inside the house after both hands are covered with paint dust.
- Plastic-compatible spray paint
- Plastic primer, if required by the paint manufacturer
- Mild dish soap or a suitable household cleaner
- Soft brush, sponge, or microfiber cloth
- Clean water and a garden hose or bucket
- Fine-grit sandpaper or a fine sanding pad
- Tack cloth or lint-free cloth
- Painter’s tape
- Heavy cardboard, a canvas drop cloth, or plastic sheeting
- Protective gloves and safety glasses
- Respiratory protection appropriate for the product
Read the spray paint label before preparing the chair. Product directions control the recommended temperature, humidity, spray distance, recoat window, drying time, and safety precautions.
How to Make Over White Plastic Chairs With Spray Paint
Step 1: Inspect Each Chair
Painting improves appearance, but it does not repair serious structural damage. Examine the legs, seat, back, joints, and underside. Do not paint a chair that is badly cracked, brittle, warped, or unstable. Cosmetic scratches are manageable; a leg that threatens to retire during dinner is not.
Tighten removable hardware where applicable. Remove cushions, rubber feet, labels, and any accessories that should not be painted.
Step 2: Clean the Plastic Thoroughly
Outdoor plastic can hold dirt, sunscreen, cooking grease, pollen, mildew residue, and invisible oils from hands. Paint applied over this contamination may bond to the grime instead of the chair.
Wash every surface with warm water and mild detergent. Use a soft brush around textured areas, seams, and the underside of the seat. Avoid aggressive scrubbing tools that gouge the plastic. Rinse thoroughly so no soap remains.
For difficult stains, use a cleaner that is compatible with the chair and the chosen coating. Never mix cleaning chemicals. After washing, let the chair dry completely, including trapped water inside hollow legs and molded crevices.
Step 3: Lightly Scuff Glossy Areas When Needed
Check the paint instructions before sanding because some plastic-bonding products are designed for direct application. When sanding is recommended, use fine-grit sandpaper or a fine abrasive pad to dull the shine without cutting deeply into the chair.
The goal is not to reshape the furniture. You are simply creating a more receptive surface. Sand evenly, paying attention to the front edge of the seat, armrests, and other high-contact areas. Wipe away every trace of sanding dust with a lint-free cloth.
Step 4: Test the Paint
Apply a small amount of paint to an inconspicuous section underneath the chair. Let it dry and cure according to the label, then check adhesion by gently scratching the area with a fingernail.
This small test can reveal incompatibility before an entire chair is coated. It also shows how the color looks on the white base. Bright shades may appear more vivid than expected, while pale neutrals may need additional coats for uniform coverage.
Step 5: Prepare a Safe Painting Area
Work outdoors or in a properly ventilated location permitted by the product instructions. Keep the project away from flames, sparks, pilot lights, vehicles, pets, children, and anything that should not receive a mysterious dusting of coral pink.
Place the chair on heavy cardboard or a secured drop cloth. Lightweight newspaper can lift in the spray and stick to fresh paint. Protect nearby walls, flooring, plants, and objects from overspray. Choose calm weather because even a mild breeze can redirect aerosol paint farther than expected.
Wear the protective equipment specified on the label. A basic dust mask should not automatically be assumed to provide protection from paint vapors or solvents.
Step 6: Apply Primer When Required
If the chosen paint system calls for plastic primer, shake the can for the full recommended time. Apply a light, even coat while keeping the can moving. Do not attempt to hide the white plastic with primer in one pass.
Prime the underside and difficult areas first, then work toward the more visible surfaces. Follow the manufacturer’s drying and recoating instructions exactly. Applying the color coat too early or too late can affect adhesion.
Step 7: Spray the First Color Coat
Shake the paint can as directed and test the spray pattern on scrap cardboard. Begin each pass slightly beyond one side of the chair, move smoothly across the surface, and release the nozzle after passing the opposite edge. Starting and stopping directly over the chair can create heavy spots.
Keep the can at the distance specified on its label and maintain that distance throughout the pass. Slightly overlap each stroke for consistent coverage. Coat the underside, rear surfaces, leg interiors, and narrow openings before finishing the seat, back, and armrests.
The first coat should look light and may appear uneven. That is normal. A thin first layer provides a better foundation than one thick, glossy coat that immediately begins migrating south.
Step 8: Build Coverage With Additional Light Coats
Apply additional coats within the product’s stated recoat window. Rotate or reposition the chair only when the surface is dry enough to handle safely. Change your viewing angle frequently because white gaps often hide along edges and under curves.
Several light coats generally produce a smoother result than one heavy application. Heavy spraying can cause runs, bubbling, slow drying, trapped solvents, and soft paint. Patience is not decorative, but it is one of the most important supplies in the project.
Step 9: Let the Finish Cure
Dry-to-the-touch time is not the same as full curing time. A chair may feel dry while the coating remains vulnerable to pressure, scratches, stacked furniture, tight cushions, or enthusiastic guests.
Leave the chairs in a protected, ventilated area for the full curing period listed on the can. Avoid sitting on them, stacking them, or placing objects on the seats during this period. Waiting longer now can prevent fingerprints, fabric impressions, and chipped edges later.
Creative Plastic Chair Makeover Ideas
Use One Bold Color
A saturated shade can make inexpensive chairs look intentional. Teal, cobalt blue, terracotta, mustard yellow, forest green, and coral work especially well in outdoor settings. Repeat the chair color in a planter, pillow, or table accessory to connect the furniture with the rest of the space.
Create a Coordinated Mixed Set
Paint each chair a different color from the same palette. For example, combine muted sage, clay, sand, and charcoal. The chairs do not need to match exactly when their colors share a similar level of warmth or intensity.
Try a Two-Tone Design
Use painter’s tape to separate the legs from the seat or create a color-blocked backrest. Apply the lighter color first, let it cure as directed, mask it carefully, and then apply the darker shade. Remove tape according to the paint manufacturer’s recommendations to reduce the chance of lifting.
Add a Simple Stenciled Detail
A small stencil on the backrest can give each chair personality without overwhelming the design. Numbers, leaves, geometric shapes, or simple monograms work well. Keep the stencil flat and use very light applications to prevent paint from creeping beneath the edges.
Imitate a Modern Neutral Finish
Warm beige, mushroom, taupe, charcoal, and soft black can make molded plastic look more sophisticated. Satin finishes are particularly effective when the goal is modern rather than shiny.
Common Spray-Painting Mistakes to Avoid
- Skipping the cleaning stage: Paint cannot form a durable bond over grease, chalky residue, or dirt.
- Using paint that does not list plastic: General-purpose paint may not adhere reliably to the chair.
- Spraying too close: Excess paint collects quickly and creates drips or soft spots.
- Trying to achieve full coverage immediately: Thick coats are more likely to run and cure poorly.
- Ignoring the recoat window: Applying another coat at the wrong time can wrinkle or weaken the finish.
- Painting in unsuitable weather: Excessive heat, cold, wind, or humidity can interfere with application and drying.
- Using the chairs too soon: A surface that feels dry may still be easy to scratch or imprint.
- Stacking freshly painted chairs: Contact points may stick together or chip when separated.
How to Keep Painted Plastic Chairs Looking Good
Clean the finished chairs with mild soap, water, and a soft cloth. Avoid abrasive pads and harsh solvents unless the coating manufacturer specifically approves them. Lift chairs rather than dragging them across rough concrete, which can damage the bottoms of the legs.
When possible, store painted furniture under cover during severe weather or long periods of nonuse. Do not stack the chairs until the coating has cured fully, and place soft separators between them if painted surfaces press against one another.
Small chips can often be repaired by cleaning the area, lightly smoothing the damaged edge, and applying the same paint in thin layers. Save the product name and color information so touch-ups do not become an accidental study in almost-matching blues.
Conclusion
A spray-paint makeover can turn plain white plastic chairs into furniture that looks cheerful, modern, coordinated, or completely custom. The most important steps happen before and after the exciting burst of color: inspect the chair, remove contamination, prepare the plastic according to the coating instructions, and allow the finish to cure fully.
Choose paint designed for plastic, test it in a hidden location, and build coverage with light, controlled coats. With those habits, an inexpensive chair can become a stylish patio accent instead of another faded object waiting beside the garage.
Real-World Experience: What a Plastic Chair Makeover Is Actually Like
The following field notes reflect the common sequence and practical surprises encountered during hands-on plastic chair makeovers. The first lesson is that cleaning takes longer than expected. A chair may appear merely dusty until soap and water reveal layers of grime around the seat edge, behind the backrest, and beneath the legs. Those hidden areas matter because overspray eventually reaches them. Cleaning only the visible front can leave paint adhering beautifully in one section and poorly in another.
The second lesson is that the chair should be viewed from every possible angle before painting. From standing height, the seat may look completely covered. Turn the chair upside down, however, and narrow white stripes may appear around molded ribs, drainage openings, and the inner sides of the legs. Beginning with the underside makes the process easier. It also allows minor imperfections to occur where they are less noticeable while the painter gets used to the nozzle.
Testing the spray pattern on cardboard is another small step that saves a surprising amount of frustration. The first burst from a can may sputter, particularly if the nozzle contains residue or the can has not been shaken thoroughly. Discovering that on scrap cardboard is mildly annoying. Discovering it in the center of a freshly prepared seat is the sort of event that causes people to invent new vocabulary.
Color choice can also produce surprises. Bright paint applied over a white chair often appears extremely vivid. A color that looks calm on the cap may become energetic across a large molded surface. That is not necessarily a problem, but it explains why a hidden test patch is useful. When painting several chairs, completing one chair first can confirm that the selected color works with the patio, cushions, and surrounding exterior.
The most noticeable difference between an amateur-looking result and a polished one usually comes from coat thickness. The temptation is to keep spraying until the original white disappears. Resisting that temptation produces a better finish. The first pass may look disappointingly transparent, and the second may still contain uneven areas. By the third light application, coverage often begins to look intentional and smooth. The transformation happens gradually rather than in one heroic cloud of paint.
Drying time creates the next challenge. Freshly coated chairs attract curiosity, fingertips, insects, leaves, and sudden changes in weather. Moving them into a protected location without touching visible surfaces requires planning. A clean, covered area should be prepared before spraying begins, not after clouds appear over the neighbor’s roof.
Curing requires even more discipline. A chair that feels dry can still develop impressions from clothing, stacked furniture, or a heavy flowerpot. Giving the paint the full time stated by the manufacturer is less exciting than revealing the new color, but it is one of the best ways to improve durability.
Finally, expectations should remain realistic. Painted plastic furniture may eventually need touch-ups, especially at flexible edges and high-contact areas. That does not make the project unsuccessful. Outdoor furniture experiences sunlight, rain, movement, friction, and temperature changes. Keeping the leftover color information makes future maintenance easy. A quick repair every so often is still cheaper and more satisfying than replacing a functional set simply because white plastic lost its sparkle.
The overall experience is rewarding because the visual change is immediate. A faded chair that once looked temporary can suddenly anchor an outdoor color scheme. More importantly, the project teaches a useful DIY principle: preparation may not produce the dramatic before-and-after photograph, but it is what keeps the “after” from turning back into a “before.”
SEO Information
Note: Always follow the exact surface-preparation, application, ventilation, protective-equipment, recoat, and curing instructions printed on the selected spray-paint container.