A painted rose on a coffee table is one of those decorating ideas that sounds delicate, romantic, and possibly like something your very crafty aunt would do after drinking exactly one cup too many of chamomile tea. But in real life, it can be surprisingly stylish. A rose motif can turn a plain coffee table into a statement piece, soften a modern living room, rescue a thrift-store find, or add personality to a table that has been silently begging for a glow-up since 2009.
The beauty of this project is that it works in many design styles. A soft blush rose can look cottage-inspired. A dramatic red rose on a black tabletop feels bold and artsy. A white line-art rose over natural wood can be clean and modern. Even a slightly imperfect hand-painted rose has charm because flowers in nature are not exactly symmetrical either. That is great news for anyone whose hand shakes after too much coffeewhich is slightly ironic when painting a coffee table.
This guide explores how to design, paint, protect, and style a coffee table with a rose motif. Whether you want a small floral accent in one corner or a large centerpiece rose that steals the show, the right preparation and finish will help your painted design last through mugs, books, remotes, snack plates, and the occasional mystery sticky spot.
Why a Painted Rose Works So Well on a Coffee Table
A coffee table sits in the visual center of a living room, which makes it perfect for decorative painting. Unlike a wall mural, it is small enough to finish in a weekend. Unlike a canvas, it is functional. And unlike a throw pillow, it cannot mysteriously disappear into the laundry pile.
The rose is especially effective because it has instant visual meaning. It suggests warmth, beauty, softness, romance, nostalgia, and handmade character. A painted rose can make a mass-produced table feel custom. It can also balance harder materials like metal, glass, concrete, or dark wood by adding an organic shape.
It Adds Personality Without Replacing the Furniture
One of the smartest reasons to paint a rose on a coffee table is that you do not have to buy a new table. If the table has good bones but a tired surface, paint can make it feel completely different. Scratches, faded finish, and small stains become less tragic when they are covered with primer, paint, and a fresh design.
It Can Match Almost Any Room Style
A painted rose is not limited to shabby-chic rooms. In a farmhouse space, it can look cozy and handcrafted. In a vintage room, it can feel timeless. In a minimalist room, a single black rose outline can look graphic and intentional. In a colorful bohemian living room, a cluster of roses can blend beautifully with layered rugs, woven baskets, and plants that may or may not be surviving.
Choosing the Right Coffee Table for a Painted Rose Design
Before choosing paint colors, look at the table itself. Wood, MDF, laminate, and metal can all be painted, but each surface needs proper preparation. A real wood coffee table usually gives the best long-term result because it can be sanded and repaired more easily. MDF can work well too, as long as the surface is sealed properly. Laminate needs extra attention because paint may not grip slick surfaces without bonding primer.
If you are buying a table specifically for this project, look for a sturdy top, simple lines, and a shape that gives the rose design room to breathe. Round tables are lovely for circular rose wreaths. Rectangular tables work well with corner florals, borders, or a large rose placed off-center. Square tables can handle a symmetrical centerpiece design.
Best Table Colors for Rose Painting
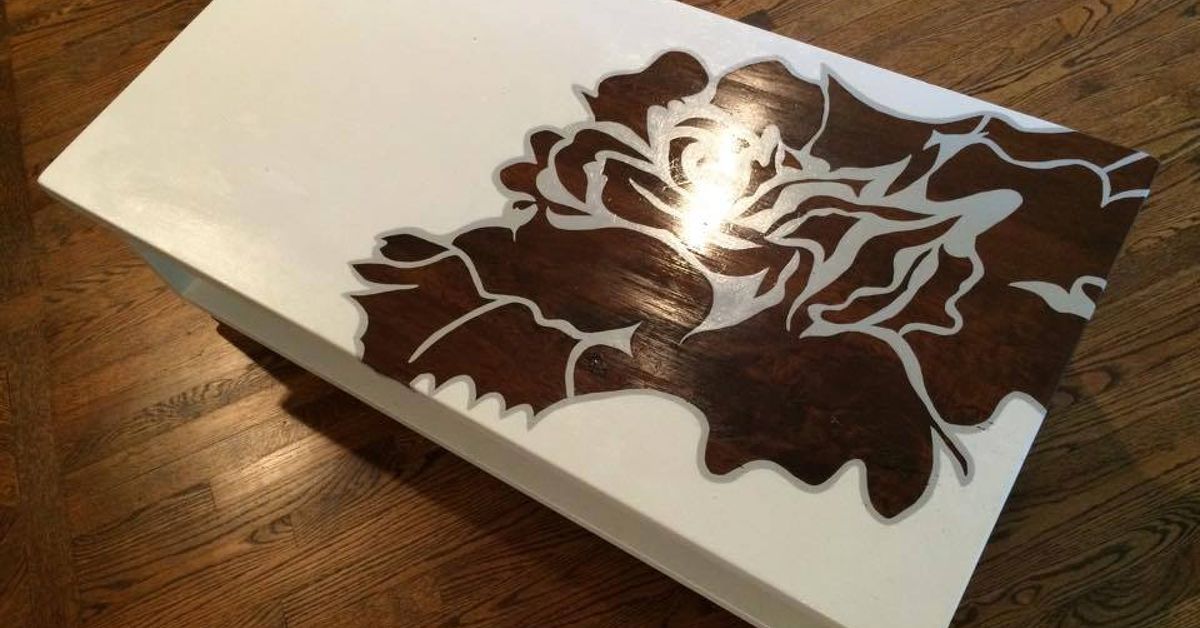
The base color matters because it becomes the background of the artwork. White, cream, pale gray, charcoal, navy, sage green, and natural wood all work beautifully. A light background makes the rose feel airy and classic. A dark background makes the petals look dramatic and rich. Natural wood with a painted rose can feel warm and artistic, especially if the wood grain remains visible around the design.
Planning the Rose Design Before You Paint
Good painted furniture begins before the first brushstroke. Sketch the idea on paper, or use painter’s tape to mark the area on the tabletop. The design should feel balanced with the table shape. A rose that is too small may look lost. A rose that is too large may look like it is trying to swallow the room whole.
Popular Rose Layout Ideas
There are several ways to place a rose on a coffee table. A single large rose in the center creates a bold focal point. A small rose in one corner feels subtle and elegant. A rose garland along the edge creates a decorative border. A cluster of roses and leaves can look like a hand-painted garden. For a modern look, try a simple rose outline instead of a realistic shaded flower.
If you are nervous about freehand painting, use a stencil, transfer paper, or a light pencil sketch. There is no prize for suffering through freehand petals unless you enjoy that kind of emotional cardio. A stencil can give you clean structure, while hand-painted shading adds personality.
Supplies You May Need
The exact supplies depend on your table material and design style, but most painted rose coffee table projects use the same basic toolkit.
- Cleaner or mild soap and water for removing dust, oil, and grime
- Fine-grit sandpaper or sanding sponge
- Tack cloth or lint-free cloth
- Wood filler for dents, holes, or deep scratches
- Primer suited to the table material
- Furniture paint, acrylic paint, or enamel paint
- Small artist brushes for petals and detail work
- Painter’s tape, stencil, or transfer paper
- Clear protective topcoat such as water-based polyurethane or furniture sealer
- Drop cloth and good lighting
For a coffee table, durability matters. This is not a decorative object that sits untouched on a shelf. It is a hardworking surface. People place drinks on it, feet near it, books on it, and occasionally dinner on it while pretending the dining table is simply too far away. Because of that, the final clear coat is not optional if you want the painted rose to stay beautiful.
How to Paint a Rose on a Coffee Table
Step 1: Clean the Table Thoroughly
Start by cleaning the table. Remove dust, grease, wax, fingerprints, furniture polish, and any unknown household residue. Paint does not like sticking to grime. It is very dramatic that way. Use a mild cleaner, wipe the surface well, and let the table dry completely before sanding.
Step 2: Sand for Better Adhesion
Lightly sand the tabletop and any areas you plan to paint. The goal is not always to remove the entire old finish. Often, you only need to dull the glossy surface so primer can bond. Use a fine-grit sanding sponge for flat surfaces and edges. After sanding, remove every bit of dust with a tack cloth or lint-free cloth. Dust trapped under paint can create bumps that look tiny but feel enormous once you know they are there.
Step 3: Repair Imperfections
If the table has dents, gouges, or old screw holes, fill them with wood filler. Let the filler dry according to the product instructions, then sand it smooth. A painted rose can hide small flaws, but a raised ridge or crater under the design may still show through. A smooth surface makes the final artwork look cleaner and more professional.
Step 4: Apply Primer
Primer creates a more even base for paint and helps reduce peeling or uneven absorption. Use a primer that matches your surface: wood primer for wood, bonding primer for laminate, and metal primer for metal. Brush or roll on a thin, even coat. Let it dry, lightly sand if needed, and wipe away dust. If the table is dark and you are painting it a light color, a second coat of primer may help.
Step 5: Paint the Base Color
Apply the base color in thin coats. Thin coats dry smoother and are less likely to drip, wrinkle, or look gummy. Two light coats are usually better than one heavy coat. Let each coat dry fully before adding the next. Brush in the direction of the wood grain when possible, or use a small foam roller for a smooth tabletop finish.
Step 6: Transfer or Sketch the Rose
Once the base coat is dry, draw the rose lightly with pencil or transfer the design. Keep the lines soft so they do not show through translucent paint. If you are using a stencil, tape it securely so it does not shift. For a handmade look, use the stencil only as a guide and add freehand details afterward.
Step 7: Paint the Rose Petals
Begin with the main petal color. For a classic red rose, start with a medium red. Add darker red or burgundy near the petal folds and lighter pink or coral on the edges. For a blush rose, use soft pink, cream, and a touch of warm peach. For a white rose, use ivory, pale gray, and tiny shadows instead of pure white everywhere.
Paint petals as layered shapes rather than perfect outlines. Roses look natural because the petals overlap, curl, and tuck into one another. Start from the center spiral and work outward. Do not worry if the first layer looks flat. Roses often look awkward halfway through, just like bangs during a grow-out phase. The magic happens when highlights, shadows, and leaves are added.
Step 8: Add Leaves and Stems
Greenery makes the rose feel grounded. Use two or three shades of green for depth. A dark olive or forest green works well for shadow, while sage, mint, or yellow-green can create highlights. Leaves should point in different directions so the design feels organic. Add a stem only if it supports the layout; a floating rose can also look artistic and intentional.
Step 9: Add Highlights, Shadows, and Tiny Details
Use a small brush to add fine lines, petal curves, and subtle highlights. Avoid outlining every petal in the same dark color unless you want a graphic illustration style. For a softer look, blend shadows gently. For a bolder folk-art look, use crisp outlines and decorative dots. A few small accent strokes can make the rose feel alive without turning the tabletop into a botanical textbook.
Step 10: Let the Paint Dry and Cure
Dry paint and cured paint are not the same thing. Paint may feel dry to the touch long before it becomes hard enough for daily use. Give the painted rose time to cure before sealing or placing heavy objects on the table. Follow the paint label, and be patient. This is the part where the table looks finished but still needs emotional support from a “Do Not Touch” sign.
Step 11: Seal the Coffee Table
Seal the painted surface with a clear protective finish. Water-based polyurethane is popular for painted furniture because it dries clear and is generally less likely to amber than oil-based finishes. Use thin coats, let each coat dry, and lightly sand between coats if the product directions recommend it. For a coffee table, multiple thin coats are usually better than one thick coat. A smooth protective finish helps defend the painted rose against scratches, water rings, and everyday use.
Design Styles for a Painted Rose Coffee Table
Vintage Cottage Rose
A vintage cottage rose usually features soft pinks, creamy whites, sage leaves, and a lightly distressed background. This style works beautifully on white, cream, or pale blue tables. After sealing, you can style the table with a small vase, linen coasters, and old books for a cozy, collected look.
Modern Black-and-White Rose
For a modern design, paint the table matte black or warm white, then add a simple rose outline in the opposite color. Keep the lines clean and minimal. This style is ideal for apartments, contemporary living rooms, or anyone who loves flowers but does not want the room to look like a tea party moved in permanently.
Bold Red Rose on Dark Wood
A red rose over dark stained wood or charcoal paint feels dramatic and elegant. Add deep green leaves and subtle gold accents for a luxurious effect. This design works especially well in rooms with leather furniture, moody wall colors, brass lighting, or vintage rugs.
Boho Floral Cluster
A bohemian coffee table can handle multiple roses, vines, leaves, dots, and decorative borders. Use warm colors like terracotta, dusty rose, mustard, olive, and cream. The result feels relaxed, creative, and a little wildin the best possible way.
Common Mistakes to Avoid
The biggest mistake is skipping surface preparation. If the table is not cleaned, sanded, and primed, the paint may chip or peel. Another common mistake is applying paint too thickly. Thick paint can dry unevenly and leave brush marks. Rushing the curing process is also risky. A coffee mug placed too early can leave a mark that feels personally insulting after all your hard work.
Another mistake is forgetting the table’s actual use. A coffee table is touched constantly, so delicate artwork needs protection. Choose a clear coat that can handle regular household activity. Also consider the finish sheen. Matte looks soft and modern but may show marks more easily. Satin is a good middle ground. Gloss can be dramatic but may highlight imperfections.
How to Style a Coffee Table With a Painted Rose
Once the table is finished, let the painted rose remain the star. Do not cover the design completely with trays, stacks of books, candles, and decorative objects. Use styling pieces that frame the artwork instead. A clear glass vase, a low bowl, or a narrow tray can keep the table functional without hiding the flower.
Choose accessories that echo the rose colors. If the rose is blush pink, add cream candles or a soft beige throw nearby. If it is red, use brass, black, or deep green accents. If it is a white rose, keep the styling calm with natural textures like wood, linen, ceramic, and woven baskets.
Care Tips for a Painted Rose Coffee Table
Use coasters, especially during the first few weeks after sealing. Clean the table with a soft damp cloth instead of harsh scrubbers. Avoid ammonia-heavy cleaners unless the finish manufacturer says they are safe. Lift objects instead of dragging them across the surface. If a scratch happens, do not panic. Small touch-ups can usually be blended with leftover paint and resealed in the affected area.
For homes with kids, pets, or enthusiastic snackers, a tray can protect part of the tabletop while still showing the rose. For homes with all three, congratulationsyou are not decorating, you are managing a tiny indoor wildlife preserve. Choose durable finishes and keep touch-up paint labeled for future repairs.
Personal Experience: What Painting a Rose on a Coffee Table Teaches You
Painting a rose on a coffee table teaches patience faster than most DIY projects. At first, the table looks plain. Then it looks messy. Then it looks questionable. Then, somewhere around the second layer of petals, it suddenly begins to look intentional. That middle stage is where many people panic. The trick is to keep going slowly, let the layers dry, and remember that flowers are forgiving subjects.
One practical experience many DIYers discover is that the rose design should match the table’s daily life. A large rose in the center looks beautiful, but if you always keep a tray in the middle of the table, the artwork will spend its career hidden under remote controls. A corner rose or side border may be more useful. Good design is not just about what looks pretty in a photo; it is about what still looks pretty after Tuesday night pizza, homework, and someone losing the TV remote again.
Another lesson is that color testing matters. A rose color that looks perfect on a paint chip can appear too bright on a tabletop. Before painting the final design, test colors on cardboard or the underside of the table. Red can become loud quickly. Pink can turn sugary. White can disappear if the background is too pale. Mixing a tiny bit of brown, gray, or cream into floral colors often makes them feel more natural and less like frosting from a birthday cake.
Brush choice also makes a big difference. A small round brush helps create curved petals. A flat brush can make broad petal strokes. A liner brush is useful for veins, stems, and delicate outlines. Cheap brushes can shed bristles into wet paint, which is a special kind of DIY betrayal. You do not need professional art supplies, but using decent brushes makes the project easier and cleaner.
The most satisfying part is sealing the finished table. Once the clear coat goes on, the rose shifts from “craft project” to “real furniture.” The colors deepen slightly, the surface feels smoother, and the table finally looks ready to return to the living room. That moment is worth the sanding dust, the waiting time, and the tiny fear that you have accidentally painted a cabbage instead of a rose.
A painted rose coffee table also tends to become a conversation piece. Guests notice it because it is personal. It does not look like every table from a catalog. It has evidence of a hand, a choice, and a little courage. Even if the rose is not perfect, it tells a story. In a home full of factory finishes and fast furniture, that handmade detail feels refreshing.
The best experience-based advice is simple: do not rush the prep, do not overload the brush, and do not judge the rose too early. Work in layers. Step back often. Let the table dry properly. Protect the finished surface. And most importantly, enjoy the fact that you turned an ordinary coffee table into something that feels custom, creative, and completely yours.
Conclusion
A painted rose on a coffee table is more than a decorative flourish. It is a smart furniture makeover, a creative weekend project, and a way to bring warmth into the center of a room. With proper cleaning, sanding, priming, painting, curing, and sealing, a rose design can be both beautiful and durable. Whether your style is vintage cottage, modern minimal, dramatic, or bohemian, the rose can be adapted to fit your home.
The key is to treat the coffee table as both art and furniture. Make it pretty, but make it practical. Use colors that match your space, choose a layout that works with your daily habits, and protect the finished design with a clear topcoat. Done well, a painted rose coffee table becomes the kind of piece people notice, ask about, and remember. Not bad for a table that used to just hold coffee.