

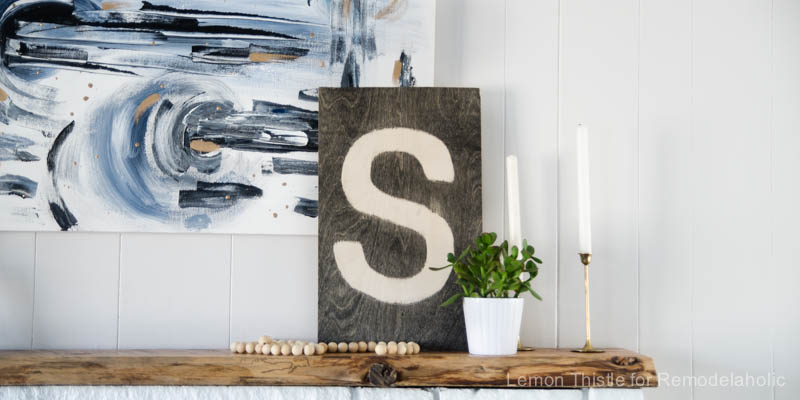
Note: This guide is written for homeowners, crafters, and weekend DIYers who want a personalized rustic wood sign without needing a professional woodshop, a mysterious cabinet full of tools, or a second mortgage for décor.
Why a Rustic Stained DIY Plywood Monogram Sign Is the Perfect Weekend Project
A rustic stained DIY plywood monogram sign is one of those projects that looks boutique-worthy but can be made with humble materials, a little patience, and just enough sanding to make you feel like a real craftsperson. It combines warm wood grain, personalized lettering, farmhouse charm, and the satisfying feeling of pointing at your wall and saying, “I made that.” Then, naturally, waiting for applause.
Unlike mass-produced wall décor, a plywood monogram sign can be customized for a family name, wedding gift, nursery, entryway, porch, kitchen, or gallery wall. The plywood base keeps the project budget-friendly, while stain gives it depth and character. Add a painted letter, vinyl stencil, raised wooden initial, greenery, ribbon, or metal accents, and suddenly a simple board becomes a statement piece.
This project is also forgiving. Rustic style does not demand perfection. A tiny ding? Character. A dark corner in the stain? Vintage charm. A slightly uneven brush mark? Congratulations, you have discovered “handmade texture.” That said, there is a big difference between charmingly rustic and accidentally chaotic, so this guide walks through materials, design choices, staining techniques, lettering options, finishing, hanging, and real-world lessons from the sawdust zone.
What Makes a Monogram Sign Look Rustic?
Rustic design is all about warmth, texture, and a sense of history. For a plywood monogram sign, that usually means visible grain, earthy stain colors, slightly distressed edges, simple typography, and natural accessories. Think weathered barn board energy without needing to dismantle an actual barn, which is generally frowned upon by barn owners.
Key Rustic Design Elements
A strong rustic monogram sign usually includes several of these features:
- Wood grain: Stained plywood lets the surface pattern show through instead of hiding it under heavy paint.
- Warm color: Walnut, chestnut, oak, espresso, gray wash, and weathered brown stains work beautifully.
- Simple lettering: Large initials, family names, established dates, or short words like “Welcome” keep the design readable.
- Layered texture: Raised letters, dry-brushed paint, twine, faux greenery, or metal hardware add dimension.
- Imperfect edges: Light distressing makes the sign feel handmade rather than factory-flat.
The secret is balance. Too little texture and the sign looks unfinished. Too much distressing and it may look like it survived a raccoon attack. Aim for “cozy farmhouse,” not “lost in a shed since 1987.”
Choosing the Best Plywood for a DIY Monogram Sign
Plywood is made from thin layers of wood veneer bonded together, giving it stability and strength for many home projects. For a decorative sign, you do not need the thickest or most expensive panel in the store. What matters most is a smooth face, manageable weight, and a surface that can accept stain evenly with proper preparation.
Recommended Plywood Thickness
For most indoor monogram signs, 1/4-inch plywood works well for small signs, especially if they are framed or backed. For medium to large wall signs, 1/2-inch plywood offers more strength and less flex. If you want a chunky, substantial look, 3/4-inch plywood can be used, but it will be heavier and may require stronger hanging hardware.
A practical size for beginners is 16 x 20 inches, 18 x 24 inches, or 24 x 24 inches. These dimensions are large enough to make an impact but small enough to handle on a workbench, dining table covered in cardboard, or garage floor that has already accepted its destiny.
Best Plywood Types for Staining
Sanded plywood, birch plywood, oak plywood, maple plywood, and cabinet-grade plywood are good options for a stained sign. Birch is popular because it has a smooth surface and a clean grain. Oak and maple veneer plywood can look more like solid hardwood once stained. Lower-grade construction plywood may work for a very rugged farmhouse look, but it often has knots, patches, voids, and rough spots that require extra sanding and creative forgiveness.
Materials and Tools You Will Need
You can make a rustic stained plywood monogram sign with basic tools. A cutting machine such as a Cricut or Silhouette is helpful for stencils, but it is not required. You can also use printed paper templates, store-bought stencils, transfer paper, or raised wooden letters.
Materials
- Plywood panel cut to desired size
- Wood stain in a rustic color
- Pre-stain wood conditioner, especially for softer or blotchy woods
- Sandpaper in 120-, 180-, and 220-grit
- Wood filler, if needed
- Paint for lettering, usually white, black, cream, or charcoal
- Stencil vinyl, adhesive stencil, or printed letter template
- Clear protective finish, such as polyurethane or polycrylic
- Foam brush, stain pad, lint-free rags, or natural-bristle brush
- Painter’s tape
- Hanging hardware such as D-rings, sawtooth hangers, or keyhole hangers
- Optional trim boards, twine, greenery, ribbon, hooks, or decorative metal accents
Tools
- Jigsaw, circular saw, table saw, or store-cut panel service
- Orbital sander or sanding block
- Drill or screwdriver
- Measuring tape and ruler
- Pencil
- Craft knife or weeding tool for stencil work
- Level for hanging
- Dust mask, gloves, and eye protection
Step-by-Step: How to Make a Rustic Stained DIY Plywood Monogram Sign
Step 1: Plan the Size and Layout
Start by deciding where the sign will live. A small sign above a nursery shelf may only need to be 12 x 12 inches, while an entryway sign may look better at 24 x 36 inches. Measure the wall space first. Guessing is how people end up with signs that look either adorably tiny or aggressively enormous.
Sketch the layout before cutting or staining. Place the large monogram initial in the center, then add a family name, first names, “established” date, or short phrase below it. Leave breathing room around the edges. Rustic signs look better when the design has space to relax instead of pressing against the border like it is late for a meeting.
Step 2: Cut the Plywood
Cut the plywood to size using a saw appropriate for your skill level and available workspace. If you do not own a saw, many home improvement stores can cut plywood panels for easier transport and project use. After cutting, inspect the edges for splinters or tear-out.
For a more finished look, you can add a simple frame using 1 x 2 boards around the plywood. Stain the frame darker than the center panel for contrast, or paint it black for a modern farmhouse look. A frame also hides raw plywood edges, which is useful because plywood edges sometimes reveal layers like a tiny wooden lasagna.
Step 3: Sand the Surface Smooth
Sanding is not glamorous, but it is the difference between “handmade gift” and “why is this fuzzy?” Start with 120-grit sandpaper to smooth rough areas, then move to 180-grit and finish with 220-grit. Sand with the grain when possible and avoid pressing too hard, especially on veneer plywood. The top layer can be thin, and sanding through it is a sad little DIY plot twist.
Wipe away dust with a vacuum, tack cloth, or slightly damp lint-free rag. Dust left behind can mix with stain and create gritty patches. Your sign should feel smooth to the touch before stain ever enters the chat.
Step 4: Apply Wood Conditioner
Plywood can absorb stain unevenly, especially if the face veneer is soft or porous. A pre-stain wood conditioner helps reduce blotching and supports a more even finish. Apply it with a brush or cloth, let it penetrate according to the product directions, and wipe away the excess. Then apply stain within the recommended window on the label.
This step is optional in the same way measuring ingredients is optional in baking. You can skip it, but do not act surprised if things get weird.
Step 5: Stain the Plywood
Stir the stain thoroughly before use. Do not shake the can like a protein drink unless you enjoy bubbles in your finish. Apply stain in the direction of the wood grain with a lint-free cloth, stain pad, or brush. Let it sit briefly, then wipe off the excess. The longer stain sits, the darker the color usually becomes, but leaving heavy puddles can cause sticky spots and uneven drying.
For a rustic stained plywood monogram sign, popular stain colors include dark walnut, special walnut, provincial, early American, espresso, weathered oak, classic gray, and whitewash. Test the stain on a scrap piece from the same plywood before committing. Stain color can change dramatically depending on wood species, sanding level, and the number of coats.
Step 6: Distress the Wood for Rustic Character
Once the stain is dry, you can lightly distress the surface. Sand the corners, edges, and high spots with 220-grit sandpaper. Focus on areas that would naturally wear over time. You can also gently tap the surface with a chain, screw, or hammer for small dents before staining, but use restraint. The goal is “antique charm,” not “this board lost a fight.”
Dry brushing is another easy rustic technique. Dip a brush lightly into white, cream, or gray paint, wipe most of it off on a paper towel, then drag it across the surface. This adds a weathered look while allowing the stained wood to show through.
Step 7: Add the Monogram Design
There are several ways to add the monogram. The best choice depends on your tools, patience, and feelings about tiny vinyl pieces sticking to your fingers.
Option 1: Vinyl Stencil
Create the monogram in design software, cut it from stencil vinyl, weed the design, and apply transfer tape. Position the stencil on the stained plywood, press it firmly, and burnish the edges. Paint over the stencil with light coats, letting each coat dry slightly before adding the next. Remove the stencil while the paint is not fully cured to help prevent peeling.
Option 2: Raised Wooden Letter
Buy a wooden letter from a craft store or cut one with a scroll saw, laser cutter, or CNC machine. Paint or stain the letter in a contrasting color, then attach it with wood glue and small brad nails. Raised letters create dimension and make the sign look more expensive than it is, which is the entire spirit of good DIY.
Option 3: Hand-Painted Template
Print a large letter or family name, shade the back of the paper with pencil, tape it to the sign, and trace the outline. The graphite transfers the design onto the wood. Fill it in with a small brush or paint marker. This method is low-tech, affordable, and surprisingly satisfying.
Monogram Design Ideas That Work Beautifully
Your design should match the room and purpose. For wedding gifts, use the couple’s last initial, last name, and wedding year. For nursery signs, use a single initial with the baby’s first name in script. For porch décor, pair a large letter with “Welcome.” For kitchen wall art, try a family name with a small wreath or herb illustration.
Popular Layout Examples
- Classic family sign: Large initial, last name across the middle, established year below.
- Modern farmhouse sign: Black stained frame, warm brown plywood center, white lettering.
- Nursery monogram: Soft gray stain, white letter, small floral accents.
- Porch sign: Vertical plywood board with a large initial and seasonal ribbon.
- Wedding gift: Couple’s monogram with a date and subtle greenery.
When choosing fonts, combine one decorative script with one simple block font. Two fancy fonts together can look like they are arguing. A bold serif or sans-serif font makes the monogram readable, while a script font adds personality.
How to Seal and Protect the Sign
After the lettering is completely dry, apply a clear protective topcoat. For indoor signs, water-based polycrylic is a popular option because it dries clear and has lower odor than many oil-based finishes. Oil-based polyurethane can add warmth and durability, but it may slightly amber light colors. Always test first if your sign includes white paint.
Apply thin coats and let each coat dry fully. Lightly sand between coats with fine-grit sandpaper if the product directions recommend it. Two coats are usually enough for indoor wall art. A porch sign or high-touch sign may need extra protection and an exterior-rated finish. If the sign will be exposed to rain, direct sun, or humidity, choose materials and finishes designed for outdoor use.
How to Hang a Plywood Monogram Sign Safely
The right hanging hardware depends on sign size and weight. Small lightweight signs can use a sawtooth hanger. Medium signs often do better with D-rings and picture wire. Large or heavy signs should be anchored into wall studs when possible. Drywall anchors can help, but they must be rated for more than the sign’s weight.
Before hanging, attach hardware evenly on the back and use a level on the wall. If the sign is going above a crib, bed, bench, or high-traffic area, be extra careful with secure installation. A rustic sign should make guests say “That’s beautiful,” not “Is that about to fall?”
Common Mistakes to Avoid
Skipping the Test Piece
Stain is unpredictable on plywood. A color that looks rich and warm on the can may turn orange, muddy, or darker than expected on your actual board. Always test stain, paint, and topcoat on scrap wood first.
Oversanding Veneer
Plywood face veneer can be thin. Aggressive sanding can expose the layer beneath, creating a patch that does not stain the same way. Use moderate pressure and let the sandpaper do the work.
Using Too Much Stain
Stain is not paint. It should penetrate the surface, then be wiped back. Heavy coats can remain tacky and uneven. If you want a darker color, apply a second coat according to the product directions instead of drowning the first coat.
Removing the Stencil Too Late
If stencil paint cures completely, it may peel when you remove the vinyl. Pull the stencil carefully while the paint is still slightly soft. Use a craft knife to score tricky edges if needed.
Forgetting About Contrast
A gorgeous monogram is useless if nobody can read it. Dark stain needs light lettering. Pale stain needs dark lettering. If the sign will be viewed from across the room, increase font size and simplify details.
Budget-Friendly Ways to Upgrade the Sign
A rustic stained DIY plywood monogram sign can be simple or fancy depending on your mood and craft supply drawer. Add thin trim around the edges for a framed look. Wrap twine around one corner for texture. Attach faux eucalyptus, cotton stems, or dried flowers for a farmhouse accent. Add small hooks along the bottom and turn it into a key holder. Use metal house numbers, antique drawer pulls, or small decorative brackets for extra charm.
For seasonal flexibility, attach décor with removable floral wire or small hooks. That way, your monogram sign can wear a tiny wreath in spring, plaid ribbon in fall, and greenery in winter. Yes, your sign can have outfits. No judgment here.
Where to Display Your Rustic Monogram Sign
The beauty of a plywood monogram sign is that it works in many spaces. Hang it in an entryway to greet guests, above a mantel for a personalized focal point, in a dining room for cozy farmhouse energy, or in a bedroom for a soft custom touch. A nursery monogram sign can become a keepsake. A wedding sign can later move into the couple’s home. A porch sign can make the front door feel welcoming before anyone even rings the bell.
For best visual impact, style the sign with other textures. Pair it with woven baskets, neutral ceramics, linen curtains, black metal fixtures, or greenery. Rustic décor loves company, especially if that company is a plant in a cute pot.
Cleaning and Maintenance Tips
Dust the sign gently with a microfiber cloth. Avoid soaking it with water or harsh cleaners, especially if it has raised letters, vinyl, or decorative greenery. If the sign is displayed outdoors, inspect the finish every season. Sunlight, humidity, and temperature swings can wear down protective coatings over time.
If the surface starts to look dull, clean it lightly and apply a fresh clear coat if the original finish allows. If a painted letter chips, touch it up with a small brush. Rustic décor is kind to touch-ups because minor wear often blends into the overall style.
Experience Notes: What Making a Rustic Stained DIY Plywood Monogram Sign Teaches You
The first thing this project teaches is that plywood has opinions. You may walk into the project thinking, “I will stain this board dark walnut and it will look exactly like the inspiration photo.” The plywood may respond, “How about orange-brown with one mysterious blotch near the corner?” This is why testing matters. Every sheet has its own grain, density, and personality. The more you respect that, the better the final sign looks.
Another real-world lesson is that rustic does not mean careless. In fact, the best rustic signs are carefully made to look relaxed. The sanding is thoughtful. The stain is controlled. The distressing is placed where natural wear would happen. A beginner may be tempted to beat up the entire board with every object in the garage, but subtlety usually wins. A few softened edges and lightly rubbed corners look more believable than random dents everywhere.
Stencil work also has a learning curve. The most common problem is paint bleeding under the stencil edges. The fix is simple but important: press the stencil down firmly, use very little paint, and apply multiple thin coats instead of one heavy coat. Some crafters seal the stencil edge first with a thin layer of the background color or clear topcoat before painting the letter color. That way, any bleeding is nearly invisible. It feels like a tiny magic trick, except with less smoke and more painter’s tape.
Choosing fonts can take longer than staining the board. A monogram sign should be readable, especially if it includes a last name or date. Beautiful script fonts can become tangled spaghetti if they are too small. Bold initials look great from a distance, while thinner lettering works best for secondary text. A good rule is to print the design on paper and tape it to the wall before committing. Step back ten feet. If you can read it without squinting like you forgot your glasses, you are on the right track.
Finishing is another area where patience pays off. Many DIYers rush the topcoat because the project looks “done.” But the protective finish is what helps preserve the stain, paint, and wood surface. Thin coats dry better than thick ones. Light sanding between coats can make the final result feel smoother and more professional. The waiting time may be annoying, but it is better than leaving fingerprints in tacky polyurethane and pretending they are part of the rustic theme.
One of the most enjoyable parts of this project is how personal it becomes. A store-bought sign may look nice, but a handmade monogram sign carries a story. You chose the stain. You picked the letter. You decided whether the corners needed more distressing. You probably got stain on at least one finger despite wearing gloves for the first eight minutes. Those tiny memories become part of the finished piece.
This project is especially rewarding as a gift. A customized family sign, wedding monogram, housewarming piece, or nursery name sign feels thoughtful without being overly complicated. It says, “I made this for you,” which is much warmer than “I panic-bought this from aisle seven.” Even when the sign is simple, the personalization makes it meaningful.
Finally, making one rustic stained plywood monogram sign often leads to making more. Once you learn the basic process, the variations are endless: holiday signs, porch signs, kitchen signs, family command centers, pet name plaques, wedding welcome boards, and small shelf sitters. The project builds confidence because it combines beginner-friendly woodworking with creative design. By the end, you understand sanding, staining, stenciling, sealing, and hanging better than when you started. That is the real winplus, of course, the very attractive sign now making your wall look like it has its life together.
Conclusion
A rustic stained DIY plywood monogram sign is a practical, personal, and budget-friendly project that delivers big visual impact without requiring advanced woodworking skills. With the right plywood, careful sanding, a tested stain color, clean lettering, and a protective topcoat, you can create custom wall décor that feels warm, handmade, and polished.
The charm of this project comes from the blend of simple materials and personal meaning. Plywood brings structure, stain brings warmth, and the monogram makes it yours. Whether you hang it in an entryway, give it as a wedding gift, decorate a nursery, or add personality to a porch, the finished sign has a cozy rustic character that mass-produced décor rarely captures.
Take your time, test your finishes, keep your lettering readable, and let the wood grain do some of the decorating for you. The result will be a sign that looks custom, feels meaningful, and gives you full permission to casually mention, “Oh, that? I made it.”