Repeating a clip in Adobe Premiere Pro sounds like it should involve a giant glowing “Loop Forever” button. Sadly, Premiere Pro is a professional editing app, which means the obvious button is usually hiding behind six other useful tools and a panel you accidentally closed yesterday. The good news? Repeating a clip is still simple once you know the right workflow.
Whether you are making a looping background video, repeating a reaction shot, extending a music visualizer, creating a boomerang-style effect, or building a social media edit that hits the same beat again and again, Premiere Pro gives you several reliable ways to do it. Some methods are fast and practical. Others are cleaner for long edits. A few are best when you want the repetition to feel stylish instead of looking like you copied the same clip with the enthusiasm of a tired intern at 2 a.m.
This guide breaks down 3 ways to repeat a clip in Premiere, including manual duplication, copy-and-paste looping, and nesting for cleaner repeated sections. You will also learn when to use each method, how to avoid awkward jumps, and how to make your loop feel smooth enough that viewers do not notice where the clip starts over.
What Does “Repeat a Clip” Mean in Premiere Pro?
In Premiere Pro, repeating a clip usually means placing the same video or audio segment multiple times in a sequence so it plays again after it ends. Unlike some mobile editors, Premiere Pro does not treat every clip as an auto-looping object by default. Instead, you create the repeated result in your timeline.
That may sound less convenient at first, but it gives you more control. You can decide exactly how many times the clip repeats, whether the audio repeats too, whether every other version reverses, whether the loop is nested, and whether the repetition is visible in the final exported video.
There are two big types of repetition in Premiere Pro:
Timeline repetition
This is when you duplicate or paste a clip several times in the sequence. The viewer sees the clip play, then play again, then play again. This is the method you use for exported videos, social clips, GIF-style edits, and repeated b-roll.
Playback loop for editing
This is when you loop playback inside Premiere Pro while editing. It helps you preview a section repeatedly, but it does not automatically create a repeated clip in the final export. Think of it as Premiere saying, “Sure, I will replay this while you obsess over the cut,” not “I will render this ten times for you.”
For this article, we are focusing mainly on timeline repetitionthe kind that actually appears in your final video.
Way 1: Repeat a Clip by Duplicating It on the Timeline
The fastest way to repeat a clip in Premiere Pro is to duplicate it directly on the timeline. This is the “get it done before your coffee gets cold” method. It works perfectly for short clips, quick edits, memes, social videos, and any project where you only need a few repeats.
How to duplicate a clip in Premiere Pro
First, open your project and place the clip on the timeline. Click the clip once to select it. Then use one of these common duplication methods:
On Windows: hold Alt, click the selected clip, and drag it to a new position on the timeline.
On macOS: hold Option, click the selected clip, and drag it to the new position.
When you release the mouse, Premiere Pro creates a copy of the clip. Place it immediately after the original if you want a continuous repeat. If snapping is enabled, the copied clip should lock neatly to the end of the first clip. Snapping is your friend here. Without it, you may accidentally leave a tiny gap, and nothing screams “beginner edit” like one mysterious black frame appearing between loops like a tiny cinematic pothole.
When this method works best
Duplicating clips is ideal when you only need to repeat a clip two, three, or four times. For example, imagine you have a three-second shot of a coffee pour and you want it to play three times under a voiceover. You can duplicate the clip twice, align the copies, and you are done.
This method also works well for repeating sound effects, visual overlays, lower-third animations, light leaks, glitch effects, or short b-roll moments. Because each duplicate sits separately on the timeline, you can edit each copy independently. You might add a zoom to the second copy, reverse the third copy, or adjust the audio on only one repeat.
How to make duplicated clips loop smoothly
The biggest problem with repeating a clip is that the cut point can feel obvious. A person’s hand may jump, a camera movement may reset, or the lighting may change suddenly. To make the repeat smoother, trim the beginning and end of the clip carefully. Look for frames where the motion is similar, such as a wave returning to the same shape or a camera move ending near a natural pause.
You can also add a short cross dissolve between duplicates, but use this carefully. A dissolve can hide a jump, but it can also make the loop look mushy if the movement does not match. For clean loops, the best trick is often choosing the right clip before you start editing. Footage with repetitive motionwater, traffic, blinking lights, fire, screens, clouds, or crowdsusually loops better than footage with one-time actions.
Way 2: Repeat a Clip with Copy and Paste
If you need to repeat a clip many times, copy and paste is often faster than dragging duplicates one by one. This method is especially useful when you are building a longer repeated pattern, such as a looping background, music beat cut, repeated animation, or countdown graphic.
How to copy and paste a clip in Premiere Pro
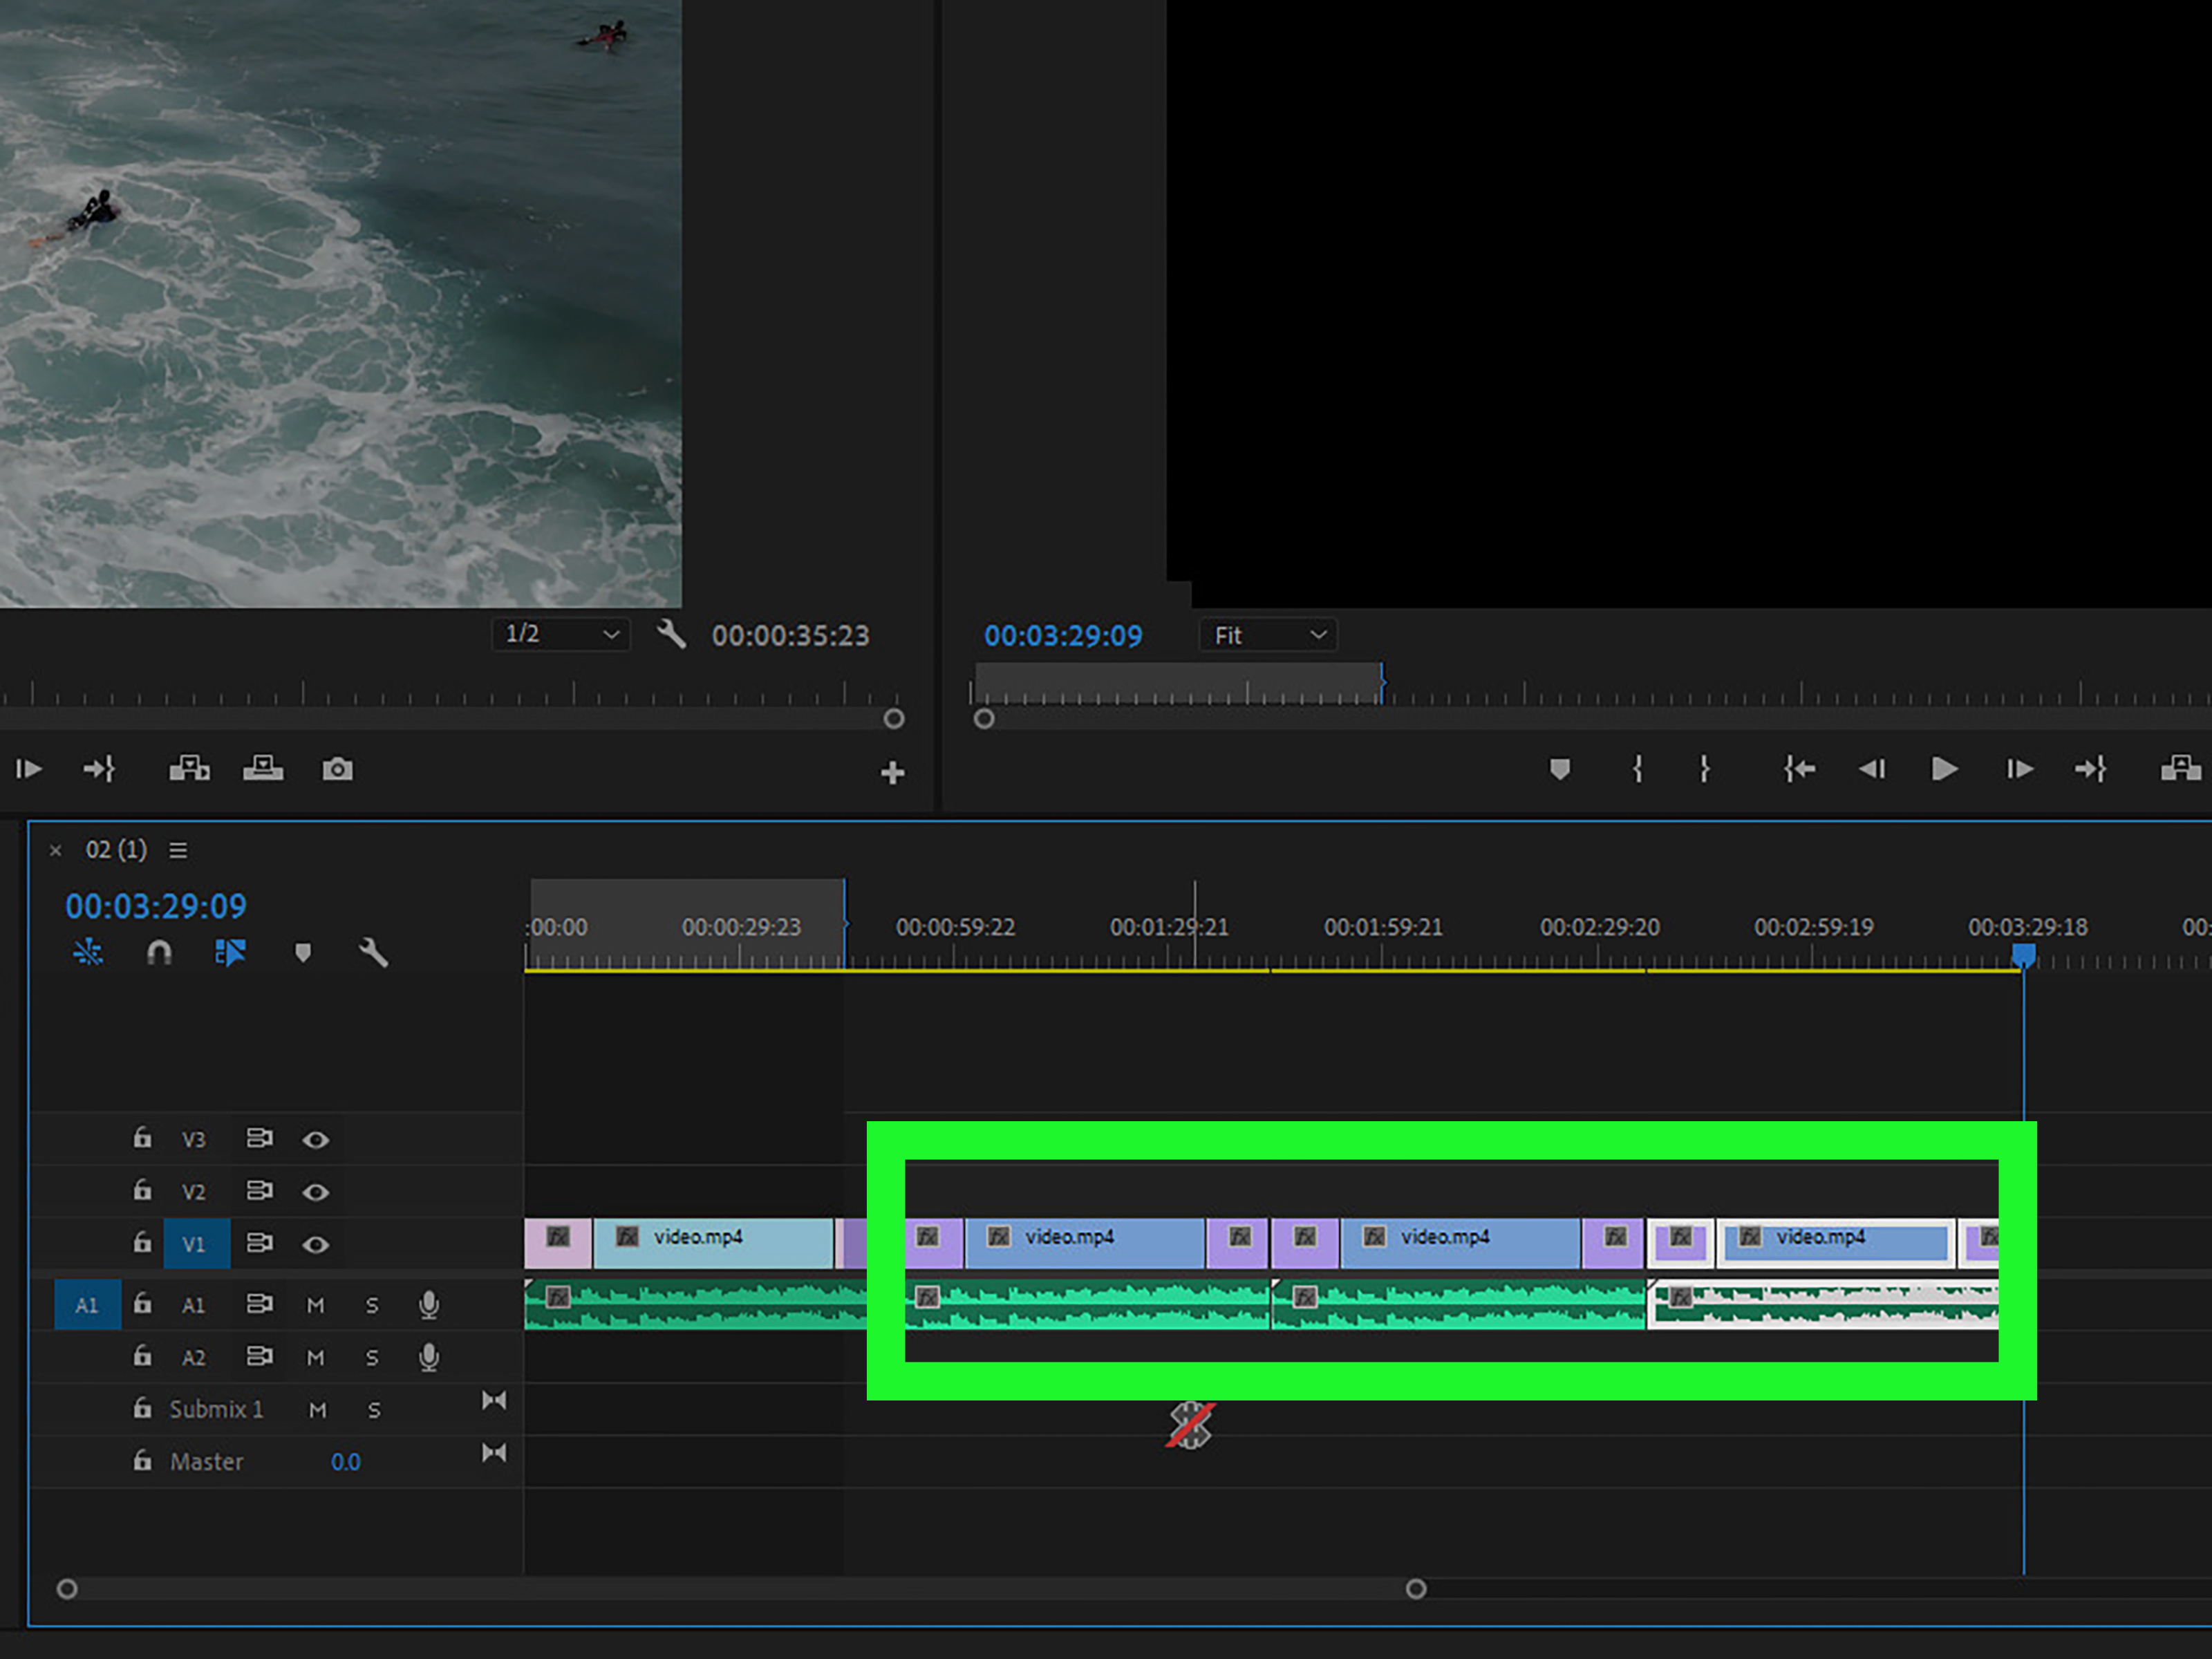
Select the clip on your timeline. Press Ctrl+C on Windows or Command+C on macOS to copy it. Move the playhead to the exact point where you want the repeated clip to begin. Then press Ctrl+V on Windows or Command+V on macOS to paste it.
To create a continuous loop, move the playhead to the end of the clip before pasting. You can also select the pasted copy, move the playhead to the end again, and paste another copy. Once you get the rhythm, this becomes quick. It is not glamorous, but neither is organizing footage named “final_final_REAL_final_v7.mp4,” and we all do what we must.
Pay attention to track targeting
One detail that trips up many editors is track targeting. Premiere Pro pastes clips onto the active targeted tracks. If your copied clip suddenly appears on the wrong video or audio track, check the track targeting buttons on the left side of the timeline. Make sure the correct V and A tracks are active before pasting.
This matters a lot when repeating clips that include both video and audio. For example, if your video is on V1 and audio is on A1, but A1 is not targeted, Premiere may paste only the video or place the audio somewhere unexpected. The software is not being rude; it is simply obeying buttons you forgot were turned on.
Use copy and paste for precise repeated sections
Copy and paste is also excellent when you need to repeat only a selected portion of a clip. Use the Razor Tool or trim handles to isolate the exact section. Then copy that trimmed segment and paste it wherever you need it.
For example, suppose you have a 30-second dance clip, but you only want to repeat the two-second spin. Cut around the spin, select that short segment, copy it, and paste it several times. Now the movement repeats without dragging the entire original clip around. This is a common trick in music videos, TikTok edits, sports highlights, and reaction content.
Example: Creating a repeated beat edit
Let’s say you are editing a short promo video and want a product shot to flash three times on the beat. You can cut a half-second product clip, copy it, and paste it at each beat marker. Add a quick scale-up effect or a flash transition to each copy, and suddenly the edit feels intentional instead of accidental. Congratulations: you have tricked the timeline into having rhythm.
Way 3: Repeat a Clip by Nesting It First
Nesting is the cleanest method when you want to repeat a group of edits instead of one simple clip. In Premiere Pro, a nest turns selected clips into a new sequence that behaves like a single clip in your main timeline. This is useful when your repeated section contains multiple layers, effects, audio, text, adjustment layers, or transitions.
How to nest a clip or group of clips
Select the clip or clips you want to repeat. Right-click the selection and choose Nest. Give the nested sequence a clear name, such as “Looping Product Shot” or “Intro Animation Repeat.” Premiere Pro will replace the selected clips with one nested sequence on your timeline.
Now you can duplicate or copy and paste that nested sequence just like a normal clip. The difference is that all the internal layers stay organized inside the nest. Your main timeline stays clean, and your future self does not have to scroll through 37 tiny pieces of animation wondering what life choices brought you here.
When nesting is the better option
Nesting is best when your repeated clip is not really just one clip. Maybe you have a video clip with a color grade, text overlay, sound effect, whoosh transition, and animated logo. If you duplicate all those layers manually, your timeline can become messy fast. Nesting packages them into one reusable block.
This is also helpful for repeated intros, end screens, animated callouts, reaction layouts, tutorial steps, podcast video templates, and social media frames. If the repeated section has several moving parts, nest it first.
Be careful when editing nested repeats
One important detail: duplicated nests can still refer to the same nested sequence. That means if you open the nest and change what is inside, the change may appear in every repeated instance of that nest. This is useful when you want all repeats to update together. It is less useful when you wanted each repeat to be different and suddenly every title says “Banana Sale Tuesday.”
If you need independent versions, duplicate the nested sequence in the Project panel and use separate copies. Rename them clearly, such as “Loop Section 01,” “Loop Section 02,” and “Loop Section 03.” Clear naming may not feel exciting, but it is cheaper than therapy after a chaotic timeline meltdown.
Bonus: How to Preview a Repeated Section with Loop Playback
Sometimes you do not want to create repeated clips in the final video. You only want Premiere Pro to play the same section over and over while you adjust timing, audio, transitions, or effects. That is where loop playback helps.
Set an In point and Out point around the section you want to preview. Then enable loop playback in the Program Monitor. If the Loop button is not visible, you can add it from the Button Editor. Once enabled, Premiere Pro will replay that selected range continuously during preview.
This is extremely useful for checking whether a transition feels smooth, whether a music cut lands properly, or whether a visual loop has a noticeable jump. It does not create repeated media in your export, but it saves time while editing.
How to Choose the Best Method
Use timeline duplication when you need a quick repeat and only have one or two clips. It is fast, direct, and easy to control. Use copy and paste when you need many repeats or want to place repeated clips at precise points in the timeline. Use nesting when your repeated section contains multiple layers or effects and you want to keep the timeline clean.
Here is the simple rule: if the repeat is small, duplicate it. If the repeat is frequent, copy and paste it. If the repeat is complicated, nest it.
Common Mistakes When Repeating Clips in Premiere
Leaving tiny gaps between clips
Turn on snapping and zoom into the timeline to make sure repeated clips touch perfectly. Even a one-frame gap can create a black flash during playback or export.
Repeating audio without checking the cut
Audio loops can click, pop, or feel abrupt if the waveform does not connect smoothly. Add a very short audio crossfade if needed, or cut at a quieter point in the sound.
Forgetting about motion continuity
A clip that starts with a hand raised and ends with a hand down may jump badly when repeated. Look for a better loop point or use a reverse copy to create a forward-backward effect.
Making the timeline messy
If you repeat a clip with many layers, consider nesting. A clean timeline makes revisions faster and reduces the chance of accidentally moving one tiny piece out of sync.
Pro Tips for Better Repeating Clips
For a seamless visual loop, try reversing every other duplicate. Place the original clip first, then duplicate it, right-click the copy, choose speed or duration settings, and reverse the speed. This creates a back-and-forth movement that can hide the reset point. It works especially well for waves, blinking lights, hair movement, fabric motion, product spins, and camera pushes.
You can also add a subtle zoom or crop change to repeated clips so they feel less identical. For example, the first repeat can be normal, the second can zoom in slightly, and the third can include a small rotation or color shift. This works well for energetic social edits where repetition is part of the style.
If you are repeating a background clip behind text, consider lowering its opacity, blurring it slightly, or slowing it down. Viewers are less likely to notice the loop point when the background is not fighting for attention.
Experience Notes: What Editors Learn After Repeating Clips Too Many Times
After you repeat clips in Premiere Pro for a while, you start to notice that looping is not just a technical action. It is also a taste test. A clip can be perfectly duplicated and still feel wrong if the timing is awkward. On the other hand, a slightly imperfect loop can feel great when it matches the music, supports the story, or gives the viewer a satisfying visual rhythm.
One practical experience is that short clips are not always easier to loop. A one-second clip may repeat so quickly that the viewer notices the pattern immediately. A five- or six-second clip often feels more natural because the eye has more time to settle before the repeat begins. For background visuals, slightly longer loops usually feel smoother.
Another lesson: always watch the loop at normal speed. Scrubbing through the timeline is useful, but it does not show how the rhythm feels in real time. Many editors spend several minutes trimming a loop frame by frame, only to discover during playback that the first version felt better. Premiere Pro is powerful, but your eyes and ears still get the final vote.
Audio deserves special attention. A repeated video clip can sometimes survive a visual jump, especially in fast-paced content. Repeated audio is less forgiving. A tiny click at the loop point can become irritating after three repeats. When repeating audio, use fades, cut on beats, or loop sections where the sound naturally sustains. Music beds, room tone, crowd noise, and ambience can often be looped smoothly if you overlap them slightly and add crossfades.
For social media videos, repetition can be a feature, not a flaw. A repeated gesture, facial reaction, product movement, or punchline can make a clip funnier and more memorable. The trick is to make the repetition feel intentional. Add a beat, text pop-up, zoom, sound effect, or speed change. When the viewer understands that the repeat is part of the joke or rhythm, it feels polished instead of lazy.
For professional edits, nesting becomes more valuable over time. Beginners often avoid nests because they feel like an extra step. Experienced editors use them because they reduce timeline clutter. If you are repeating a mini-sequence with titles, effects, sound design, and transitions, nesting can turn a messy stack of layers into one manageable block. That makes revisions easier, especially when clients ask for changes using phrases like “Can we make it pop more?” which, as all editors know, can mean absolutely anything.
One final experience-based tip: duplicate your sequence before experimenting heavily with repeated clips. Create a version called “Loop Test” or “Repeat Experiment.” This gives you freedom to try reverse loops, speed changes, nests, and transitions without damaging your original edit. Premiere Pro rewards experimentation, but it also rewards backup versions. Future you will be grateful, and future you is already dealing with enough.
Conclusion
Repeating a clip in Premiere Pro is simple once you know which method fits the job. For quick repeats, duplicate the clip on the timeline with Alt or Option dragging. For longer repeated sections, use copy and paste to build the pattern efficiently. For complex repeated edits, nest the section first so your timeline stays organized and easier to manage.
The best repeat is not just the one that plays again. It is the one that feels smooth, supports the edit, and does not distract the viewer. Trim carefully, watch for gaps, check your audio, and use loop playback to preview the result before exporting. With a little timing and a little patience, Premiere Pro can turn one clip into a clean, stylish, professional-looking loopno magic button required.