

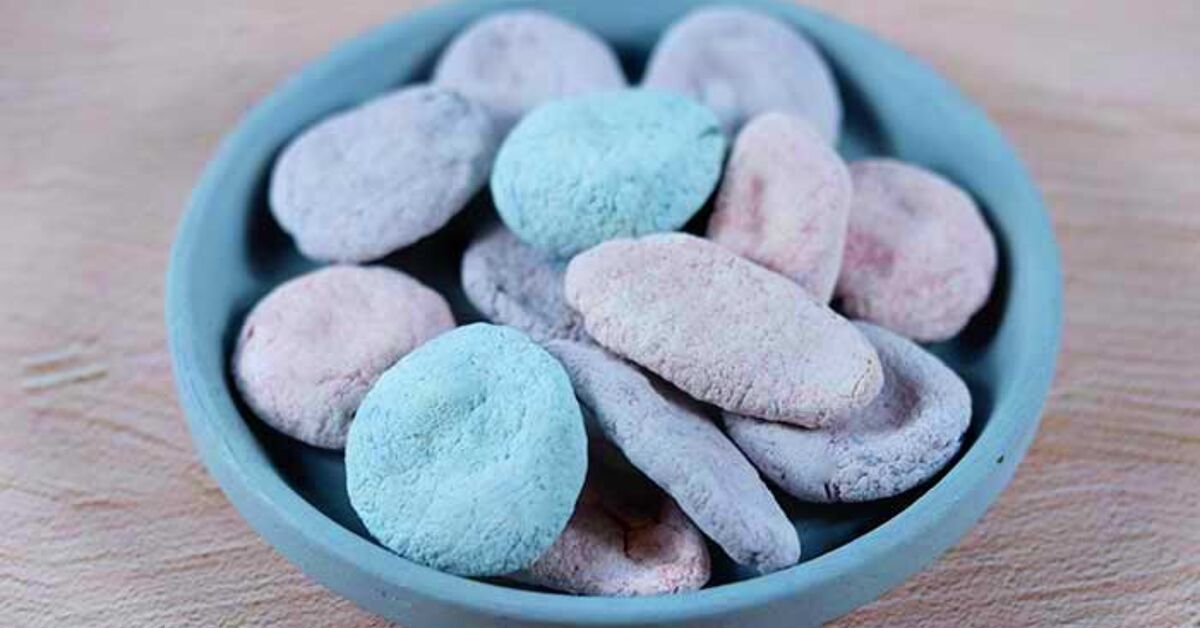
Some home fragrance projects require electricity, open flames, mysterious replacement cartridges, or a gadget that begins beeping at 2:00 a.m. DIY aroma stones require none of those things. These small, porous decorations slowly release the scent of essential oils without heat, smoke, or a powered diffuser.
They are also surprisingly easy to personalize. You can cast them as flowers, leaves, seashells, stars, geometric tiles, or tiny woodland creatures. Place one in a closet, bathroom, entryway, home office, or linen drawer, and it becomes both a decorative object and a passive essential oil diffuser.
The most dependable method is to make a porous stone from plaster of Paris, allow it to cure completely, and then add essential oil to the finished surface. Air-dry clay is another beginner-friendly option. Both materials can absorb small amounts of aromatic oil and release the fragrance gradually. Passive aromatherapy accessories made from absorbent materials are also recognized as an alternative to powered diffusion.
What Are Aroma Stones?
Aroma stones are unglazed, absorbent objects used to hold fragrance. Unlike wax melts, they are not heated. Unlike candles, they do not burn. Unlike ultrasonic diffusers, they do not spray scented mist throughout an entire room.
Instead, a few drops of essential oil soak into microscopic pores in the stone. The volatile aromatic compounds slowly evaporate into the surrounding air. The result is usually a gentle, close-range fragrance rather than a scent powerful enough to announce itself from three rooms away.
This makes DIY aroma stones especially useful in smaller spaces. They can freshen a nightstand, desk, guest bathroom, dresser drawer, or shelf without dominating the area. Because fragrance compounds can affect indoor air and sensitive people differently, the ability to control the amount and location of the scent is a major advantage.
Why Plaster of Paris Works So Well
Plaster of Paris is popular for DIY aroma stones because it is inexpensive, easy to find, and designed for mold-making and casting. Once dry, it forms a firm but porous surface that accepts essential oil readily.
Many plaster products use a general proportion of two parts plaster powder to one part cold water, although the package instructions should always take priority. DAP, for example, specifies a two-to-one ratio, a short working time, removal from a mold after approximately one hour, and at least 24 hours of drying before use. Its technical information lists a longer final curing period, so patience produces a stronger stone. Retail craft guidance from Michaels and Home Depot likewise recommends following the manufacturer’s ratio and working instructions.
The important word is porous. If you cover the entire finished stone with varnish, resin, or thick paint, you close the pores that are supposed to absorb the oil. Your aroma stone may become beautifully shiny and almost completely useless, rather like a designer raincoat made from paper towels.
Supplies for DIY Plaster Aroma Stones
- Plaster of Paris intended for crafts or mold casting
- Cold water
- A clean disposable or dedicated mixing container
- A craft stick, silicone spatula, or disposable spoon
- Flexible silicone molds
- Measuring cups or a digital kitchen scale reserved for crafts
- Disposable gloves
- A dust mask suitable for fine particles
- Wax paper, a drop cloth, or a washable work mat
- Fine-grit sandpaper or a damp sanding sponge
- Essential oils
- A dropper or pipette
- Optional acrylic paint, mica powder, dried botanicals, or cork pads
Work in a ventilated area and avoid stirring plaster powder aggressively. Fine plaster dust should not be inhaled, and dry sanding can release additional particles. NIOSH provides occupational guidance for plaster and calcium sulfate dust, while product manufacturers commonly recommend wet sanding to reduce airborne dust.
How to Make DIY Aroma Stones With Plaster
Step 1: Prepare the Work Area
Cover the table before opening the plaster. Set out the molds, water, mixing container, and tools so everything is within reach. Plaster begins setting quickly, which means this is not the ideal moment to discover that your silicone mold is still in the dishwasher.
Use clean molds that are completely free of crumbs, lint, glitter, and the mysterious sticky residue that appears in craft drawers. Flexible silicone molds are easiest to demold and are widely used for plaster, clay, wax, soap, and other casting materials.
Step 2: Measure the Cold Water
Pour the required amount of cold water into the mixing container first. For a product using a two-to-one plaster-to-water ratio, one-half cup of water would be combined with approximately one cup of plaster powder.
Do not assume that every brand has the same formula. Read the label before mixing. Making a test batch is wise when using a new product or an unusually detailed mold.
Step 3: Add the Plaster Gradually
Sprinkle the plaster powder evenly over the water rather than dropping the entire amount in as one dramatic white avalanche. Let it absorb the water briefly, then stir slowly until the mixture is smooth and similar in consistency to pourable pancake batter.
Avoid vigorous whipping. Fast stirring traps air bubbles, and those bubbles eventually become tiny craters on your finished aroma stones. They are harmless, but a flower mold covered in accidental moon craters may not be the aesthetic you had planned.
Step 4: Add Color Carefully
You can leave the plaster white for a clean, minimalist appearance or tint it with a very small amount of compatible pigment. Mica powder, water-based craft pigment, or a tiny drop of acrylic paint may work, but too much liquid color can alter the plaster consistency.
Another option is to paint selected details after the stone dries. Leave at least one large area unpainted so the surface remains absorbent. The back is usually the best place to apply essential oil.
Step 5: Pour the Plaster Into the Mold
Fill each mold gradually. Pour approximately one-quarter of the cavity, tap the mold against the table to release trapped air, and continue filling in stages. Manufacturer casting instructions recommend this incremental approach because it helps bubbles rise before the plaster hardens.
Use a craft stick to scrape the top level. Remember that the exposed top becomes the back of the finished stone. It does not need to look like it was polished by Italian marble artisans, but a reasonably flat surface helps the stone sit neatly on a shelf.
Step 6: Let the Stones Set
Do not bend, squeeze, or investigate the molds every four minutes. Let the plaster become completely firm. Depending on the product and size of the mold, initial setting may occur within 20 to 30 minutes, while demolding may be recommended after about an hour.
Gently peel the silicone mold away from the plaster instead of pulling the stone upward. Thin petals, narrow points, and delicate corners are most likely to break when the cast is still damp.
Step 7: Cure the Aroma Stones Completely
Place the unmolded stones on a dry, nonporous surface with air circulating around them. Allow at least 24 hours before decorating or scenting, and give thick pieces additional time. Some plaster formulas list a final cure of several days.
A stone that feels cool, damp, or unusually heavy probably contains moisture. Adding oil too early can produce blotches, slow drying, and weaken the fragrance. Waiting is less exciting, but so is watching the corner fall off your freshly painted lavender medallion.
Step 8: Smooth Rough Edges
Once the plaster is dry, smooth sharp seams with a damp sanding sponge or fine-grit wet sandpaper. Wet sanding helps control dust. Wear suitable protection, work gently, and stop as soon as the edges feel comfortable.
Wipe away residue and allow the stone to dry again before adding paint or oil.
Step 9: Decorate Without Sealing the Entire Stone
Paint small raised details, add a light metallic accent, or dry-brush the edges. Avoid coating every surface with varnish. Sealant makes an air-dry-clay or plaster ornament more resistant to handling, but it does not necessarily make it waterproof, and a full coating will interfere with fragrance absorption. Crayola recommends allowing air-dry clay to dry thoroughly before varnishing and notes that sealed pieces should still be displayed indoors.
For furniture protection, glue a small cork or felt circle to the bottom. This also prevents fresh oil from touching painted or finished surfaces.
Step 10: Add the Essential Oil
Place the dry stone on a protected surface. Add three to five drops of essential oil to the unpainted back and wait for them to absorb. Begin modestly. You can always add another drop; persuading an aroma stone to return excess peppermint oil is considerably more difficult.
Let the oil soak in for several minutes before placing the stone in its intended location. Refresh it with one to three drops whenever the scent becomes faint. Sculpey’s craft guidance similarly recommends using only a drop or two on the back of a finished clay air freshener rather than saturating the entire piece.
Alternative Method: Air-Dry Clay Aroma Stones
Air-dry clay is useful when you want handmade shapes without mixing powder. Roll the clay approximately one-quarter to one-half inch thick, cut shapes with cookie cutters, and press leaves, lace, stamps, or textured fabric into the surface.
Smooth rough edges with a slightly damp finger. Place the shapes on a nonporous surface and let them dry according to the package instructions, flipping them periodically so both sides dry evenly. Typical guidance ranges from 24 to 72 hours, but thick pieces and humid conditions can require longer.
Once dry, add a small amount of essential oil to an unsealed area. Test one stone first because air-dry clay formulas vary in porosity. Some absorb oil immediately, while smoother formulas release the fragrance more slowly.
Essential Oil Blends for Aroma Stones
Essential oil preferences are personal, so treat these combinations as starting points rather than sacred botanical law. Blend the oils in an empty bottle first, then apply a few drops of the mixture to your stone.
Fresh and Bright
- 3 drops sweet orange
- 2 drops lemon
- 1 drop cedarwood
Soft Floral
- 3 drops lavender
- 1 drop geranium
- 1 drop frankincense
Woodland Blend
- 3 drops cedarwood
- 2 drops fir needle
- 1 drop sweet orange
Clean Herbal Blend
- 2 drops rosemary
- 2 drops lavender
- 1 drop lemon
These blends are intended to create ambient fragrance, not to diagnose, prevent, or treat a medical condition. Federal health agencies note that research into many therapeutic aromatherapy claims remains limited, and the FDA treats products marketed with disease-treatment claims differently from products used simply for fragrance.
Important Essential Oil Safety Tips
Do Not Swallow Essential Oils
Essential oils are highly concentrated. Natural does not automatically mean edible or harmless. Poison Control warns that some oils can cause serious problems when swallowed, inhaled incorrectly, absorbed through the skin, or aspirated into the lungs. Store both the bottles and scented stones away from children.
Keep Aroma Stones Away From Pets
Place the stones where dogs, cats, and other animals cannot lick, chew, or knock them down. The ASPCA notes that concentrated essential oils may be dangerous to pets, with risk varying by oil, concentration, exposure route, and animal. Cats can be especially vulnerable. Consult a veterinarian before using essential oils around pets with respiratory, liver, or neurological conditions.
Use Less Around Sensitive People
Strong fragrances can cause headaches, eye or throat irritation, coughing, wheezing, or shortness of breath in sensitive individuals. People with asthma, allergies, migraines, COPD, or chemical sensitivities may react even when other household members enjoy the smell. Use fewer drops, ventilate the room, and remove the stone if discomfort occurs.
Do Not Place Oils Near Heat or Flames
Aroma stones are passive diffusers. They should not be placed on hot appliances, radiators, candle warmers, or near open flames. Johns Hopkins specifically cautions against using essential oils near heat sources.
Protect Finished Surfaces
Essential oil can stain wood, dissolve some coatings, or leave marks on plastic and painted furniture. Put a ceramic dish, glass coaster, cork pad, or felt backing beneath the stone.
Common Aroma Stone Problems and Fixes
The Stones Have Air Bubbles
Mix more slowly and tap the filled mold against the work surface. For highly detailed molds, brush a thin first layer of plaster into the design before filling the remaining cavity.
The Stones Break During Demolding
Allow more setting time, choose a flexible mold, and peel the mold away from the cast. Avoid designs with extremely thin stems, points, or petals until you become familiar with the material.
The Aroma Is Too Strong
Move the stone to a larger, better-ventilated area. Do not add more oil until the fragrance has faded. A stone stored temporarily in a lidded glass container will release less scent into the room.
The Aroma Disappears Quickly
Light citrus notes often seem to fade faster than heavier woody aromas. Refresh the stone with one or two drops, or pair a citrus oil with cedarwood or frankincense for a deeper blend. Room size, air movement, temperature, oil composition, and the stone’s porosity all affect the noticeable scent duration.
Oil Leaves a Dark Spot
This is normal on unpainted plaster and many clays. Apply oil to the back if appearance matters. Test colored or delicate stones before using them as gifts.
Creative Ways to Use DIY Aroma Stones
- Add ribbon and hang one inside a closet without letting it touch clothing.
- Place a small stone in a linen cabinet on a protective dish.
- Create seasonal sets shaped like leaves, snowflakes, shells, or flowers.
- Use alphabet molds to make personalized gifts.
- Pair several unscented stones with a bottle of essential oil in a gift box.
- Place one near the entryway to provide a subtle fragrance when guests arrive.
- Make a simple geometric stone for a desk or meditation corner.
Avoid putting oil-soaked stones directly inside tightly packed clothing, handbags, or vehicles where heat can build up. A ventilated container or small dish offers better protection.
Conclusion
Learning how to make DIY aroma stones with essential oils is an approachable way to combine home fragrance, casting, and decorative crafts. Plaster of Paris creates crisp details and reliable porosity, while air-dry clay offers more freedom for hand-shaped designs.
The essential steps are simple: follow the material manufacturer’s ratio, mix slowly, remove bubbles, let the stone cure fully, preserve an unsealed surface, and add only a few drops of oil at a time. The result is an attractive passive diffuser that can be refreshed repeatedly without electricity, heat, or a cloud-producing machine.
My Experience Making DIY Aroma Stones: What Actually Helped
The first lesson I learned was that making a large batch immediately is a wonderfully efficient way to produce twelve copies of the same mistake. A test batch of two or three stones is far more useful. It reveals whether the plaster mixture is too thick, whether the mold releases cleanly, and whether the chosen pigment behaves itself or turns the project into decorative oatmeal.
Cold water made the working process calmer and more predictable. I measured everything before opening the plaster bag because the mixing window was shorter than expected. When I paused halfway through to search for a missing craft stick, the plaster began thickening with the determination of concrete pursuing a career goal.
Slow mixing also mattered. In my early attempts, I stirred the mixture as if I were beating eggs. The stones looked smooth from above, but the decorative surfaces emerged covered in pinholes. On the next batch, I folded the powder and water together gently, poured in stages, and tapped the mold after every partial fill. The difference was obvious: sharper details, fewer bubbles, and much less muttering during demolding.
I also discovered that more decoration is not always better. A fully painted aroma stone looked lovely but absorbed oil reluctantly. An unpainted stone held fragrance much more effectively. The compromise that worked best was painting only raised details and leaving the entire back unfinished. A small cork circle attached to the bottom protected furniture while preserving plenty of exposed plaster.
Drying time was another lesson in resisting optimism. A stone can appear dry while still holding moisture inside. The pieces I scented after only one day developed uneven oil marks and a slightly chalky surface. Stones left for several days felt lighter, harder, and more consistent. Waiting was not exciting, but neither was remaking chipped flowers.
When adding essential oil, five drops seemed laughably small until I used ten drops of peppermint in a tiny office. The room smelled as though a candy cane had been promoted to management. Starting with three drops produced a much gentler result, and adding one drop later was easy.
Different shapes also behaved differently. Thin ornaments released scent quickly but were fragile. Thick medallions were stronger and held oil longer, although they needed more curing time. Medium-thickness shapes with rounded edges became my favorite because they survived handling and still absorbed oil readily.
Finally, I began labeling the backs with a pencil or tiny painted symbol. Without labels, two pale stones scented with lavender and eucalyptus look exactly alike until someone performs the extremely scientific procedure of sniffing both repeatedly. Keeping one scent family per stone prevents muddy combinations and makes refreshing them much easier.
Overall, the project became more successful when I stopped treating the aroma stones like miniature room deodorizers and began treating them as adjustable, close-range fragrance accessories. A few drops, a protected location, and occasional refreshing created a subtler and more pleasant result than saturating every stone in sight.
Note: DIY aroma stones are decorative passive fragrance products, not medical devices or treatments. Follow the plaster, clay, pigment, and essential-oil manufacturer’s instructions, and discontinue use if the fragrance causes irritation or breathing discomfort.