Fall decorating has a funny way of sneaking up on us. One minute you are enjoying iced coffee in flip-flops, and the next minute your front porch is begging for pumpkins, plaid ribbon, and something cheerful enough to make the mail carrier pause dramatically. That is where a Dollar Tree pumpkin wreath with sunflowers comes in. It is budget-friendly, beginner-friendly, and ridiculously charming in the best “I made this, please admire it” kind of way.
This DIY fall wreath combines the cozy shape of a pumpkin with the sunny glow of faux sunflowers. The result is warm, welcoming, and full of farmhouse charm without the boutique price tag. You can hang it on a front door, style it above a mantel, tuck it into a kitchen wall display, or use it as a Thanksgiving backdrop. Even better, most of the supplies can be found at Dollar Tree or similar dollar stores, which means your wallet gets to stay calm while your creativity runs wild.
In this guide, you will learn how to choose the right wreath form, arrange sunflowers naturally, add texture with ribbon and greenery, avoid common crafting mistakes, and customize the design for your home. No professional floral training required. If you can use a glue gun without gluing yourself to the table permanently, you are already qualified.
Why a Dollar Tree Pumpkin Wreath Is the Perfect Fall DIY
A pumpkin wreath is one of those seasonal crafts that looks more expensive than it actually is. The pumpkin shape instantly says “fall,” while sunflowers add brightness and warmth. Unlike spooky Halloween décor, this design can stay up from early September through Thanksgiving. That gives you more decorating mileage, which is the DIY equivalent of finding an extra fry at the bottom of the bag.
Dollar Tree is especially useful for this type of project because it often carries seasonal craft basics such as wire pumpkin wreath forms, faux flowers, ribbon, decorative mesh, burlap, mini pumpkins, berry picks, floral wire, and hanging signs. Product availability can vary by store and season, but the general idea remains the same: start with affordable materials, then layer them thoughtfully so the finished wreath looks full, balanced, and intentional.
The beauty of a sunflower pumpkin wreath is flexibility. You can make it rustic with burlap and raffia, elegant with cream sunflowers and muted pumpkins, bold with orange mesh and buffalo check ribbon, or modern with neutral tones and eucalyptus. The pumpkin frame provides structure, while the sunflowers do the heavy visual lifting. They are basically the extroverts of the floral aisle.
Supplies You Will Need
Before you begin, gather everything in one place. This prevents the classic crafter’s workout: standing up every two minutes to find scissors, wire cutters, glue sticks, or the one ribbon roll that somehow vanished into another dimension.
Basic Materials
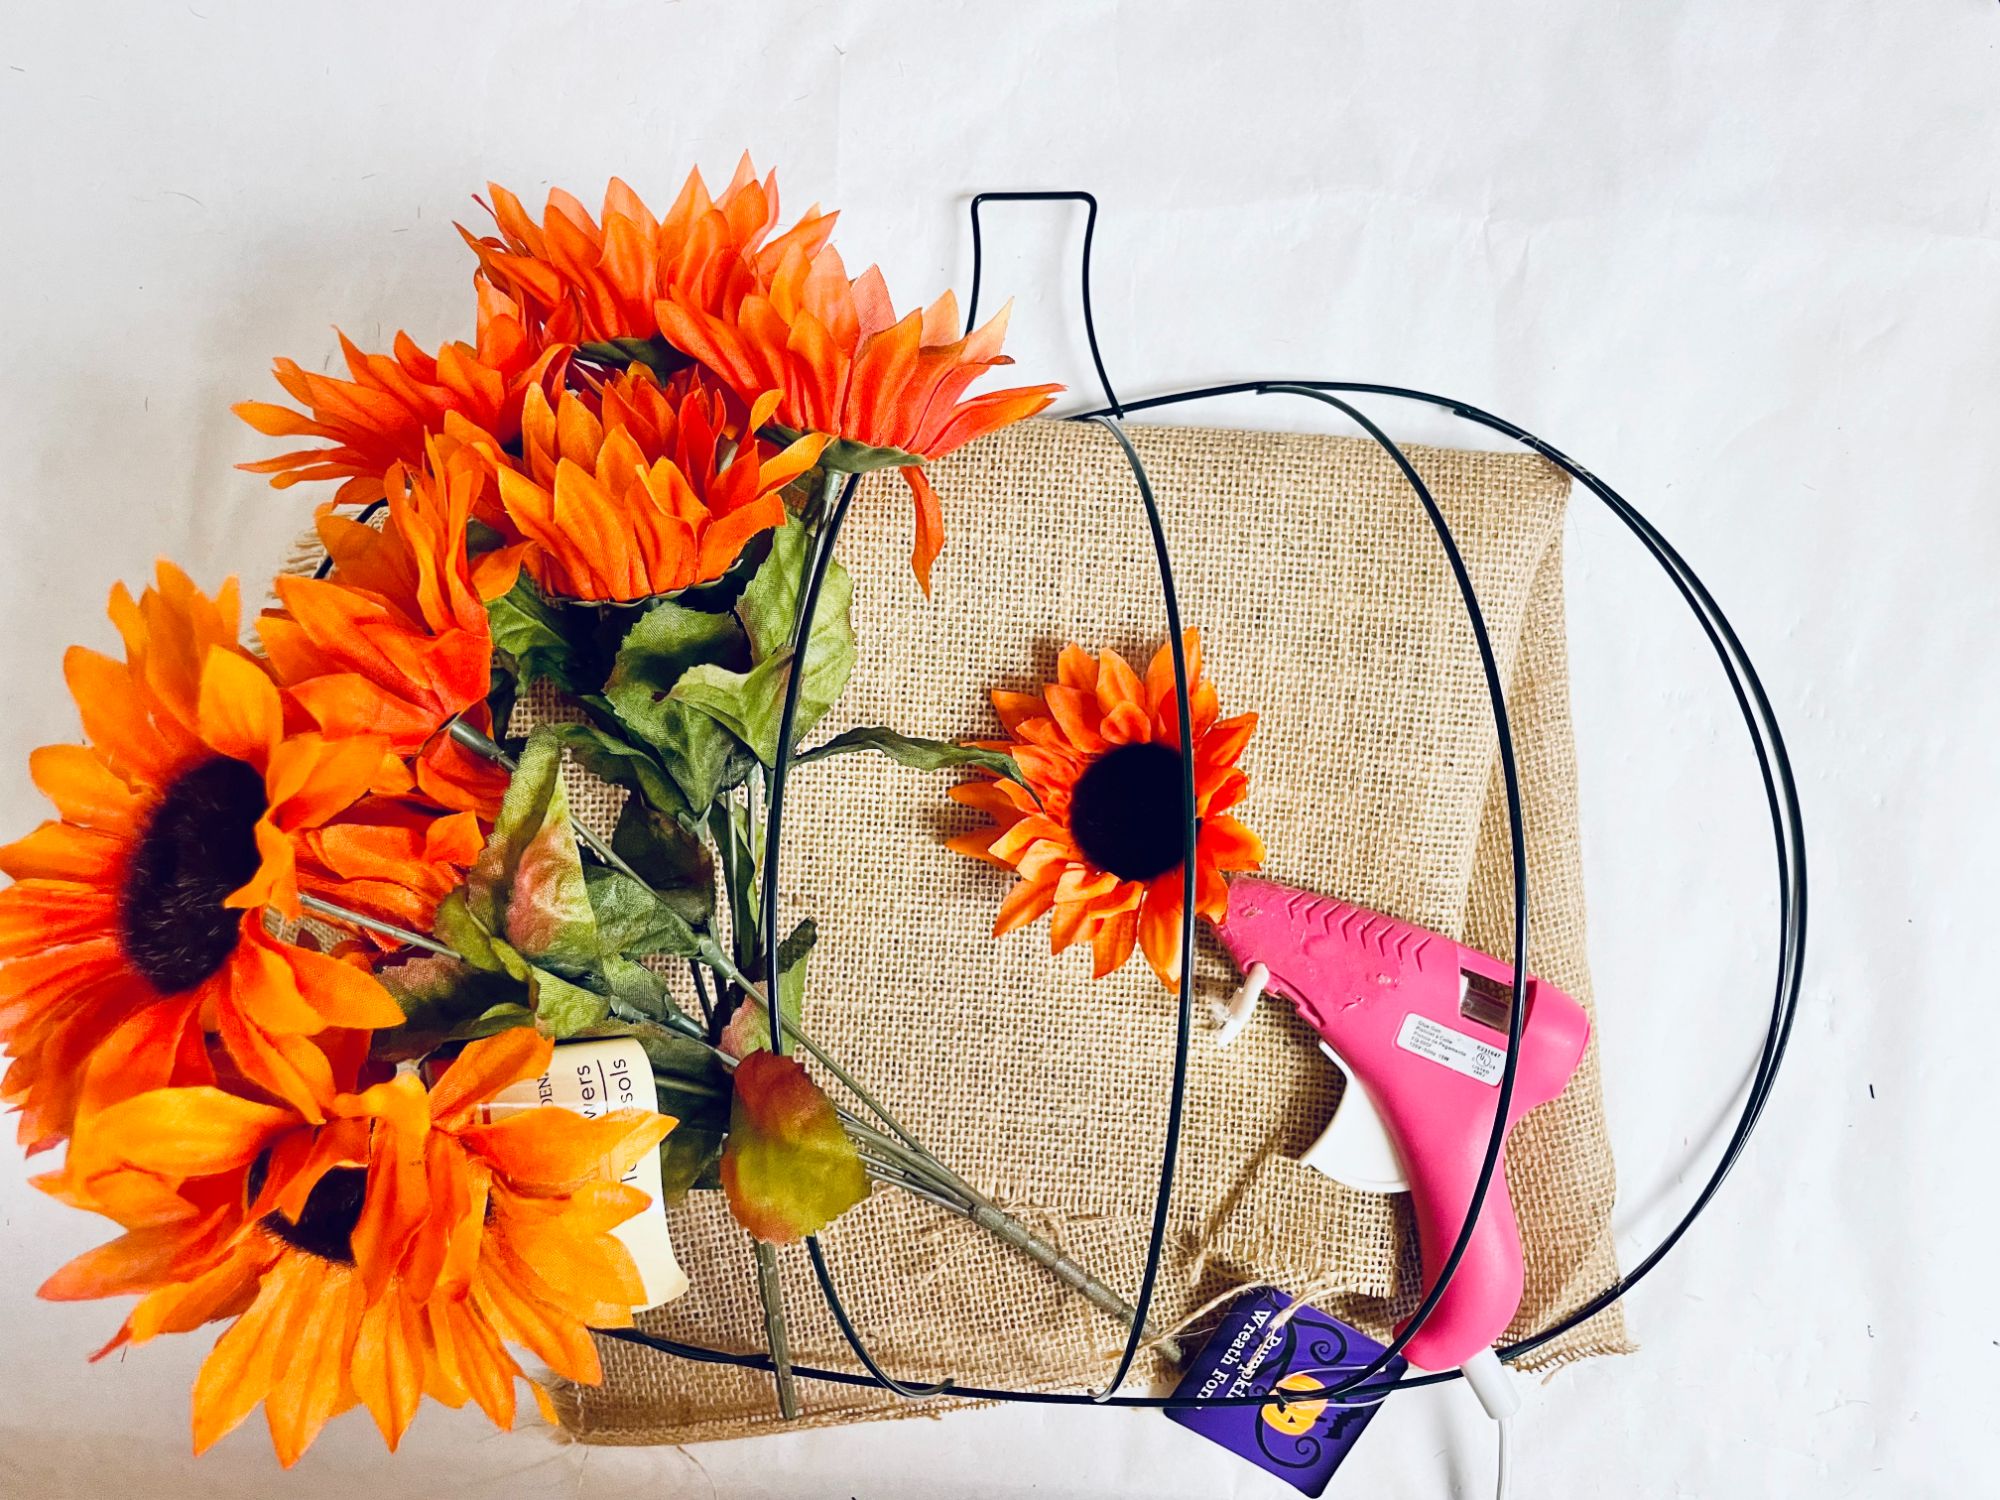
- 1 Dollar Tree pumpkin wire wreath form
- 4 to 6 bunches of faux sunflowers
- 2 to 3 bunches of fall leaves or greenery
- Decorative mesh, burlap ribbon, raffia, chunky yarn, or jute rope
- Floral wire or pipe cleaners
- Hot glue gun and glue sticks
- Wire cutters
- Scissors
- Optional mini pumpkins, berries, acorns, wheat stems, or a small fall sign
- Ribbon for a bow, such as buffalo check, plaid, burlap, or satin
If you want a fuller wreath, buy more flowers than you think you need. Faux florals can look sparse once they are separated from the stem, especially on a wire form. A good rule is to choose one main flower, one filler flower or berry, one greenery texture, and one ribbon style. That keeps the design cohesive instead of looking like the craft aisle had a small explosion.
Choosing the Right Color Palette
The most classic version uses orange sunflowers, yellow sunflowers, deep green leaves, brown burlap, and a natural jute accent. This creates a traditional harvest look that pairs beautifully with pumpkins, hay bales, mums, and lanterns. It is cheerful, warm, and very “someone here owns a cinnamon broom.”
For a softer farmhouse style, try cream sunflowers, beige burlap, white mini pumpkins, eucalyptus, and black-and-white buffalo check ribbon. This palette feels modern and neutral while still clearly belonging to fall. If your front door is dark, cream and yellow florals will pop beautifully. If your door is white or light gray, deeper oranges, burgundy leaves, and brown ribbon can create stronger contrast.
You can also choose a dramatic autumn palette with burgundy mums, golden sunflowers, copper mesh, and dark berries. This style works well for larger doors, covered porches, and homes with brick or wood siding. The key is to repeat each color at least two or three times around the wreath. Repetition makes the design feel polished, not accidental.
Step-by-Step: How to Make a Dollar Tree Pumpkin Wreath with Sunflowers
Step 1: Prepare the Pumpkin Wreath Form
Start by laying your pumpkin wire wreath form flat on your work surface. Decide whether you want the wire frame to show or be completely covered. If you like a rustic, airy design, you can leave some of the frame visible. If you want a fuller, more luxurious look, wrap the frame with burlap, mesh, chunky yarn, jute rope, or strips of fabric.
To wrap the frame, secure one end of your material with floral wire or hot glue. Then weave or wrap it around the pumpkin form, following the curves of the wires. Do not worry about perfection. Fall décor is forgiving. A slightly uneven wrap can actually add charm, which is wonderful news for anyone whose crafting style is “confident chaos.”
Step 2: Create a Base Layer
The base layer gives the wreath fullness and hides empty spaces. Use fall leaves, greenery, burlap mesh, or fabric strips to build a background. Attach these pieces with floral wire first, then add hot glue where extra hold is needed. Wire is helpful because it allows small adjustments before everything becomes permanently committed.
Place greenery around the outer edges and inner curves of the pumpkin form. Angle some leaves outward to create width and movement. Avoid making the leaves all face the same direction. Nature does not line up perfectly, and neither should your wreath. A little variation makes faux materials look more natural.
Step 3: Cut and Arrange the Sunflowers
Use wire cutters to separate the sunflower heads from the main stems, leaving about two to three inches of stem attached. This gives you enough length to tuck the flowers into the frame securely. Before gluing anything, place the sunflowers on the wreath and test the arrangement.
A strong design usually has one focal cluster. For example, place three large sunflowers on the lower right side of the pumpkin, then add smaller blooms across the top left for balance. Another option is to fill the entire pumpkin shape with sunflowers for a bold, flower-packed look. If you want the wreath to still read as a pumpkin, leave the stem area visible or define it with jute, burlap, or brown ribbon.
Once you like the layout, attach each sunflower with hot glue and floral wire. Push the short stems through the wire frame where possible, then secure from the back. This makes the wreath sturdier, especially if it will hang on a door that opens and closes often.
Step 4: Add Pumpkins, Berries, and Texture
Now comes the fun part: the little details. Mini foam pumpkins, berry picks, wheat stems, pinecones, faux acorns, and raffia curls can make the wreath feel layered and expensive. The trick is restraint. Add enough detail to create interest, but not so much that the sunflowers disappear under a mountain of tiny pumpkins.
Place larger accents near the main sunflower cluster. Smaller accents can trail outward. For example, tuck a mini white pumpkin near the bottom, add a few berry stems near the top, and weave wheat pieces along one side. This creates movement and guides the eye around the wreath.
Step 5: Make and Attach the Bow
A bow can completely change the personality of your wreath. A burlap bow feels rustic. A buffalo check bow feels farmhouse. A satin ribbon bow feels polished. A plaid bow says, “I own at least one cozy blanket and I am not afraid to use it.”
To make a simple bow, create two or three loops on each side, pinch the center, and secure it with floral wire. Cut the ribbon tails at an angle or in a V-shape for a finished look. Attach the bow near the pumpkin stem, on the lower corner, or beside the main floral cluster. If your wreath already has a lot of flowers, keep the bow medium-sized. If your wreath is more minimal, go bigger.
Step 6: Finish the Pumpkin Stem
The stem is a small detail, but it helps sell the pumpkin shape. Wrap the stem section with jute rope, brown yarn, burlap ribbon, or raffia. You can also paint it brown or cover it with a small piece of faux wood-look ribbon. Add a curled piece of floral wire or grapevine-like twine to mimic a pumpkin vine.
This little finishing touch makes the wreath look more intentional. Without it, the shape may read as “oval floral situation.” With it, people instantly see the pumpkin. Tiny detail, big payoff.
Design Variations to Try
Farmhouse Sunflower Pumpkin Wreath
Use cream sunflowers, eucalyptus, burlap ribbon, and black-and-white buffalo check. Add one or two white mini pumpkins for a clean farmhouse look. This version works beautifully with neutral home décor and modern front porches.
Classic Harvest Pumpkin Wreath
Choose orange and yellow sunflowers, maple leaves, berries, raffia, and plaid ribbon. This is the most traditional fall style and pairs well with pumpkins, mums, cornstalks, and lanterns.
Elegant Neutral Pumpkin Wreath
Wrap the frame in beige yarn or jute rope, then add cream florals, muted greenery, champagne ribbon, and small gold accents. This version feels more boutique and can transition from September into Thanksgiving without looking too theme-heavy.
Halloween-to-Thanksgiving Wreath
Make a flexible base with sunflowers and greenery, then use removable accents. Clip on a tiny Halloween sign in October, then replace it with pumpkins, wheat, or a thankful sign in November. Your wreath gets a costume change, and you get extra use from the same project.
Common Mistakes and How to Avoid Them
The first common mistake is using too few flowers. A wire wreath form needs volume, especially if it will be photographed or seen from the street. If your wreath looks thin, add more greenery behind the flowers before adding extra blooms. Greenery is usually cheaper and helps fill space quickly.
The second mistake is gluing everything immediately. Always dry-fit your arrangement first. Take a photo with your phone before attaching pieces. Photos make balance issues easier to see. If one side looks heavy, shift a few flowers or add a smaller accent on the opposite side.
The third mistake is ignoring the back of the wreath. If you have poking wires, loose stems, or glue strings hanging behind the form, trim and secure them. This matters because rough edges can scratch doors or make the wreath hang unevenly.
The fourth mistake is using indoor-only materials on an exposed front door. If your door gets rain, wind, or direct sun, choose sturdier faux florals, secure everything with wire as well as glue, and consider using a covered porch location. Hot glue can soften in extreme heat, so extra wire support is your best friend.
How to Hang and Style Your Sunflower Pumpkin Wreath
For a front door, use a wreath hanger, ribbon loop, removable hook, or clear fishing line. If you use ribbon, choose a color that complements the wreath. A long ribbon loop can make the wreath look taller and more elegant, while a metal hanger is quick and practical.
To style the wreath on a porch, repeat its colors nearby. Add yellow mums, orange pumpkins, a plaid doormat, or a lantern with warm lights. Repeating colors creates a pulled-together look without requiring a huge decorating budget. You do not need a magazine-perfect porch. You just need a few pieces that look like they are speaking the same seasonal language.
Indoors, hang the wreath above a mantel, on a pantry door, over a mirror, or as part of a fall gallery wall. It can also sit flat as a centerpiece with a flameless candle in the middle, especially if your wreath is not too bulky. Just avoid real flames near faux florals, ribbon, or mesh. Fall ambiance is lovely; accidental fire drama is not.
Budget Tips for a Fuller Look
To make your wreath look more expensive, mix textures. Sunflowers alone can look flat, but sunflowers plus leaves, berries, burlap, jute, and ribbon create depth. You can also use leftover fabric strips from old shirts, scarves, or table runners. Plaid fabric works especially well for fall.
Another smart trick is to paint or customize cheap accents. Foam pumpkins can be painted cream, copper, sage green, or matte black. Dollar-store leaves can be lightly brushed with gold or bronze craft paint. Even basic ribbon looks nicer when layered with a thinner ribbon on top.
If you are shopping on a tight budget, focus your spending on the most visible pieces: the sunflowers and ribbon. These two elements define the wreath. Filler leaves and small accents can be simple because they support the design rather than steal the show.
Care and Storage Tips
When the season ends, remove dust with a soft cloth or a hair dryer on the cool, low setting. Store the wreath in a plastic wreath container, a large storage bag, or a box with tissue paper around the flowers. Avoid crushing the sunflower heads, because flattened petals can make the wreath look tired next year.
If a flower comes loose, reattach it with hot glue and floral wire. If ribbon tails curl or wrinkle, smooth them gently with your hands. Faux wreaths can last several seasons when stored properly, which makes this project even more budget-friendly over time.
Personal Experience: What I Learned Making a Dollar Tree Pumpkin Wreath with Sunflowers
The first time I made a Dollar Tree pumpkin wreath with sunflowers, I had a very confident plan. This plan lasted approximately seven minutes. Then I realized the sunflowers were larger than expected, the ribbon had opinions of its own, and the glue strings were multiplying like tiny plastic spiderwebs. Still, that is part of the fun. DIY wreaths are not about perfection; they are about adjusting as you go and pretending every design decision was intentional.
One of the biggest lessons is to buy extra floral stems. In the store, one bunch of sunflowers looks generous. On a wreath form, it suddenly looks like three flowers trying to cover a football field. Having extra stems lets you fill bare spots, create symmetry, and avoid that awkward moment when one side of the wreath looks ready for a harvest festival and the other side looks like it missed the meeting.
I also learned that ribbon placement matters more than people think. A bow can either support the flowers or fight them for attention. When I placed a large bow directly in the center, it swallowed the pumpkin shape. Moving it slightly to one side made the whole wreath look more natural. The best arrangement often comes from shifting pieces around before gluing. Taking a quick phone photo helped me spot problems I did not notice while leaning over the craft table.
Another useful experience is mixing attachment methods. Hot glue is fast, but floral wire adds strength. For wreaths that hang on active front doors, wire is worth the extra few minutes. Doors move, wind happens, and sometimes a sunflower decides it wants independence. Wire keeps everything in place and gives the wreath a cleaner finish from the front.
Texture made the biggest difference in the final look. The wreath felt plain when it had only sunflowers and leaves. Once I added jute around the stem, a few berry picks, and a small raffia curl, it looked much more finished. Those tiny details made the design feel layered instead of flat. They also helped hide the wire frame in spots where the flowers did not fully cover it.
Color balance was another surprise. Bright yellow sunflowers are beautiful, but too many can overwhelm the pumpkin shape. Mixing yellow blooms with orange leaves, cream pumpkins, and brown ribbon created a warmer, more balanced design. If your home exterior is neutral, brighter flowers can work well. If your porch already has lots of color, a softer wreath may look more elegant.
The most satisfying part was how quickly the wreath changed the feeling of the entryway. A plain door became welcoming, cheerful, and seasonal without needing a full porch makeover. It proved that fall decorating does not have to be expensive or complicated. Sometimes one handmade piece is enough to make the house feel cozy.
My best advice is to treat the project like play, not a test. Lay everything out, experiment with angles, remove pieces, add pieces, and trust your eye. If something looks odd, move it. If a blank spot appears, tuck in a leaf. If the bow refuses to behave, remind it who owns the glue gun. By the end, you will have a sunflower pumpkin wreath that feels personal, affordable, and proudly handmade.
Conclusion
A Dollar Tree pumpkin wreath with sunflowers is one of the easiest ways to bring fall charm to your home without spending a fortune. With a pumpkin wire form, faux sunflowers, greenery, ribbon, and a few textured accents, you can create a warm and welcoming wreath that looks custom-made. The project is flexible enough for farmhouse, rustic, elegant, neutral, or classic harvest décor, and it can stay on display from early fall through Thanksgiving.
The secret is layering. Start with a strong base, arrange your sunflowers before gluing, add texture with leaves and ribbon, and finish the pumpkin stem so the shape is clear. Whether you are decorating a front door, mantel, kitchen wall, or porch, this DIY wreath delivers big seasonal style on a small budget. And yes, when guests ask where you bought it, you are fully allowed to smile mysteriously before saying, “Oh, I made it.”