

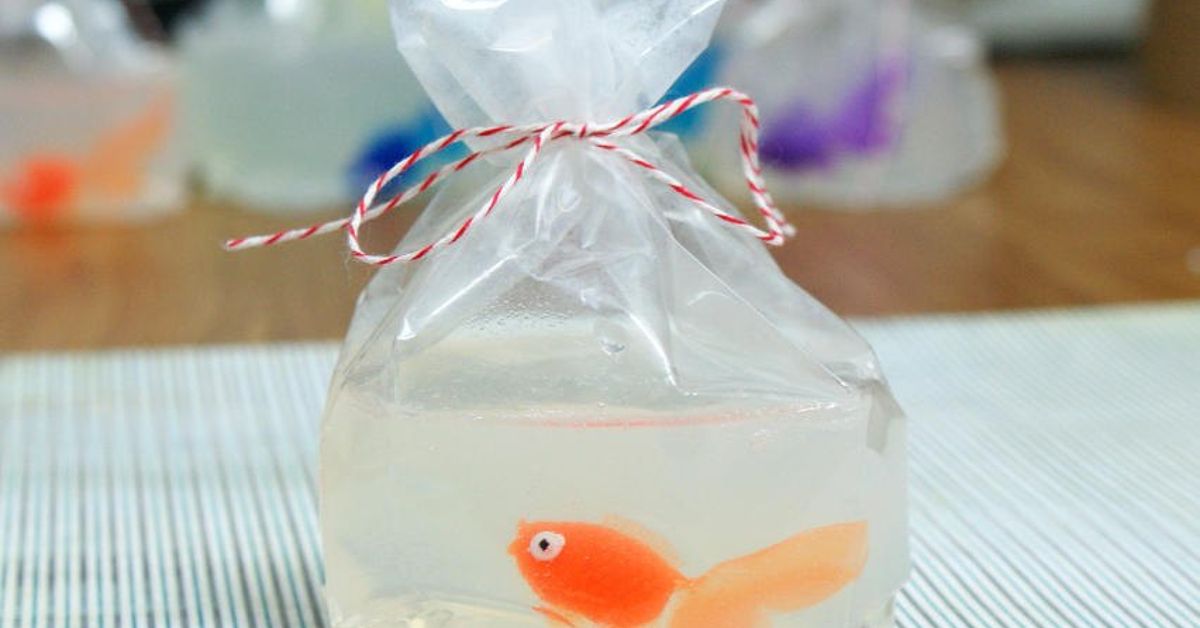
Note: This novelty soap contains a small toy that becomes loose as the bar is used. Keep it away from children under 3, supervise older children, and remove the toy immediately once exposed. Use only skin-safe soap colorants and fragrance oils intended for wash-off products.
There are few DIY projects more delightfully ridiculous than a tiny plastic goldfish appearing to swim inside a bag of soap. It looks like a carnival prize, a science experiment, and a bathroom conversation starter all at once. The best part? No actual fish are involved, no aquarium cleaning is required, and nobody has to explain why the goldfish is floating belly-up after three days.
DIY goldfish in a bag soaps are made with clear melt-and-pour soap base, a small plastic fish, a heat-safe clear bag, and a little patience. The finished bar resembles a miniature bag of water, complete with a fish suspended inside. It is a playful handmade gift for birthdays, pool parties, summer celebrations, ocean-themed events, classroom favors, or anyone who has ever looked at ordinary soap and thought, “This needs more fish.”
Melt-and-pour soap is especially beginner-friendly because the base has already gone through the soapmaking process before you buy it. You melt it, customize it, pour it, and let it harden rather than working directly with lye.
Why DIY Goldfish in a Bag Soaps Are So Popular
These soaps work because they combine nostalgia, novelty, and usefulness. A tiny fish in clear soap instantly reminds people of old-fashioned fairground goldfish prizes, except this version does not require fish food, tank filters, or an emotional speech about responsibility. The soap looks surprisingly realistic when the fish is placed against the front of the bag and the clear base catches the light.
The project also gives beginners a chance to practice important melt-and-pour soapmaking skills. You learn how to melt soap gently, control temperature, avoid bubbles, add color without turning the “water” murky, and work quickly before the soap starts to thicken. Those are useful skills whether your next project is a simple glycerin bar, a layered soap, or a wildly ambitious soap sculpture shaped like a taco.
Clear melt-and-pour soap base is the star of the show. A high-clarity or suspension-style base gives the fish the best visibility and can help it stay positioned instead of immediately sinking like it has accepted its fate. Clear bases are designed to showcase embeds, layers, and decorative details.
What You Need for Goldfish in a Bag Soap
Essential Ingredients
- Clear melt-and-pour soap base or clear suspension soap base
- Small plastic goldfish or colorful toy fish
- Skin-safe fragrance oil, optional
- Soap-safe blue liquid colorant, optional
- Cosmetic-grade iridescent glitter, optional
Helpful Tools and Supplies
- Heat-safe measuring cup or microwave-safe pouring pitcher
- Digital kitchen scale
- Microwave or double boiler
- Infrared or candy thermometer
- Clear cellophane or heat-resistant plastic bags
- Small funnel
- Binder clips, clothespins, or sturdy clips
- Wooden skewer, chopstick, or pipette for positioning the fish
- Twist ties, ribbon, baker’s twine, or raffia
- A cup, mug, or narrow bowl to hold each bag upright while pouring
Choose bags carefully. Not every clear bag is designed to tolerate warm melted soap. Test one bag first with a small amount of soap at the intended pouring temperature. Several fish-in-a-bag tutorials recommend pouring at roughly 135°F or lower to reduce the risk of softening or damaging the bag.
Safety First: A Cute Craft Still Needs Common Sense
DIY goldfish soaps are novelty items, but they are still personal-care products. Use a fresh, clean, smooth plastic fish with no sharp edges, loose paint, or strong chemical smell. Avoid using mystery toys from the bottom of a toy chest, especially one that has spent the last decade sharing space with glitter glue, cracker crumbs, and a suspiciously sticky crayon.
Only use colorants and fragrance oils labeled for cosmetic or soap use. Food coloring, craft paint, random glitter, and candle-only fragrance oils do not automatically belong in a body product. In the United States, color additives used in cosmetics must be approved for their intended use, and homemade cosmetic products still need to be safe and properly labeled when sold or distributed.
The embedded fish presents a choking hazard once the soap gets smaller. The U.S. Consumer Product Safety Commission warns that products with small parts can create choking, aspiration, or ingestion hazards for children under 3. Treat the fish as a removable small part, not as a bath toy for toddlers.
How to Make DIY Goldfish in a Bag Soaps
Step 1: Prepare Your Workspace
Set up everything before melting the soap. Open your clear bags, place each one inside a mug or tall cup, set out the fish, and have clips, ribbon, colorant, fragrance, and tools within arm’s reach. Melt-and-pour soap has a short working window, so the time to search for scissors is not when your soap is cooling into a rubbery blob.
Keep paper towels nearby and work on a protected surface. If you are making several soaps, start with one. A single successful fish soap is charming. Four bags of leaking blue soap across the kitchen counter is a low-budget remake of a disaster movie.
Step 2: Cut and Melt the Clear Soap Base
Cut the clear melt-and-pour soap base into small, even cubes. Smaller pieces melt more evenly and reduce the temptation to blast the microwave until the soap resembles a tiny volcanic eruption. Heat the soap in short bursts, stirring gently between each interval.
Do not overheat the base. Many melt-and-pour guides recommend keeping soap below 160°F because overheating can create foam, bubbles, and an unpleasant rubbery texture. For this project, cooling the soap before it enters the bag is just as important as melting it evenly.
Step 3: Add Color and Fragrance
Add only a tiny amount of blue soap colorant. You want the illusion of clean aquarium water, not a deep-sea storm cloud. Begin with one or two drops, stir well, and add more only if necessary. A pale aqua tint usually looks more realistic than dark blue.
Add fragrance sparingly and follow the usage rate recommended by the supplier for your specific fragrance oil and soap base. Fresh options such as cucumber, aloe, ocean breeze, citrus, green apple, or light floral scents can work well. Avoid dark or vanilla-heavy fragrance oils if clarity matters, since some scents can discolor clear soap over time.
For a little sparkle, stir in a pinch of cosmetic-grade iridescent glitter. Keep it subtle. The fish should look like it is swimming in water, not attending a Las Vegas nightclub under the sea.
Step 4: Let the Soap Cool Before Pouring
Allow the melted soap to cool until it is warm and fluid but no longer extremely hot. A useful target is below 135°F for the bag-pouring stage. This temperature helps protect the bag and gives the soap enough body to support the fish instead of letting it instantly sink to the bottom.
As the soap cools, a thin skin may begin forming on top. Stir gently to reincorporate it. Do not whip the mixture; aggressive stirring creates air bubbles, and while a few bubbles are charming, a frothy soap bag can make your goldfish look as though it is trapped in a washing machine.
Step 5: Fill the Bag Slowly
Place a funnel in the center of the bag and pour the soap slowly. Aim for the middle so soap does not streak the inside walls of the bag. Fill the bag about two-thirds to three-quarters full, leaving enough empty space at the top to twist and seal it.
Use the cup or mug as a support. It keeps the bag upright, catches small drips, and gives you at least the illusion of being a highly organized soap professional.
Step 6: Add and Position the Fish
Drop one fish into the warm soap. If it immediately sinks, wait a few minutes for the soap to thicken slightly, then use a skewer, chopstick, or pipette to guide the fish toward the front of the bag. Hold it there briefly until the soap begins to support it.
Another reliable method is to clip the bag shut, lay it on one side for about 10 minutes so the fish settles against that face, then flip it once the fish no longer slides. This creates a rounded front and a flatter back, making the finished soap look more like a tiny bag of water.
Step 7: Seal, Cool, and Finish
Twist the top of the bag and secure it with a clip while the soap sets. Let the soap harden completely at room temperature for several hours or overnight. Once firm, trim excess plastic from the top if needed and tie the bag with ribbon, baker’s twine, or a twist tie.
Do not remove the bag until the soap is ready to use or gift. The bag is part of the illusion and also helps protect the clear surface from moisture and fingerprints.
Common Problems and Easy Fixes
The Fish Sank to the Bottom
Your soap was probably too hot or too thin. Let it cool longer before adding the fish, or choose a clear suspension base. Work with one bag at a time so you can focus on timing rather than trying to direct an entire school of plastic fish.
The Bag Warped or Leaked
The soap may have been poured too hot, or the bag material may not be suitable. Always test bags first. Use a stronger clear cellophane or polypropylene-style bag rather than a thin candy bag not intended for warm contents.
The Soap Looks Cloudy
Cloudiness can come from too much colorant, unsuitable fragrance, excess glitter, vigorous stirring, or tiny air bubbles. Use a very light hand with additives and pour slowly. Ultra-clear soap base gives the best glassy effect.
The Fish Is Crooked
Congratulations: you have made a fish with personality. You can try gently repositioning it with a skewer while the soap is still soft. But do not obsess over perfect symmetry. A slightly tilted fish often looks more natural, as though it has just noticed someone approaching the aquarium with a net.
The Soap Is Sweating
Clear melt-and-pour soap often contains glycerin, which can attract moisture from humid air. Keep finished soaps wrapped, store them in a cool and dry place, and use an airtight container for longer storage.
Creative Variations for Goldfish in a Bag Soaps
Once you master the classic goldfish version, the design can swim in many directions. Try neon fish with clear turquoise soap for a retro arcade theme. Use tiny shells and seaweed-colored soap scraps for an ocean bag. Make pastel fish with pale pink or lavender “water” for a whimsical birthday favor. Add one tiny fish for a minimalist look or two fish for a cheerful pair.
For party favors, attach a tag that says “Thanks for making a splash!” For a summer birthday, use a label reading “A little something fishy for your bathroom.” For teacher gifts, try “You’re o-fish-ally amazing.” Are these puns a little corny? Absolutely. Are they also legally required by the laws of novelty soap? Practically.
If you plan to sell these soaps, use clear, accurate labeling. Include the product name, net weight, ingredient information for the soap base and additives, appropriate warnings, and contact information required for your sales channel. Avoid medical or therapeutic claims such as “heals eczema” or “treats dry skin,” because a cute fish soap should not accidentally wander into pharmaceutical territory.
Conclusion: A Tiny Aquarium You Can Actually Use
DIY goldfish in a bag soaps prove that handmade soap does not need to be serious to be useful. With a clear soap base, a carefully chosen bag, gentle heat, and a little timing, you can create a memorable novelty bar that makes people smile before they ever turn on the faucet.
The secret is not expensive equipment or professional soapmaker wizardry. It is temperature control, simple ingredients, safe materials, and the willingness to accept that your first fish may occasionally look like it has had a very long day. Once you get the timing right, these whimsical soaps make excellent handmade gifts, party favors, craft-fair items, and bathroom décor that is far more entertaining than another beige bar of soap.
The Hands-On Experience of Making Goldfish in a Bag Soaps
Making DIY goldfish in a bag soaps is one of those crafts that seems almost too easy at first. You see the finished result and think, “That is just clear soap and a tiny fish. How hard can it be?” Then you make your first attempt, watch the fish sink to the bottom, notice the bag leaning sideways, and realize you have entered a highly specialized world where temperature, timing, gravity, and one very judgmental plastic goldfish are all working against you.
The first useful lesson is that melt-and-pour soap rewards preparation. When everything is measured, opened, and placed within reach, the project feels calm and creative. When the fish are still in a sealed package, the ribbon is somewhere in a desk drawer, and the bag refuses to stand upright, the project becomes a strange form of kitchen-based improvisational theater. A cup or narrow bowl can make a huge difference because it gives the bag structure while you pour and position the fish.
The second lesson is that “clear” is not always as simple as it sounds. Adding too much blue colorant can turn the soap into a dark block that hides the fish. Adding too much glitter can make the finished bar look more like a snow globe than an aquarium. The prettiest soaps usually use very little color, a tiny touch of sparkle, and a fish placed where it can be seen immediately. The design works best when the viewer notices the fish before noticing the effort.
There is also a surprisingly satisfying moment when the fish finally stays in place. At first, it may bob, tilt, or sink like it has lost all faith in your soapmaking skills. But after the base cools slightly and thickens, the fish becomes suspended near the front of the bag. Suddenly, the soap starts to look intentional. It is the kind of tiny craft victory that makes you want to make six more, even though you promised yourself this was only a one-bag experiment.
These soaps are also excellent projects for creative gatherings. Adults can handle the melting and pouring while older children help choose fish colors, ribbon, labels, and scent ideas. The project encourages imagination without requiring complicated molds or expensive tools. A bright orange fish, pale aqua soap, and a simple blue ribbon already look polished enough to give away.
For party favors, the experience becomes even more fun because every bag can be slightly different. One soap may have a bright orange fish, another may include a blue fish, and another may contain a small swirl of glitter that catches the light. Instead of seeing small variations as mistakes, treat them as proof that the soaps were handmade. Perfect factory uniformity is impressive, but it does not have nearly as much personality.
The final experience happens when someone receives one. Most people do a small double take. They see a fish in a bag, then realize the “water” is actually soap, then immediately want to know how it was made. That reaction is the real magic of DIY goldfish in a bag soaps. They are practical enough to use, funny enough to display, and strange enough to become memorable. In a world full of predictable gifts, a tiny fish trapped in a bar of soap is wonderfully hard to forget.