If your front door has been looking a little emotionally unavailable lately, this DIY Valentine’s Day scarf wreath is here to fix that. It is sweet, soft, budget-friendly, and surprisingly polished for something made almost entirely from dollar store items. No expensive floral stems. No complicated wire gymnastics. No crafting degree from the University of Pinterest required.
This project turns a simple wreath form, a few lightweight scarves, ribbon, faux flowers, and small Valentine’s Day accents into a cheerful door decoration that looks boutique without charging boutique prices. The best part? You can make it in an afternoon, even if your crafting style is best described as “I own scissors and believe in myself.”
A scarf wreath is especially beginner-friendly because the fabric does most of the decorative work. Instead of covering a wreath form with dozens of tiny pieces, you wrap or tie soft scarves around the frame, then add embellishments where they make sense. The result is cozy, romantic, and easy to customize for farmhouse, glam, candy-heart cute, minimalist, or full “Cupid moved in and brought glitter” style.
Why Make a DIY Valentine’s Day Scarf Wreath?
Valentine’s Day décor can sometimes feel like it has only two settings: barely there or aggressively covered in glitter. A scarf wreath lands right in the happy middle. It is festive without looking like your door got into a fight with a craft aisle, and it can be made with inexpensive supplies you can find at dollar stores, discount stores, or from your own stash.
The biggest advantage is cost. A ready-made Valentine’s Day wreath can easily cost much more than the materials needed for this project. By using dollar store items, you can create a custom wreath for a fraction of the price while choosing the exact colors, textures, and decorations that match your home.
Another benefit is flexibility. Scarves come in patterns, solids, plaids, hearts, stripes, neutrals, pinks, reds, whites, and sometimes delightfully questionable seasonal prints that somehow become adorable once wrapped around a wreath form. You can make the design playful for a family entryway, elegant for a front porch, or soft and romantic for a bedroom door or mantel.
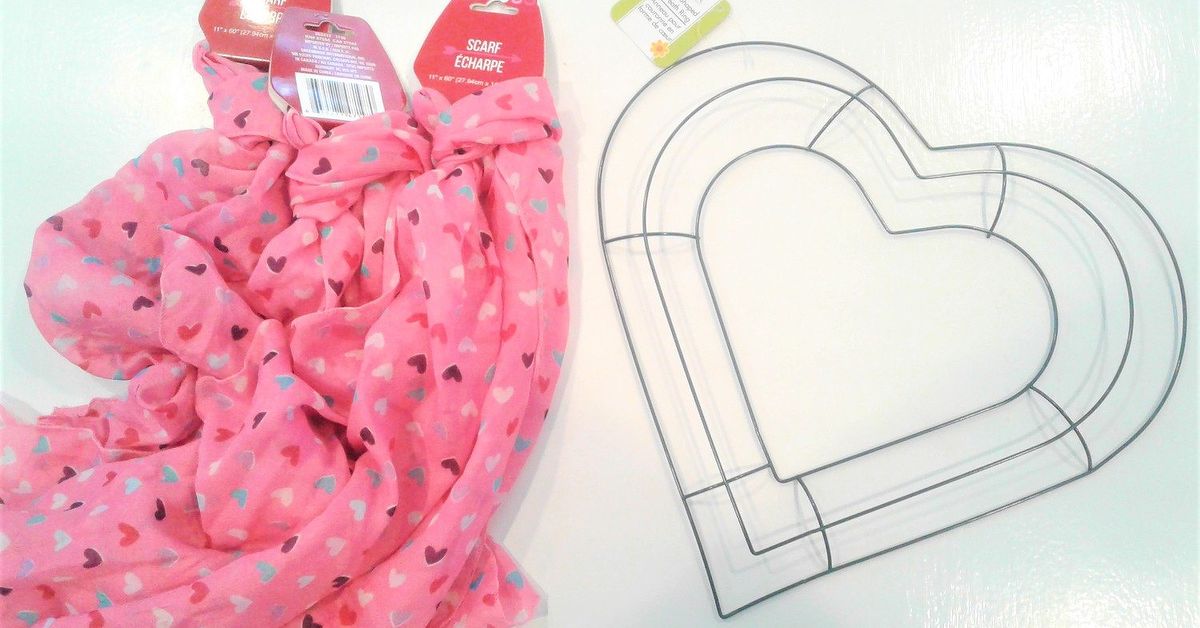
Dollar Store Supplies You’ll Need
Before you begin, take a quick inventory. Many dollar stores carry seasonal items early, so Valentine’s Day supplies may appear soon after winter holiday items are cleared. If you see heart-shaped wreath frames, pink ribbon, or cute scarves, grab them before they disappear into the mysterious land where all good seasonal craft supplies go.
Basic Supplies
- 1 wire wreath form, foam wreath form, or heart-shaped wreath frame
- 3 to 5 lightweight scarves, depending on wreath size and fullness
- Valentine’s Day ribbon, burlap ribbon, or satin ribbon
- Faux flowers, small roses, greenery, or heart picks
- Foam hearts, wooden hearts, felt hearts, or mini signs
- Hot glue gun and glue sticks
- Scissors
- Floral wire or pipe cleaners
- Twine, ribbon, or a wreath hanger for hanging
For a no-glue version, you can use floral wire, twist ties, chenille stems, or small zip ties. Hot glue gives a clean finish, but tying items in place makes it easier to reuse the wreath form later.
Optional Add-Ons
- Battery-operated fairy lights
- Wooden “Love” or “XOXO” sign
- Pom-poms or yarn hearts
- Mini clothespins
- Lace trim
- Conversation-heart-style foam stickers
- Small faux pearl strands
The goal is not to use everything in the Valentine’s aisle. The goal is to create a wreath that looks intentional. A good rule is to choose one main fabric, one accent color, and one focal decoration. Your wreath will thank you by not looking like a craft drawer sneezed.
Choosing the Right Scarves for Your Wreath
The scarf is the star of this DIY Valentine’s Day wreath, so choose wisely. Lightweight fashion scarves work beautifully because they wrap easily and create soft folds. Fleece scarves can work too, especially if you want a cozy winter look, but they may create more bulk. Infinity scarves are also useful because they can be cut and wrapped, or gathered around a frame for a plush effect.
For a classic Valentine’s Day look, choose scarves in red, blush pink, white, cream, or rose. If you prefer something modern, try black-and-white gingham with red accents. For farmhouse style, use a neutral scarf with burlap ribbon and soft pink flowers. For a bold design, mix hot pink, red, and white with a statement heart sign in the center.
Pattern matters. If your scarf has hearts or words printed in one direction, pay attention as you wrap. Keep the pattern facing the same way around the wreath so it does not look upside down on one side and emotionally confused on the other.
Step-by-Step: How to Make a DIY Valentine’s Day Scarf Wreath
This project is simple, but the difference between “cute homemade” and “wow, where did you buy that?” is in the small details. Take your time smoothing the fabric, balancing the embellishments, and hiding the ends.
Step 1: Prepare Your Wreath Form
Start with a clean wreath form. A wire wreath form is lightweight and easy to hang, while a foam wreath form gives you a fuller base. A heart-shaped frame adds instant Valentine’s Day charm, but a round wreath can look just as beautiful with the right scarf and accents.
If you are using a wire form, decide whether you want the scarf wrapped tightly or loosely gathered. A tighter wrap creates a smoother, more tailored finish. A gathered wrap looks softer and more romantic. For foam forms, wrapping is usually easiest because the scarf can grip the surface more evenly.
Step 2: Attach the First Scarf
Place one end of the scarf on the back of the wreath form. Secure it with hot glue, floral wire, or a small knot. If the scarf is thin, fold it lengthwise once or twice before attaching it. This gives the wreath a fuller appearance and helps prevent the frame from showing through.
Begin wrapping the scarf around the wreath form, overlapping each pass slightly. Keep the fabric smooth but not stretched too tight. You want it to look soft, not like it is being held hostage.
Step 3: Continue Wrapping Around the Frame
When you reach the end of the first scarf, secure it on the back of the wreath. Start the next scarf where the first one ended, tucking the edge underneath slightly for a seamless transition. Continue until the wreath form is completely covered.
If you are mixing scarf patterns, space them evenly. For example, use one blush scarf on the left side, one red scarf on the right side, and a patterned scarf across the bottom. If you prefer a cleaner design, use the same scarf style all the way around.
Step 4: Fluff and Adjust the Fabric
Once the frame is wrapped, pause before adding decorations. Fluff the fabric, adjust any uneven spots, and make sure the back is tidy. If the scarf shifted while wrapping, gently rotate it into place.
This step feels small, but it makes the finished wreath look much more professional. Think of it as brushing your wreath’s hair before picture day.
Step 5: Add a Bow or Ribbon Accent
A bow gives the wreath structure and creates a natural focal point. You can place it at the top, bottom, lower left, or lower right. A bottom bow feels traditional and balanced. A side bow feels casual and stylish. A top bow works well if you want the ribbon tails to hang down.
Use wired ribbon if possible because it holds its shape better. Dollar store ribbon can be surprisingly useful, but if it is thin, layer two ribbons together. For example, place a narrow heart-print ribbon over a wider burlap or satin ribbon for more dimension.
Step 6: Add Faux Flowers and Valentine’s Accents
Trim faux flowers from their stems, leaving a short piece to tuck into the wreath. Arrange them before gluing. Try clustering three to five flowers near the bow instead of scattering them everywhere. Grouping decorations creates a stronger design and keeps the wreath from looking random.
Next, add small hearts, a mini sign, or a wooden “Love” accent. If your wreath already has a busy scarf pattern, keep the embellishments simple. If the scarf is solid, you can add more texture with lace, greenery, pearl strands, or foam hearts.
Step 7: Attach a Hanger
Use ribbon, twine, or a built-in wire loop to hang your wreath. If the wreath will be placed outdoors, make sure every piece is firmly attached. Wind, humidity, and enthusiastic door slamming can test your craftsmanship in ways no tutorial can fully prepare you for.
For renters or anyone who does not want to damage a door, use an over-the-door wreath hanger or removable hook rated for the wreath’s weight.
Design Ideas for Different Styles
One of the best things about this DIY Valentine’s Day scarf wreath is how easily it can change personalities. The same basic method can produce several different looks.
Classic Red and Pink Wreath
Use red, pink, and white scarves with a heart-print ribbon. Add red faux roses and a small “Be Mine” sign. This version is cheerful, traditional, and perfect for a front door.
Farmhouse Valentine’s Wreath
Choose a cream or beige scarf, then add burlap ribbon, soft pink flowers, and a wooden heart. A black-and-white buffalo check ribbon also works well for farmhouse style. This design looks cozy and understated.
Glam Valentine’s Wreath
Start with a blush pink scarf and add satin ribbon, faux pearls, glitter hearts, and roses. Keep the color palette tight so the wreath looks elegant instead of chaotic. A little sparkle is charming; too much sparkle starts demanding its own dressing room.
Kid-Friendly Valentine’s Wreath
Use bright scarves, foam hearts, pom-poms, and conversation-heart stickers. Let kids help choose the colors and place the decorations. Adults should handle hot glue, but children can help with arranging, fluffing, and naming the wreath something dramatic like “Princess Heart Explosion.”
Tips for Making Your Wreath Look More Expensive
Dollar store crafts can look high-end when you edit the design and pay attention to finish. The trick is not to hide that the supplies were affordable; it is to arrange them with care.
Stick to a Color Palette
Choose two or three main colors. Red, blush, and white always work. Pink, cream, and gold feel softer. Red, black, and white feel modern. A limited palette makes inexpensive materials look coordinated.
Layer Textures
Mix soft scarf fabric with ribbon, faux flowers, wood, felt, or greenery. Texture creates depth, which makes the wreath look more intentional. A flat wreath can look unfinished, but a few layered materials make it feel designed.
Hide Glue and Wire
Turn the wreath over and check the back. Trim loose threads, tuck scarf ends, and cover visible glue with ribbon or flowers. The front matters most, of course, but a tidy back helps the wreath hang better and last longer.
Use Odd Numbers
Designers often group decorations in odd numbers because they look more natural. Three roses usually look better than two. Five small hearts often look better than four. This is not a law, but it is a helpful trick when your wreath starts looking slightly “off” and you cannot figure out why.
Safety Notes for Hot Glue and Door Décor
Hot glue is useful, but it deserves respect. Work on a protected surface, keep the hot tip away from fabric piles, and never touch melted glue. If younger crafters are helping, let them arrange pieces while an adult handles the glue gun.
Use a low-temperature glue gun for delicate materials when possible. If you are attaching heavier items, floral wire may be more secure than glue alone. For outdoor use, avoid placing paper decorations where rain can reach them. A covered porch is ideal for scarf wreaths because fabric can fade or collect moisture if exposed directly to weather.
Where to Display Your Valentine’s Day Scarf Wreath
The front door is the obvious choice, but it is not the only one. A scarf wreath can brighten many areas of your home during February.
- Hang it above a mantel with small candles or framed Valentine’s prints.
- Place it on an interior door for a cozy seasonal touch.
- Use it above a coffee bar with pink mugs and heart-shaped stirrers.
- Hang it in a classroom, office, or craft room.
- Display it on a mirror using a ribbon loop.
Because this wreath is soft and lightweight, it works especially well indoors. If you hang it outside, choose a sheltered spot and bring it in during heavy rain or strong wind.
Budget Breakdown: How Much Does It Cost?
The total cost depends on what you already own. If you buy everything new from a dollar store, a typical scarf wreath may cost around the price of a few coffees. You might need a wreath form, three to five scarves, ribbon, flowers, and a small sign or heart accents. If you already have glue sticks, scissors, and leftover ribbon, the cost drops even more.
To save money, shop your house first. Old scarves, leftover Christmas ribbon, gift wrap bows, fabric scraps, or faux flowers from another arrangement can all be reused. Valentine’s Day décor is forgiving because soft colors, hearts, flowers, and ribbon naturally work together.
Common Mistakes to Avoid
Using Too Many Decorations
It is tempting to add every tiny heart in the package. Resist. A few well-placed accents look better than twenty pieces competing for attention. Your wreath should say “Happy Valentine’s Day,” not “I panicked in aisle five.”
Wrapping the Scarf Too Loosely
Loose fabric can sag, especially when the wreath hangs vertically. Keep the scarf snug enough to stay in place but soft enough to show folds. Secure the back as you go if needed.
Ignoring Balance
If all the flowers, bows, and signs are on one side, the wreath may look visually heavy. Step back every few minutes and check the shape. A little asymmetry is stylish. Too much asymmetry looks like the wreath had a rough morning.
Skipping the Dry Run
Before gluing anything, arrange the decorations on the wreath and take a quick photo. Photos make design problems easier to see. Once you like the layout, start attaching pieces.
How to Store and Reuse the Wreath
When Valentine’s Day is over, store the wreath in a wreath bag, plastic bin, or large box. Avoid crushing the bow and flowers. If the scarf is removable, you can unwrap it and reuse the wreath form for spring, Easter, summer, fall, or Christmas crafts.
This is another reason to use wire or ties instead of permanent glue when possible. A reusable wreath form stretches your craft budget and gives you a reason to say, “No, I am not hoarding supplies. I am investing in seasonal infrastructure.”
of Real-Life Experience: What This Project Teaches You
The first thing you learn while making a DIY Valentine’s Day scarf wreath is that dollar store crafting is part creativity, part treasure hunt, and part Olympic-level decision-making in front of a seasonal display. You walk in thinking you need one scarf and maybe a ribbon. Ten minutes later, you are comparing six shades of pink like a paint consultant with a deadline.
In practice, this project works best when you do not overthink it. The scarf is forgiving. If one section looks thin, wrap over it again. If one scarf ends awkwardly, hide the seam under a bow. If your faux roses look a little too fake up close, place them slightly to the side and let the overall design do the talking. Most handmade décor is viewed from several feet away, not under a microscope by a panel of judgmental cupids.
One useful experience is learning how much texture matters. A plain scarf on a wreath form can look nice, but once you add ribbon, flowers, and a small wooden heart, the design suddenly feels complete. The contrast between soft fabric, structured ribbon, and small decorative accents creates a layered look that feels more expensive than it is.
You also learn that hot glue is both a friend and a tiny lava monster. It holds flowers beautifully, but it is not always the best choice for every part of the wreath. For the scarf itself, tying or wiring often works better because it lets you adjust the fabric. Glue is better for small signs, foam hearts, and flower heads. A mix of methods gives the strongest result.
Another lesson is that the back of the wreath matters more than expected. If the scarf ends are bulky or uneven, the wreath may not hang flat. Taking five extra minutes to tuck, trim, and secure the back can make a big difference. Nobody may see the back, but your door definitely knows.
This craft is also a confidence builder. It does not demand perfect measuring, sewing, painting, or advanced tools. You can finish it while watching a movie, drinking coffee, or pretending the laundry does not exist. And because the supplies are affordable, mistakes do not feel disastrous. If a flower looks wrong, move it. If the bow is too big, trim it. If the whole thing becomes too much, remove one element and try again.
The best part is the moment you hang it up. A handmade wreath instantly makes a space feel warmer. It says someone cared enough to make the door cheerful, even in the chilly stretch between winter holidays and spring. It is a small project, but it adds personality, color, and charm. And when someone asks where you bought it, you get to enjoy the deeply satisfying sentence: “Actually, I made it.”
Conclusion
A DIY Valentine’s Day scarf wreath is one of the easiest ways to create beautiful seasonal décor without spending much money. With a dollar store wreath form, a few scarves, ribbon, faux flowers, and heart-shaped accents, you can make a custom piece that feels cozy, romantic, and completely your own.
The key is to keep the design balanced, choose a clear color palette, and let the scarf create most of the softness and movement. Whether you prefer classic red and pink, farmhouse neutrals, glam blush tones, or kid-friendly color, this project can be adjusted to fit your style. It is affordable, beginner-friendly, and fun enough to make you forget that your glue gun has once again left a tiny string of glue across the table like a spider with crafting ambitions.