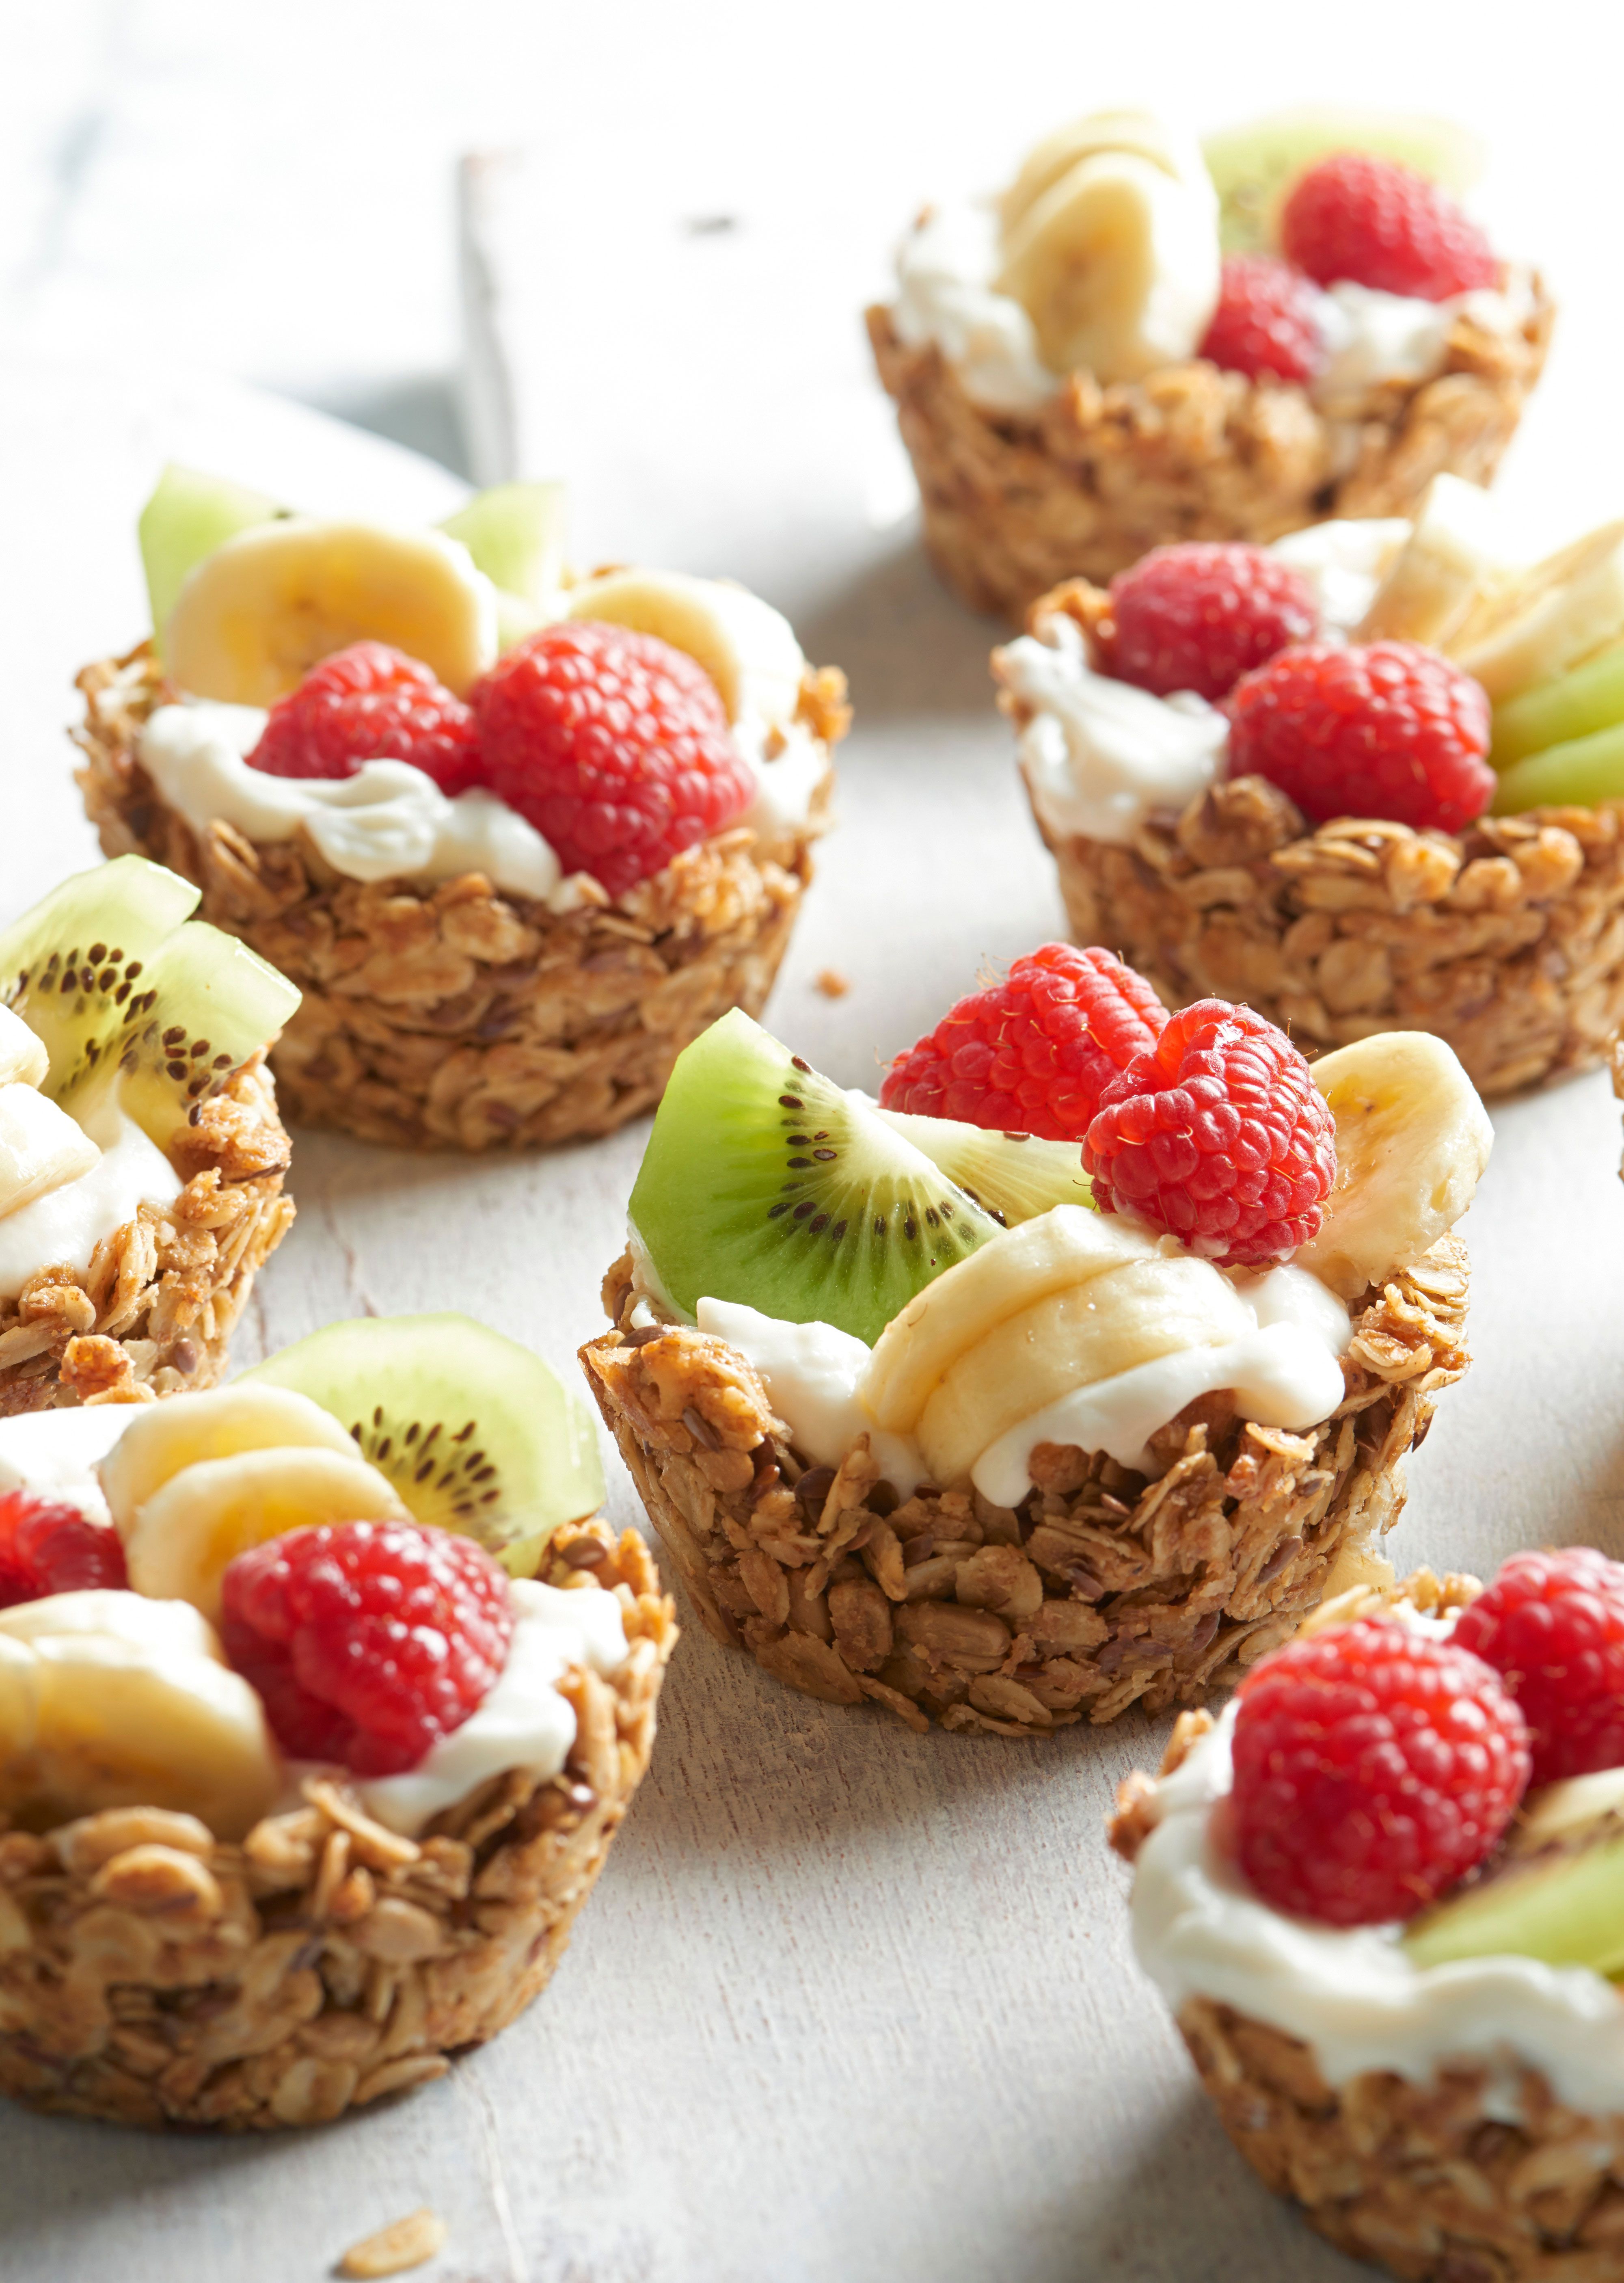
Some breakfasts are polite. They sit in a bowl, wait for a spoon, and behave themselves. These granola cups with yogurt and fruit? They’re breakfast with confidence. Crunchy, handheld, and secretly a parfait in disguiseexcept the “dish” is edible, and the cleanup is basically a victory lap.
Think of this as the best parts of a yogurt parfaitcreamy yogurt, bright fruit, and crunchy granolareorganized into a muffin-tin miracle. You get texture (crunch + cream), flavor (toasty oats + tangy yogurt + sweet fruit), and convenience (make-ahead shells that turn a sleepy weekday into something that feels suspiciously brunchy).
Why Granola Cups Work (And Why They’re Better Than a Sad Desk Parfait)
The magic is in the structure. Traditional parfaits layer crunchy granola next to wet yogurt and juicy fruit, which is delicious for about five minutesthen the crunch turns into “soft cereal feelings.” Granola cups solve that by baking a sturdy oat shell that stays crisp longer, especially if you fill them right before eating.
Texture Science, but Make It Breakfast
- Binder + heat creates a crisp, cookie-like shell (think oats held together by honey/maple + fat).
- Firm pressing in the muffin tin makes the cup strong enough to hold yogurt without collapsing like a flimsy beach chair.
- Cooling time is non-negotiablethis is when the cup sets and crisps, so don’t rush it.
Granola Cups with Yogurt and Fruit Recipe (Baked Muffin-Tin Method)
Quick Details
- Yield: 12 standard muffin-size granola cups
- Prep time: 15 minutes
- Bake time: 14–18 minutes
- Total time: ~35 minutes (including cooling)
- Best for: Make-ahead breakfast, brunch boards, lunchbox snacks, “I need something cute” moments
Ingredients (Granola Cups)
- 2 cups old-fashioned rolled oats
- 1/2 cup chopped nuts (almonds, pecans, walnutswhatever you’re loyal to)
- 2 tablespoons seeds (chia, flax, sunflower, or pumpkin seeds)
- 1/2 teaspoon ground cinnamon
- 1/4 teaspoon fine salt
- 1/3 cup honey or maple syrup
- 1/4 cup melted butter or coconut oil
- 1 teaspoon vanilla extract
- Optional (for extra “cluster power”): 1 egg white, whisked until frothy
- Optional add-ins: 2 tablespoons shredded coconut or wheat germ
Ingredients (Filling + Toppings)
- 2 to 2 1/2 cups yogurt (Greek yogurt, skyr, or regularplain or vanilla)
- 1 to 2 teaspoons honey or maple syrup (optional, to sweeten plain yogurt)
- 2 cups fresh fruit (berries, sliced strawberries, peaches, mango, kiwi, bananas)
- Optional toppings: lemon zest, toasted coconut, chopped nuts, cacao nibs, mini chocolate chips, a tiny drizzle of nut butter
Equipment
- Standard 12-cup muffin tin
- Nonstick spray or a little oil/butter for greasing
- Measuring cups/spoons
- Mixing bowl + spoon/spatula
- A small cup or spoon for pressing (your hands work tooclean hands are kitchen superpowers)
Step-by-Step Instructions
1) Prep the Pan and Oven
Preheat your oven to 350°F. Grease the muffin tin generouslybottoms and sides. Granola is delicious, but it can also be clingy in a “won’t text you back but won’t leave” sort of way. Greasing prevents heartbreak.
2) Mix the Dry Ingredients
In a large bowl, stir together the oats, nuts, seeds, cinnamon, and salt (plus coconut or wheat germ if using). This is where you set the flavor foundation.
3) Add the Wet Ingredients (a.k.a. The Glue)
Pour in the honey/maple syrup, melted butter/coconut oil, and vanilla. Mix until every oat looks glossy and coated. If you’re using the egg white, whisk it until frothy and fold it in nowthis can help the cups bake up crispier and more cohesive.
4) Shape the Cups (Press Like You Mean It)
Divide the mixture evenly among the 12 muffin cups (about 2 heaping tablespoons each). Then press firmly up the sides and across the bottom to form a cup shape. The tighter you pack it, the less likely it is to crumble later.
Pro move: Use the bottom of a small glass or measuring spoon to compress the oats. You’re not just shapingyou’re engineering.
5) Bake Until Toasty
Bake for 14–18 minutes, until the edges are golden brown and smell like a bakery with its life together. Watch closely in the last few minutesnuts go from “toasty” to “why does it smell like campfire regret?” quickly.
6) Cool Completely (This Is Where Crunch Happens)
Let the granola cups cool in the tin for 10 minutes, then carefully loosen edges with a butter knife. Transfer cups to a rack to cool completely. They firm up as they coolif you try to remove them too early, they may fall apart in protest.
7) Fill and Top Right Before Serving
Spoon yogurt into each cup (about 2–3 tablespoons), then top with fruit. If you’re sweetening plain yogurt, stir in a little honey/maple syrup first. Add extras like lemon zest or chopped nuts for maximum “this cost $9 at a café” energy.
Flavor Variations (Because Repetition Is for Laundry, Not Breakfast)
1) Berry-Lemon Cheesecake Vibes
- Use vanilla Greek yogurt + lemon zest
- Top with blueberries and strawberries
- Add a sprinkle of crushed almonds or graham-like granola bits
2) Tropical Vacation Cup (No PTO Required)
- Use coconut yogurt (or Greek yogurt + a drop of coconut extract)
- Top with mango + pineapple
- Finish with toasted coconut flakes
3) PB&J Breakfast Cup
- Swirl peanut butter into plain yogurt
- Top with sliced strawberries or a spoon of berry jam
- Sprinkle with chopped peanuts or granola clusters
4) Apple Pie Crunch Cup
- Mix cinnamon into the yogurt
- Top with diced apples (fresh or lightly sautéed)
- Finish with chopped walnuts and a tiny drizzle of maple syrup
Make-Ahead, Storage, and “Please Don’t Get Soggy” Strategies
Best Practice: Store Shells and Filling Separately
For the crispiest experience, store the baked granola cups in an airtight container at room temperature for up to 4–5 days. Keep yogurt and fruit refrigerated, then assemble when you’re ready to eat.
Can You Freeze Them?
Yesfreeze the empty granola cups in a freezer-safe container. Thaw at room temp, then fill. (Freezing filled cups can work tooespecially if you like a frozen-yogurt texturebut the shell may soften faster once thawed.)
Food Safety Note
Yogurt is perishable. Keep filled cups refrigerated and don’t leave them sitting out longer than about 2 hours at room temperature (less in hot weather). If you’re serving these at brunch, set out a small tray at a time and keep the rest chilled.
Troubleshooting: When Your Granola Cups Get Dramatic
“They Crumbled When I Picked Them Up”
- You may need a bit more binder (an extra tablespoon of honey/maple can help).
- Press the mixture more firmly in the tincompression is strength here.
- Let them cool fully before removing. Warm granola is fragile granola.
“They Stuck to the Pan Like a Soap Opera Plot”
- Grease more generously next time (especially the sides).
- Let the cups cool 10 minutes before loosening.
- Use a thin butter knife to gently release the edges first.
“They’re Too Hard”
- Bake a minute or two less, and avoid over-browning the edges.
- Consider slightly more nuts/seeds and slightly less oat density.
- If you used a lot of sugar, the shell can get extra firm when cooledtry reducing sweetener a touch.
Nutrition & Smart Ingredient Choices (Without Killing the Fun)
Granola cups can be a genuinely balanced breakfast: oats and seeds bring fiber, yogurt provides protein, and fruit adds vitamins and natural sweetness. If you want a “steady energy” version, choose plain Greek yogurt and sweeten lightly yourselfthis helps manage added sugar while keeping flavor.
For extra protein, try skyr or high-protein Greek yogurt. For extra fiber and healthy fats, add chia, flax, or pumpkin seeds. And if you’re making these for kids (or adults who are basically kids with email), set up a topping barpeople are surprisingly cooperative when toppings are involved.
Recipe Notes: What This Recipe Borrows from the Pros
This granola-cup method follows classic American granola techniqueoats + sweetener + fat baked until goldenthen adapts it for structure in a muffin tin. The “cool completely for maximum crunch” rule is a staple in traditional granola baking, and the optional egg-white trick is a popular way to encourage crisp, cohesive clusters. The “fill just before serving” guidance is also common in grab-and-go granola cup recipes to prevent sogginess.
of Real-Life Experiences Around Granola Cups (So You Don’t Learn the Hard Way)
The first thing most people notice when they make granola cups with yogurt and fruit is that shaping the cups is the entire game. Mixing ingredients is easy; pressing the mixture into a strong “edible bowl” is where success happens. The good news: once you’ve made them once, your hands instantly understand the job. The bad news: the first batch might teach you what “not pressed enough” looks likeusually in the form of a cup that politely collapses when you add yogurt. If that happens, don’t panic. Crumble that batch into a parfait jar and call it “rustic.”
Another common experience is discovering your personal crunch threshold. Some people love a very crisp, cookie-like cup that snaps cleanly. Others prefer a slightly chewy cup that feels more like a soft-baked oatmeal cookie. Your oven and sweetener choice can nudge the texture either way. Honey tends to bake up with a firm, glossy hold, while maple syrup can feel a bit lighter. If you add an egg white, the cups often set more decisivelygreat for portability, especially if you’re packing them for a commute, a school snack, or a road trip where breakfast needs to be one-handed and drama-free.
Fruit is where personalities really show up. Berries are low-effort and photogenic, but juicy fruits (like peaches or mango) can drip more than expected. A trick many home cooks adopt is to pat fruit dry or slice it shortly before serving. Bananas are delicious but can brownso they’re the “add last” friend. If you want that bright fruit flavor without extra moisture, spooning a small dollop of thick fruit jam under the yogurt can be a clever move. It gives you the “fruit-on-the-bottom” effect without turning the granola into a sponge.
For brunch, granola cups often become a surprisingly fun centerpiece. People love choosing their own toppings, and it turns breakfast into something interactive without requiring you to stand at the stove flipping pancakes like a short-order cook. You can set out yogurt options (plain, vanilla, dairy-free), bowls of fruit, nuts, seeds, and a drizzle station (honey, maple, nut butter). It’s the kind of spread that makes guests say, “Oh wow,” even though the hardest thing you did was press oats into a pan.
The final experience worth mentioning: granola cups are forgiving in the most useful way. If one cracks, it still tastes great. If the batch is a little soft, toast it a few extra minutes next time. If you end up with extra cups, they’re snackable on their ownlike a mildly responsible cookie. Over time, people tend to develop their “signature” version: maybe chocolate chips for a dessert vibe, extra seeds for a gym-morning cup, or warm spices for fall. That’s the charm: once you’ve nailed the base technique, you can riff foreverand breakfast never gets boring.