There was a time when running Linux on a Windows computer felt like inviting two rival chefs into the same tiny kitchen. One wanted Bash, the other wanted PowerShell, and both were reaching for the same cutting board. Thankfully, the Windows Subsystem for Linux, better known as WSL, changed the recipe. Today, you can run a real Linux environment directly on Windows without setting up a traditional virtual machine, partitioning your drive, or whispering motivational quotes to a bootloader at midnight.
This guide explains how to enable the Windows Subsystem for Linux in easy steps, whether you are a beginner learning Linux commands, a developer building web apps, a student working through programming assignments, or a power user who simply wants Windows and Linux to stop arguing and start collaborating. We will cover system requirements, the fastest installation method, manual feature activation, Linux distribution choices, verification commands, troubleshooting tips, and practical experience-based advice.
The main keyword here is simple: enable Windows Subsystem for Linux. But naturally, you will also see related terms such as WSL install, WSL 2, install Ubuntu on Windows, Linux terminal on Windows, PowerShell WSL command, and Windows Linux development environment. No keyword stuffing, no robot confettijust clear, useful information.
What Is the Windows Subsystem for Linux?
The Windows Subsystem for Linux is a Microsoft feature that allows you to run Linux command-line tools, utilities, scripts, package managers, and distributions directly on Windows. Instead of dual-booting into Linux or spinning up a full virtual machine, WSL gives you a Linux environment that works alongside your Windows apps.
In practical terms, this means you can open Windows Terminal, launch Ubuntu, Debian, Kali, openSUSE, or another supported Linux distribution, and run commands such as sudo apt update, grep, ssh, git, python3, npm, or docker. Your Windows desktop stays right where it is, happily holding your browser, editor, documents, and questionable number of open tabs.
WSL 1 vs. WSL 2: Which One Should You Use?
Most users should use WSL 2. It uses a real Linux kernel and offers better compatibility with Linux applications, containers, and modern development workflows. WSL 1 still exists and can be useful in specific file-system scenarios, but WSL 2 is the default choice for new installations and the recommended option for most developers.
If your goal is to run Ubuntu on Windows, use Linux tools, build web applications, work with Docker Desktop, test scripts, or create a flexible coding environment, choose WSL 2. It is the “yes, this actually behaves like Linux” option.
Before You Start: Check the Requirements
To use the modern one-command WSL installation method, your PC should be running Windows 11 or Windows 10 version 2004 and higher, build 19041 or higher. Most current Windows 11 machines are ready. On Windows 10, you may need to update first.
To check your Windows version, press Windows + R, type winver, and press Enter. A small window will show your Windows edition, version, and build number. If your build is too old, run Windows Update before attempting the WSL installation.
Make Sure Virtualization Is Enabled
WSL 2 depends on virtualization technology. Many modern PCs already have it enabled, but some systems require turning it on in BIOS or UEFI. To check quickly, open Task Manager, go to the Performance tab, select CPU, and look for Virtualization. If it says enabled, you are in good shape. If it says disabled, you may need to enable Intel VT-x or AMD-V/SVM in your firmware settings.
Do not randomly change BIOS settings like you are defusing a movie bomb. Only adjust the virtualization option, save changes, and restart.
Method 1: Enable WSL with One Command
The easiest way to enable the Windows Subsystem for Linux is by using the modern wsl --install command. This method enables required Windows features, installs WSL, sets up WSL 2, and installs Ubuntu by default.
Step 1: Open PowerShell or Windows Terminal as Administrator
Click the Start menu, type PowerShell or Windows Terminal, right-click the result, and choose Run as administrator. When Windows asks for permission, select Yes.
Step 2: Run the WSL Install Command
Type this command and press Enter:
Windows will begin enabling the required components and downloading the default Linux distribution, usually Ubuntu. Depending on your internet speed and system state, the process may take a few minutes.
Step 3: Restart Your Computer
After installation, restart your PC if prompted. Yes, restarting is not glamorous. It is the digital equivalent of “turn it off and on again,” but in this case, it genuinely matters.
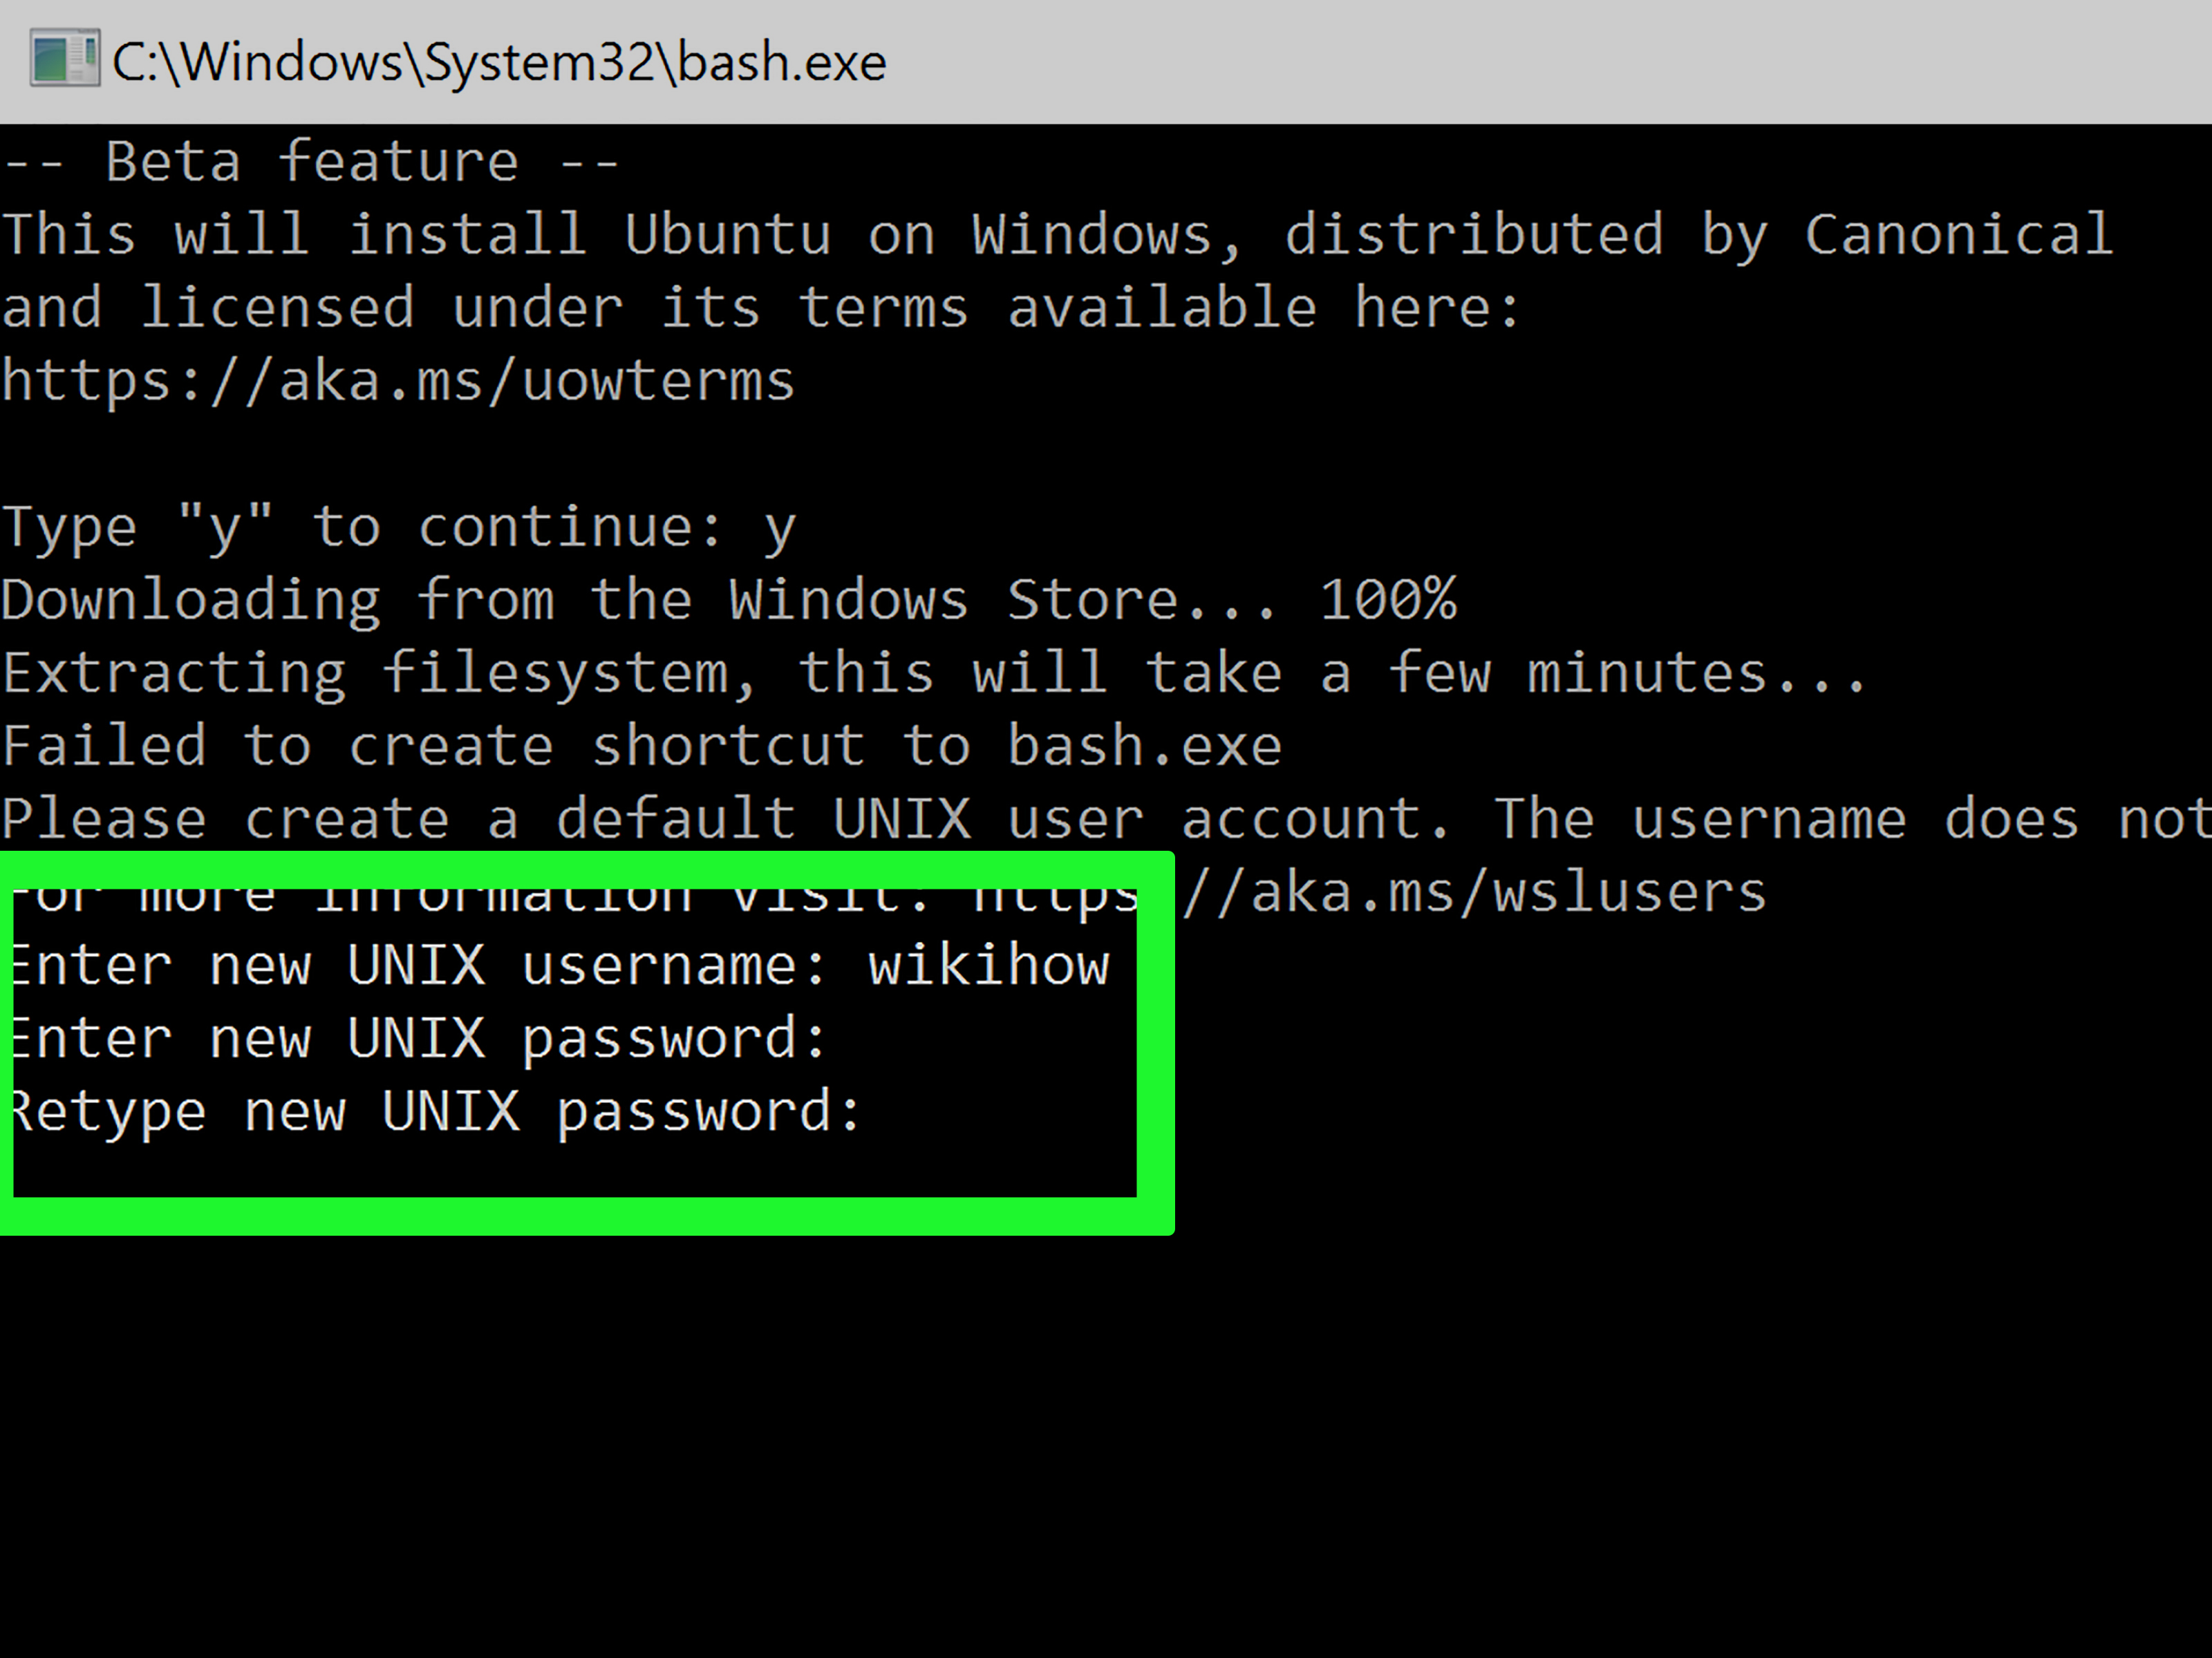
Step 4: Create Your Linux Username and Password
After rebooting, launch Ubuntu from the Start menu or open Windows Terminal and select your new Linux distribution. The first launch may take a moment while files are unpacked. Then you will be asked to create a Linux username and password.
This Linux username does not have to match your Windows account. The password will not visibly appear while you type it, which is normal. Linux is not ignoring you; it is just being mysterious for security reasons.
Method 2: Install a Specific Linux Distribution
Ubuntu is a great default, but WSL supports several Linux distributions. To see what is available online, run:
You may see choices such as Ubuntu, Debian, Kali Linux, openSUSE, and others. To install a specific distribution, use:
Replace Debian with the distribution name you want. For example, users interested in security testing labs may choose Kali Linux, while developers who want broad community documentation often choose Ubuntu.
Method 3: Enable WSL Manually Through Windows Features
If the one-command method does not work, or if you prefer the scenic route, you can enable WSL manually.
Using Windows Features
- Open the Start menu.
- Search for Turn Windows features on or off.
- Check Windows Subsystem for Linux.
- Check Virtual Machine Platform.
- Select OK.
- Restart your computer.
After restarting, open PowerShell as administrator and run:
Then install your preferred Linux distribution from the Microsoft Store or by using the command line.
Using PowerShell Commands
You can also enable the required optional components with commands. Open PowerShell as administrator and run:
Restart your PC, then run:
This manual method is especially useful on older systems or corporate machines where automated installation behaves like it has gone out for coffee and forgotten to return.
How to Check If WSL Is Working
Once WSL is installed, verify everything with:
This command shows installed distributions and whether each one is running under WSL 1 or WSL 2. You can also launch your default Linux distribution by typing:
Inside the Linux terminal, try:
If you see Linux system information, directory listings, and a working shell prompt, congratulations. You now have Linux living inside Windows, and unlike a raccoon in the attic, this is a good thing.
Essential WSL Commands for Beginners
Here are a few commands that make WSL easier to manage:
List Installed Distributions
Set WSL 2 as the Default Version
Set a Default Linux Distribution
Run a Specific Distribution
Update WSL
Shut Down WSL
The shutdown command is helpful when WSL feels stuck, after configuration changes, or when you want to free resources without restarting Windows.
What to Do After Enabling WSL
After you enable Windows Subsystem for Linux, the first thing to do inside your Linux distribution is update packages:
For Ubuntu or Debian-based distributions, this refreshes package lists and upgrades installed software. From there, you can install common development tools:
If you are setting up a web development environment, you may also install Node.js, Python, PHP, Ruby, Go, PostgreSQL, MySQL, or other tools directly inside WSL. The advantage is that many open-source development tutorials assume a Linux-like environment. With WSL, those instructions suddenly make more sense and require fewer awkward Windows translations.
Using WSL with Visual Studio Code
One of the best reasons to enable WSL is the smooth integration with Visual Studio Code. Install VS Code on Windows, add the WSL extension, and you can open Linux folders directly from your WSL terminal using:
This launches VS Code connected to your Linux environment. Your files, terminal, extensions, Git tools, and language servers can run in the Linux context while the editor interface remains comfortably on Windows. It is like having a Linux workstation wearing a Windows jacket.
Using WSL with Docker
Docker Desktop works well with WSL 2 and can use the WSL 2 backend for Linux containers. This is useful for developers who build containerized applications, test services locally, or work with frameworks that expect Linux-like behavior.
After enabling WSL 2, install Docker Desktop for Windows. In Docker Desktop settings, make sure the WSL 2 based engine is enabled. You can also enable integration for specific WSL distributions, allowing Docker commands to run directly from your Ubuntu or Debian terminal.
For developers working on Node.js, Laravel, Django, Rails, Go, or microservice projects, this setup can reduce compatibility problems and make local development closer to production environments.
Where Should You Store Project Files?
For the best performance with Linux tools, store Linux projects inside the WSL file system, usually somewhere under your Linux home directory:
You can access Windows drives from WSL under /mnt/c/, but heavy Linux operations on Windows-mounted files can be slower. For example, installing thousands of Node.js dependencies or running large Git operations often works better inside the Linux file system.
A simple rule: if you are using Linux tools heavily, keep the project in Linux. If you are editing a Word document or organizing vacation photos, Windows can keep that circus.
Common WSL Installation Problems and Fixes
Problem: The WSL Command Shows Help Text Instead of Installing
If wsl --install only shows help text, WSL may already be installed but no Linux distribution is set up. Run:
Then install a distribution:
Problem: WSL 2 Says Virtualization Is Not Enabled
Check Task Manager to confirm virtualization status. If disabled, enable Intel VT-x or AMD-V/SVM in BIOS or UEFI. Then restart and try again.
Problem: Installation Hangs at 0%
Try installing with the web download option:
Also check your internet connection, VPN, firewall, or corporate device restrictions.
Problem: A Distribution Is Installed as WSL 1
Check the version:
Then convert the distribution:
Replace Ubuntu with your actual distribution name.
Security Tips for WSL Users
WSL is powerful, but it is still part of your computer. Treat it like a real development environment. Keep packages updated, avoid running random scripts from the internet, use trusted repositories, and understand what commands do before pasting them into the terminal.
When using SSH keys, Git credentials, cloud tokens, or production secrets, store them carefully. A local Linux environment is convenient, not magical armor. If a command looks like it was written by a raccoon after three energy drinks, pause before running it.
Who Should Enable the Windows Subsystem for Linux?
WSL is useful for many people:
- Web developers who need Linux-based tooling for Node.js, Python, PHP, Ruby, or Go.
- Students learning Linux commands, shell scripting, Git, or programming.
- Data professionals who want Python, package managers, and command-line utilities.
- DevOps learners experimenting with SSH, Docker, Kubernetes tools, and cloud CLIs.
- Security students exploring Kali Linux in a controlled lab environment.
- Windows power users who want Bash without abandoning Windows applications.
If you only use Windows for email, browsing, and spreadsheets, WSL may be unnecessary. But if you code, automate, test, script, analyze data, or enjoy learning how computers work under the hood, enabling WSL is one of the best upgrades you can make.
Real-World Experience: What Enabling WSL Actually Feels Like
The first experience many users have with WSL is surprise. Not “fireworks over the keyboard” surprise, but the quieter kind: you type wsl --install, restart, open Ubuntu, and suddenly Windows has a Bash terminal that behaves like a normal Linux shell. For developers who previously used bulky virtual machines, that moment feels like replacing a moving truck with a backpack that somehow carries the same furniture.
In real work, the biggest benefit is consistency. A beginner following a web development tutorial often runs into instructions written for macOS or Linux: install packages with apt, edit shell files, run Bash scripts, use SSH, or configure permissions. Without WSL, Windows users sometimes need special workarounds. With WSL, many tutorials become easier to follow because the command-line environment matches what the author expected.
Another practical advantage is project organization. When projects live inside the WSL home folder, tools like Git, npm, Composer, pip, and Make usually run smoothly. Large dependency folders are less annoying. File permissions behave more predictably. Terminal commands feel cleaner. It is not that Windows cannot do development; it absolutely can. WSL simply gives Windows users a Linux-native lane when that lane is faster.
There is also a learning curve. New users may wonder why their Windows C drive appears under /mnt/c, why the Linux password does not show while typing, or why copying commands with line breaks can go sideways. These are normal beginner bumps. After a few sessions, commands such as cd, ls, pwd, sudo apt update, and code . become muscle memory. The terminal stops looking like a haunted calculator and starts feeling like a useful tool.
One common experience is discovering how well WSL fits with VS Code. Opening a project from Ubuntu using code . feels almost too easy. You edit files in a polished Windows application while the terminal, dependencies, and runtime live in Linux. That combination is especially helpful for JavaScript, Python, PHP, and cloud development. You get Linux behavior without giving up Windows conveniences such as multiple monitors, familiar shortcuts, and your favorite screenshot tool for capturing bugs you definitely did not create.
Docker users often appreciate WSL 2 even more. Container workflows can feel more natural when the development environment is Linux-based. Instead of juggling separate scripts for Windows and Linux, teams can standardize around Linux commands and container tooling. This is particularly useful when production servers also run Linux. Your laptop will not become a data center, but it can behave more like the environment where your app eventually lives.
Troubleshooting is part of the experience too. Sometimes virtualization is disabled. Sometimes a corporate firewall blocks downloads. Sometimes a distribution installs but does not launch correctly until Windows is updated. The good news is that most WSL problems are solvable with a small checklist: update Windows, enable virtualization, confirm Windows features, run wsl --update, check wsl -l -v, and restart when needed. WSL is easier than it used to be, but it still appreciates a little patience.
The best advice from real use is to start simple. Install Ubuntu, update packages, create a projects folder, connect VS Code, and practice basic commands. Do not try to build an entire cloud-native, AI-powered, blockchain-enabled toaster deployment pipeline on day one. Learn the shell, learn where your files live, and learn how to recover when something breaks. That confidence is worth more than installing every tool in the universe before lunch.
Over time, WSL becomes invisible in the best way. You stop thinking “I am using Linux on Windows” and start thinking “I need a terminal.” That is when the setup has done its job. Windows remains your main operating system, Linux handles the command-line work, and your development flow becomes faster, cleaner, and much less dramatic.
Conclusion
Enabling the Windows Subsystem for Linux is one of the easiest ways to turn a Windows PC into a flexible development machine. With the modern wsl --install command, most users can install WSL, enable WSL 2, and add Ubuntu in just a few steps. From there, you can run Linux commands, manage packages, use Git, connect Visual Studio Code, work with Docker, test scripts, and build projects in an environment that feels familiar to Linux users and approachable for Windows users.
The easiest path is simple: update Windows, open PowerShell as administrator, run wsl --install, restart, create your Linux user, and verify the installation with wsl -l -v. If anything goes wrong, check virtualization, Windows features, distribution settings, and WSL updates. No cape required. Maybe coffee, though.
Note: This article is based on current WSL installation practices, official documentation, and practical development workflows for Windows 10 and Windows 11 users.