Somewhere in your home, there may be a sad little window screen, cabinet insert, thrifted frame, or decorative mesh panel waiting for its second act. It once fought mosquitoes. Noble work, yes. But now? It can become something far more glamorous: a practical, pretty, wall-mounted jewelry organizer that keeps earrings visible, necklaces untangled, and bracelets from forming a mysterious knot colony in your drawer.
Learning how to turn a screen into a jewelry organizer is one of those DIY projects that feels almost too easy for how useful it is. A screen already has the magic ingredient: tiny openings that are perfect for hanging earrings. Add a sturdy frame, a few hooks, and a little creativity, and suddenly you have a custom jewelry display that looks boutique-worthy without the boutique price tag.
This guide walks you through the full process, from choosing the right screen to styling the final organizer. Whether you want a rustic farmhouse jewelry holder, a sleek modern earring display, or a colorful upcycled piece for a bedroom, closet, or vanity, this project is flexible, affordable, and very forgiving. Translation: even if your crafting history includes hot glue burns and one suspiciously crooked shelf, you can still do this.
Why Use a Screen as a Jewelry Organizer?
A screen works beautifully as a jewelry organizer because it combines visibility, airflow, and structure. Instead of hiding your favorite pieces in a drawer, you can see everything at once. That makes it easier to choose accessories, avoid buying duplicates, and actually wear the jewelry you already own.
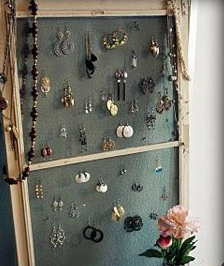
Screen mesh is especially helpful for earrings. French hooks, lever backs, and many dangle earrings slip directly through the openings. Stud earrings can also work if the screen is easy to access from the back or if you attach a removable backing panel. For necklaces and bracelets, the frame can hold screw-in cup hooks, decorative knobs, peg hooks, or small adhesive hooks.
Another big advantage is customization. A store-bought jewelry organizer may not match your wall space, color scheme, or collection. A DIY screen jewelry organizer can be built tall and narrow, wide and dramatic, rustic and distressed, bright and playful, or clean and minimal. It can be made from an old window screen, a thrifted picture frame with new mesh, a cabinet door insert, or a handmade wooden frame.
Best Types of Screens for a DIY Jewelry Organizer
Not every screen is equally useful, so start by choosing the right base. The best option depends on the jewelry you own and the look you want.
Old Window Screen
An old window screen is one of the easiest starting points because it already has a frame and mesh. Aluminum or fiberglass screen mesh can hold lightweight earrings well. If the mesh is sagging, torn, or loose, replace it before adding jewelry. A fresh screen will look cleaner and support earrings more evenly.
Picture Frame With Screen Mesh
A picture frame gives you more design freedom. You can remove the glass and backing, paint the frame, and staple screen mesh, hardware cloth, or decorative metal mesh to the back. This is a great choice for turning a flea market frame into a wall jewelry organizer.
Decorative Metal Screen or Radiator Grille
Decorative metal sheets, sometimes used for cabinet inserts or radiator covers, create a more polished look. They are usually sturdier than window screen mesh and can support heavier earrings. Choose a pattern with openings large enough for earring hooks.
Chicken Wire or Hardware Cloth
Chicken wire has a rustic, farmhouse feel and works well for larger earrings. Hardware cloth is stronger and more structured, though the edges can be sharp, so it must be trimmed carefully and secured behind the frame.
Materials You Will Need
Gather your supplies before you start. Nothing ruins a creative afternoon faster than realizing you have paint, mesh, and enthusiasmbut no way to hang the thing.
- Old window screen, picture frame, or wooden frame
- Screen mesh, hardware cloth, chicken wire, or decorative metal sheet
- Staple gun or small nails
- Wire cutters or heavy-duty scissors
- Sandpaper or sanding block
- Spray paint, chalk paint, stain, or acrylic paint
- Small cup hooks, screw hooks, knobs, or drawer pulls
- Picture hanging hardware, D-rings, or sawtooth hangers
- Measuring tape or ruler
- Pencil
- Utility knife
- Work gloves and safety glasses
- Optional: ribbon, fabric, felt, cork, labels, small bowls, or trays
Step 1: Plan Your Jewelry Zones
Before cutting, painting, or attaching anything, look at your jewelry collection. This is the moment to be honest. Do you own three necklaces, or do you own enough necklaces to open a tiny pirate treasure museum?
Sort your jewelry into categories: earrings, necklaces, bracelets, rings, watches, brooches, and hair accessories. Then decide what the screen should hold. For most people, the mesh area is best for earrings, while the bottom or side of the frame is best for necklaces and bracelets.
A smart layout might include:
- Upper mesh area for lightweight earrings
- Lower hooks for necklaces
- Side hooks for bracelets
- Small shelf or tray below for rings and perfume
- Open space between necklaces to prevent tangling
If you own long necklaces, choose a vertical frame or mount hooks low enough so the chains can hang freely. If earrings are your main issue, choose a wider frame with plenty of mesh surface.
Step 2: Clean and Prep the Screen or Frame
A good DIY jewelry organizer starts with a clean base. If you are using an old window screen, wipe the frame with a damp cloth and mild soap. Remove dust, cobwebs, dirt, and any mysterious garage residue that looks like it might have a backstory.
If the frame is wood, sand rough areas and wipe away dust. If it is metal or aluminum, clean it thoroughly and allow it to dry. If there is old peeling paint, scrape and sand the surface before repainting. A smooth frame makes the finished project look intentional rather than “I rescued this from behind the shed five minutes ago.”
Check that the frame is sturdy. Tighten loose corners if possible. A wobbly frame may work for a photo, but once necklaces and bracelets are hanging from it, weakness becomes obvious quickly.
Step 3: Replace or Attach the Mesh
If your screen is already tight and clean, you may be able to keep it as is. But if the mesh is torn, sagging, or stained, replace it. Fresh mesh gives the organizer a crisp, finished appearance.
For an Existing Window Screen
Remove the old spline, which is the flexible cord that holds mesh in the frame channel. Pull out the damaged mesh, lay new screen material over the frame, and press the spline back into the groove with a screen rolling tool. Keep the mesh straight and taut as you work. Trim the extra mesh with a utility knife.
For a Picture Frame
Remove the glass and backing. Cut your mesh slightly larger than the frame opening. Pull it tight across the back and secure it with staples, small nails, or a strong adhesive suitable for the materials. Space staples closely enough to prevent sagging. Trim extra mesh carefully.
For Metal Mesh or Hardware Cloth
Wear gloves, because cut metal edges can be sharp. Cut the mesh to size with wire cutters, then secure it firmly to the back of the frame. Make sure all cut edges are hidden or covered so they cannot scratch your wall, fingers, or jewelry.
Step 4: Paint or Finish the Frame
Now comes the fun part: making it look like decor instead of a household repair project that wandered into your bedroom.
Choose a finish that matches your space. White paint feels clean and cottage-inspired. Black paint looks modern and dramatic. Gold or brass adds a boutique feel. Natural wood works well for boho, rustic, or farmhouse rooms. Pastel colors can make the organizer cheerful for a teen bedroom, dorm room, or craft space.
If you spray paint, work outdoors or in a well-ventilated area. Apply light coats instead of one heavy coat. Heavy paint can clog delicate mesh and create drips. Let the frame dry fully before adding hooks or hanging jewelry.
Step 5: Add Hooks for Necklaces and Bracelets
Mesh is excellent for earrings, but necklaces need hooks. The easiest option is to screw small cup hooks into the bottom rail of a wooden frame. Mark the spacing first with a pencil so the hooks look balanced.
For delicate necklaces, spacing hooks about two inches apart usually works well. For chunkier statement necklaces, leave more room. If you hang necklaces too close together, they may tangle, which defeats the entire purpose of the project and may cause you to whisper angry things at jewelry before breakfast.
Other hook options include:
- Decorative drawer knobs for a vintage look
- Small brass hooks for a classic style
- Matte black hooks for modern decor
- Adhesive hooks for lightweight pieces
- Pegboard hooks if using a sturdier backing
If your frame is metal or too thin for screw hooks, attach a small wood strip across the bottom back or front of the frame, then install hooks into that strip.
Step 6: Create a Spot for Rings and Small Pieces
A screen jewelry organizer is ideal for hanging pieces, but rings, studs, pins, and tiny charms need a different solution. Add a small shelf under the frame, place a decorative bowl on a nearby vanity, or attach a narrow ledge if the frame is sturdy enough.
For a more complete organizer, mount the screen above a dresser and place small trays beneath it. Use a ceramic dish for rings, a velvet-lined box for delicate pieces, and a small cup for everyday earrings. This gives every item a home, which is the secret to keeping jewelry organized after the excitement of the DIY project wears off.
Step 7: Install Hanging Hardware
The organizer should be easy to use and securely mounted. Lightweight frames may work with sawtooth hangers, but larger or heavier pieces should use D-rings and wall anchors. If you plan to hang many necklaces, do not rely on a tiny nail unless you enjoy dramatic crashes at 2 a.m.
Choose a location near where you get dressed. Good spots include above a dresser, inside a closet door, beside a vanity, or on a bedroom wall. Avoid humid areas like bathrooms, especially for silver, costume jewelry, or pieces that may tarnish or degrade with moisture.
Hang the organizer at eye level so you can see your earrings and reach your necklaces comfortably. If it is too high, you will stop using it. If it is too low, long necklaces may pile on the surface below.
Step 8: Arrange Your Jewelry Like a Pro
Once the organizer is on the wall, start placing jewelry by category. Hang earrings in pairs and leave a little breathing room between larger designs. Put everyday earrings in the easiest-to-reach section. Save the top corners for special-occasion pieces.
Hang necklaces by length. Short chains can go toward the sides, while long necklaces should hang from lower hooks. Bracelets can share hooks if they are lightweight, but avoid overcrowding. The goal is visibility, not creating a sparkly traffic jam.
You can also organize by color, metal, or frequency of use. For example, keep gold earrings on one side, silver on the other, and colorful statement pieces in the center. A clear system makes the organizer more than prettyit makes your morning routine faster.
Design Ideas for Different Styles
Farmhouse Screen Jewelry Organizer
Use a distressed white frame, chicken wire, and bronze hooks. Add a small wood shelf at the bottom for rings or perfume. This look works beautifully in bedrooms with natural textures, linen bedding, and vintage accents.
Modern Minimalist Organizer
Choose a simple black, white, or natural wood frame with fine metal mesh. Keep hooks evenly spaced and avoid extra embellishments. This style is perfect for a clean closet wall or modern vanity area.
Glam Jewelry Display
Paint the frame gold, champagne, or glossy black. Use decorative metal mesh and crystal-style knobs for necklaces. Add a small mirror nearby to create a boutique dressing-station feel.
Boho Upcycled Organizer
Use a thrifted frame, warm wood stain, rattan-inspired mesh, or soft neutral paint. Add macrame trim, tiny hooks, or a fabric strip for pins and brooches. The result feels relaxed, creative, and personal.
Common Mistakes to Avoid
The most common mistake is using mesh that is too weak. Lightweight screen is fine for earrings, but it should not hold heavy necklaces. Put heavier items on hooks installed into the frame, not directly on the mesh.
Another mistake is skipping the layout stage. If you add hooks randomly, you may discover that your favorite necklace hangs awkwardly or overlaps with earrings. Measure first, install second, celebrate third.
Avoid overcrowding the organizer. When every inch is packed, jewelry becomes hard to remove and pieces may scratch each other. A good jewelry display should make accessories easier to enjoy, not turn them into a decorative puzzle.
Finally, avoid hanging valuable or delicate jewelry in direct sunlight, damp rooms, or dusty areas. Fine jewelry, pearls, and pieces prone to tarnish may be better stored in lined boxes or pouches when not in use.
How to Keep Your Screen Jewelry Organizer Looking Good
Dust the frame and mesh regularly with a soft cloth or small duster. Remove jewelry before deep cleaning so hooks do not snag chains or earring backs. If the mesh loosens over time, tighten or replace it before it sags too much.
Every few months, review what is hanging on the organizer. Move rarely worn pieces to storage and keep daily favorites visible. This prevents clutter and helps the display stay attractive.
If you notice tarnish, scratches, or tangled chains, adjust your storage method. Some jewelry does better in separate compartments, soft pouches, or anti-tarnish storage. Your screen organizer can be the main display while trays and boxes handle the more delicate supporting cast.
Budget-Friendly Tips
This project can be very inexpensive if you use what you already have. Look for frames at thrift stores, garage sales, salvage shops, or in your own attic. Old window screens, cabinet doors, and unused picture frames are perfect candidates.
Leftover paint from another project can refresh the frame. Spare knobs from a cabinet makeover can become necklace hooks. Ribbon scraps can decorate the top. Even a small piece of cork or felt can be added for pins or studs.
The beauty of this DIY jewelry organizer is that it does not need to be perfect. Slight wear, vintage texture, and handmade details often make it more charming. Your earrings will not file a complaint if the frame has character.
Safety Notes Before You Start
Wear gloves when cutting metal mesh or hardware cloth. Use safety glasses if trimming wire, sanding old paint, or using a staple gun. If you are working with an old painted frame, be cautious; older paint may contain lead. When in doubt, seal it properly, avoid sanding indoors, or choose a newer frame.
Make sure the finished organizer is mounted securely. Jewelry may seem light, but a fully loaded frame can gain weight quickly. Use wall anchors when hanging on drywall, and choose hardware rated for more weight than you expect to use.
Experience-Based Tips for Turning a Screen Into a Jewelry Organizer
After making and using a screen jewelry organizer, the first thing you notice is how much time it saves. When jewelry is hidden in drawers, pieces become invisible. You may own the perfect earrings for an outfit but forget they exist until three months later, when you find them under a scarf, next to one mysterious button and a receipt from 2021. A screen organizer solves that problem by putting your collection where your eyes can actually find it.
One practical lesson is to start with the jewelry you wear most often, not the jewelry you think looks prettiest on display. It is tempting to arrange the organizer like a magazine photo, with dramatic earrings in the center and delicate necklaces flowing perfectly below. That looks lovely for about a day. But if your everyday hoops are tucked in the upper corner and your favorite necklace is trapped behind a heavy statement piece, the organizer becomes annoying. Function should lead; beauty can follow wearing cute shoes.
Another useful experience is that hook spacing matters more than you think. At first, many people install too many hooks because more hooks seem like more storage. In reality, crowded hooks cause tangles. Necklaces need room to hang straight. Bracelets need enough space so they do not knock into earrings. If you are unsure, tape paper marks on the frame first and hang a few sample pieces before drilling or screwing anything in.
The type of mesh also changes the user experience. Fine window screen looks subtle and works well for lightweight earrings, but it can be harder to use with tiny stud backs. Decorative metal mesh feels sturdier and often looks more upscale, but the pattern must have openings large enough for your earring hooks. Chicken wire is charming and rustic, but it can visually dominate delicate jewelry. Choose the screen based on your collection, not just the style trend you saw online at midnight.
Placement is another big factor. A jewelry organizer works best when it lives near your getting-ready routine. Above a dresser, beside a mirror, or inside a closet door are all practical choices. If you hang it across the room, you may stop using it. Convenience is the difference between a real organizing system and wall art wearing earrings.
It also helps to leave open space. A half-full organizer looks intentional and makes each piece easy to remove. A completely packed organizer may look impressive, but it can turn daily accessorizing into a tiny wrestling match. Keep special-occasion pieces in a box if they are fragile, sentimental, or rarely worn. Let the screen hold the jewelry that makes sense for everyday visibility.
Finally, expect the organizer to evolve. You may add more hooks later, repaint the frame, switch from screen mesh to metal mesh, or add a small shelf underneath. That is the advantage of a handmade project: it can adapt. The best version is not the one that looks perfect on day one. It is the one that keeps working after real life, busy mornings, outfit changes, and the occasional “Where is my other earring?” emergency.
Conclusion
Turning a screen into a jewelry organizer is a simple DIY project with a big payoff. It clears drawer clutter, prevents tangled necklaces, displays earrings beautifully, and gives an old screen or frame a stylish new purpose. With the right mesh, sturdy hooks, secure hanging hardware, and a layout based on your actual jewelry habits, you can create an organizer that is both practical and decorative.
The best part is that this project does not demand expert carpentry skills or a luxury budget. It rewards creativity, patience, and a willingness to look at an old screen and think, “You know what? You deserve rhinestones.” Whether your style is farmhouse, modern, glam, or boho, a DIY screen jewelry organizer can turn everyday accessories into part of your room’s personality.