Brass has a talent for making ordinary things look fancy. A brass candlestick can make a dinner table feel like a historic inn. A brass doorknob can make a hallway look polished. A brass tray can make your coffee table whisper, “Yes, I have my life together,” even if the laundry chair in the bedroom says otherwise.
Then tarnish arrives. Fingerprints, water spots, dull patches, and that mysterious greenish film can make brass look less “timeless heirloom” and more “forgotten pirate loot.” The good news: cleaning brass is usually simple when you know what kind of brass you have and choose the right method.
The best way to clean brass, according to cleaning pros, is to start gently: identify whether the piece is solid brass, brass-plated, lacquered, or unlacquered; wash it with warm water and mild dish soap; dry it completely; then use a mild brass-cleaning paste or polish only if tarnish remains. In other words, do not sprint toward the harshest product in the cabinet like you are entering a cleaning Olympics event.
Why Brass Gets Tarnished in the First Place
Brass is an alloy made primarily from copper and zinc. Its warm gold tone is what makes it so popular for cabinet pulls, lamps, candlesticks, faucets, trays, picture frames, fireplace tools, and decorative bowls. But brass reacts with air, moisture, skin oils, and household residue over time. That reaction creates tarnish, which can look brown, black, green, blue, or simply dull.
Tarnish is not always bad. On unlacquered brass, a soft patina can add depth and character. Designers often love this “living finish” because it changes naturally with use. However, sticky grime, uneven dark spots, old polish residue, and green oxidation are different stories. Those can make brass look neglected and, in some cases, may signal that moisture has been hanging around too long.
Before Cleaning Brass, Find Out What You Are Working With
This is the step many people skip, and it is also the step that prevents heartbreak. Cleaning pros do not treat every gold-colored object the same way. Some pieces are solid brass. Some are brass-plated. Some are coated with lacquer. Each one needs a different level of care.
Do the Magnet Test
Hold a small magnet against the item. If the magnet does not stick, the piece may be solid brass. If the magnet does stick, it is likely brass-plated steel or another metal with a thin brass finish. This matters because aggressive scrubbing can remove brass plating, leaving the base metal exposed. That is not a “vintage look.” That is a cleaning tragedy wearing a shiny hat.
Check for Lacquer
Lacquered brass has a clear protective coating that helps keep the metal shiny. If your brass looks glossy and tarnish appears only where the coating is chipped, it may be lacquered. Lacquered brass should usually be cleaned with a soft damp cloth and mild soap. Avoid acidic cleaners, abrasive powders, and metal polishes unless the manufacturer says they are safe for the finish.
Decide Whether You Want Shine or Patina
Unlacquered brass darkens over time. Some homeowners love that mellow, aged look. If you want to preserve patina, stick with dusting, mild soap, and gentle wiping. If you want a bright mirror-like shine, you can polish more thoroughly, but understand that every polishing session removes a tiny amount of surface material. Gentle and occasional is better than aggressive and weekly.
The Best Way to Clean Brass: A Pro-Approved Step-by-Step Method
This method works for many solid, unlacquered brass household items. Always test first in a hidden area, especially on antiques, valuable pieces, hardware with unknown finishes, or anything sentimental enough to cause family drama if damaged.
What You Need
- Mild dish soap
- Warm water
- Two or three soft microfiber cloths
- A soft-bristled toothbrush
- Lemon juice and baking soda, or lemon and salt
- Optional: commercial brass polish
- Optional: mineral oil or microcrystalline wax for protection
- Gloves, especially if using a commercial cleaner
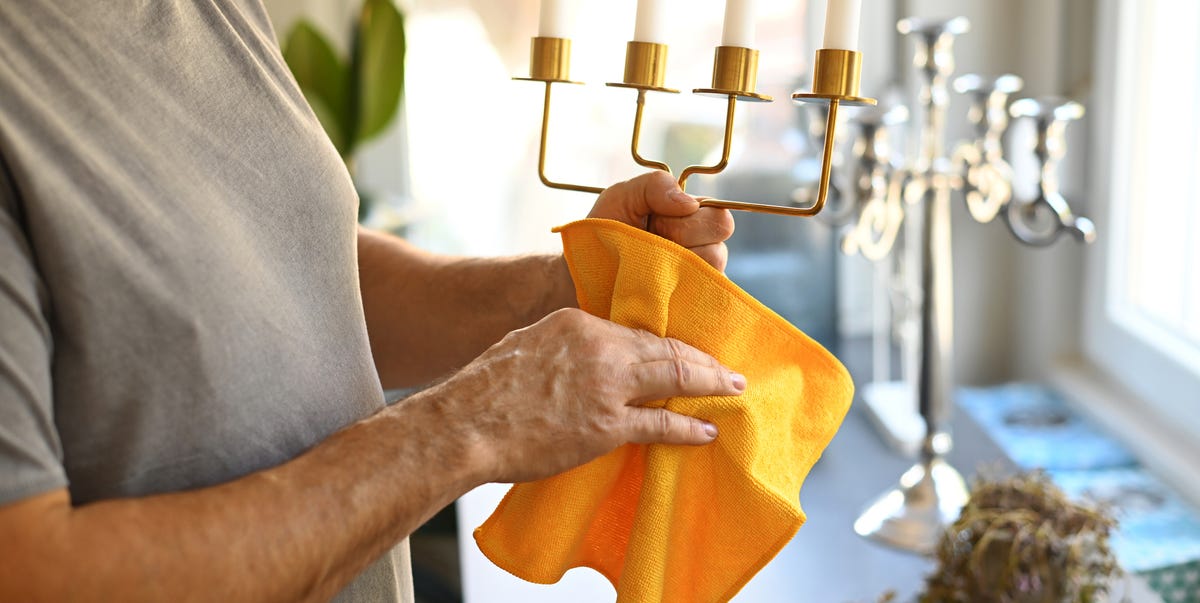
Step 1: Remove Dust and Surface Dirt
Start with a dry microfiber cloth. Wipe the brass to remove loose dust. Dust may seem harmless, but when mixed with moisture and pressure, it can become mildly abrasive. Think of it as tiny household confetti with bad intentions.
Step 2: Wash With Soap and Water
Mix a few drops of mild dish soap into warm water. Dip a soft cloth into the solution, wring it well, and wipe the brass. For removable solid brass pieces, you can wash them more thoroughly, but avoid soaking antique items, pieces with seams, or objects with wood, fabric, stone, or glued details.
Use a soft toothbrush for grooves, edges, and decorative areas. Do not use steel wool, stiff brushes, scouring pads, or gritty scrubbers. Brass is softer than it looks, and scratches are much easier to create than to apologize for.
Step 3: Rinse Carefully
Wipe away soap with a clean damp cloth. Soap residue can dull the surface and attract more grime. If the item can be safely rinsed under water, rinse briefly and carefully. If it is attached hardware, use a damp cloth instead of flooding the area.
Step 4: Dry Immediately
This is not optional. Water spots and lingering moisture can encourage tarnish and corrosion. Dry the brass completely with a clean microfiber cloth. Pay attention to screw holes, hinges, raised details, seams, and decorative grooves.
Step 5: Treat Tarnish With a Gentle Paste
If soap and water are not enough, use a mild homemade brass cleaner. One reliable option is a paste made from lemon juice and baking soda. Add the lemon juice slowly because the mixture will fizz. Once it forms a spreadable paste, apply a small amount to the tarnished area with a soft cloth.
Another classic method is lemon and salt. Dip half a lemon in fine salt and gently rub it over tarnished solid brass. The acid helps loosen tarnish, while the salt offers mild abrasion. Use a light hand. You are polishing brass, not sanding a deck.
For stubborn tarnish on solid brass, a paste of vinegar, salt, and flour can also work. The vinegar provides acidity, the salt helps lift discoloration, and the flour thickens the mixture so it stays where you put it. Apply, let it sit briefly, rub gently, then rinse thoroughly and dry completely.
Step 6: Buff to Bring Back the Shine
After rinsing away any paste, buff the brass with a dry microfiber cloth. Use small circular motions and light pressure. Buffing is where the shine usually returns. It is also the part that makes you hold the object up to the light like you just discovered treasure in your kitchen sink.
Step 7: Add Light Protection
For unlacquered brass that you want to keep bright longer, apply a very thin coat of mineral oil or a suitable wax with a soft cloth, then buff off the excess. The goal is a whisper-thin barrier, not a greasy film. If the brass feels slick or sticky, you used too much.
Best Homemade Brass Cleaners and When to Use Them
Homemade cleaners are popular because they use pantry ingredients and can be surprisingly effective. Still, “natural” does not automatically mean “safe for every finish.” Lemon juice and vinegar are acidic. Salt and baking soda can be abrasive. Use them wisely.
Lemon Juice and Baking Soda
This is one of the best all-around options for solid brass with moderate tarnish. It is easy to control, easy to apply, and less messy than some alternatives. Mix it into a paste, rub gently, rinse, and dry. Do not let the paste dry on the brass.
Lemon and Salt
This method is fast and satisfying on simple, solid brass pieces. It is not ideal for delicate antiques, plated brass, or pieces with lots of crevices where salt can hide. If you use it, rinse carefully and dry like your brass depends on itbecause it does.
Vinegar, Salt, and Flour
This paste is useful for heavier tarnish on solid brass. Because vinegar is acidic, do not leave it on too long, and do not use it on lacquered brass, brass plating, marble-adjacent fixtures, or antique pieces unless you are certain the finish can handle it.
Ketchup
Yes, ketchup. The mild acids in tomato-based condiments can help loosen tarnish. Apply a thin layer to solid brass, let it sit briefly, wipe, rinse, and dry. It can be useful for uneven tarnish or small hardware, although your brass may temporarily smell like a backyard cookout.
When to Use Commercial Brass Polish
Commercial brass polish can be a smart choice when tarnish is heavy, the piece is plain solid brass, or you want a brighter, more uniform finish. Follow the label exactly. Use gloves, ventilate the area, and keep polish away from stone countertops, painted surfaces, and delicate finishes.
Do not assume more product means better results. A small amount, used patiently, often works better than a thick layer. After polishing, remove residue from grooves with a soft cloth or cotton swab. Leftover polish can dry into chalky white lines, which is the cleaning equivalent of leaving toothpaste on your face before a video call.
How to Clean Brass-Plated Items
Brass-plated items need the gentlest treatment. Use warm water, mild dish soap, and a soft cloth. Avoid acidic pastes, abrasive powders, rough scrubbers, and heavy polishing. The brass layer may be thin, and once it is scrubbed away, it cannot be cleaned back into existence.
If a brass-plated item is badly tarnished or scratched, consider leaving the aged look, consulting a professional refinisher, or replacing the hardware. Sometimes the best cleaning decision is knowing when to stop.
How to Clean Lacquered Brass
Lacquered brass is designed to resist tarnish, so it does not need frequent polishing. Dust it regularly with a microfiber cloth. For fingerprints or grime, wipe with a damp cloth and a small amount of mild dish soap, then dry thoroughly.
If the lacquer is peeling, cloudy, or chipped, polishing will not fix the underlying issue. In fact, it can make the finish look worse. Restoring lacquered brass may require removing and reapplying the coating, which is often a job for a professional, especially on valuable or antique pieces.
How to Clean Brass Hardware Without Making a Mess
Cabinet pulls, door plates, hinges, and knobs are some of the most common brass items in the home. They are also magnets for fingerprints and skin oils. If possible, remove hardware before deep cleaning it. This protects cabinets, doors, paint, and surrounding surfaces from acidic cleaners or polish residue.
If you cannot remove the hardware, tape off nearby painted wood, marble, natural stone, or delicate surfaces. Apply cleaner to a cloth, not directly to the hardware. This gives you more control and prevents liquid from seeping into screws, locks, hinges, or cabinet seams.
Cleaning Brass Faucets and Bathroom Fixtures
Bathroom brass needs extra caution because water, soap residue, toothpaste splatter, and hard-water minerals can build up quickly. For daily or weekly care, wipe fixtures with a damp microfiber cloth and dry them after use. That simple habit can prevent many water spots before they become a weekend project.
Avoid harsh bathroom cleaners unless the product label clearly says it is safe for brass and the specific finish. Many products meant for tile, grout, toilets, or limescale are too aggressive for metal finishes. If you use a commercial cleaner, apply it to a cloth instead of spraying it directly onto the fixture.
What Not to Use on Brass
- Steel wool or metal scrubbers
- Harsh abrasive powders on plated or lacquered brass
- Bleach or ammonia-based cleaners
- Toilet bowl cleaner, oven cleaner, or drain cleaner
- Dishwasher cycles for decorative brass
- Long vinegar soaks on delicate or antique brass
- Any cleaner mixed with another cleaner “just to see what happens”
Cleaning products are formulated to work on their own. Mixing them can create dangerous fumes or damage surfaces. The safest approach is simple: use one product at a time, follow the label, rinse when appropriate, and keep the area ventilated.
How Often Should You Clean Brass?
High-touch brass, such as doorknobs, cabinet pulls, and faucet handles, may need gentle cleaning every few weeks or monthly. Decorative brass, such as trays, vases, candlesticks, and frames, may only need dusting and occasional polishing once or twice a year.
If you like patina, clean less often and polish only when grime or uneven oxidation bothers you. If you prefer a bright, reflective shine, clean lightly and consistently rather than waiting until tarnish becomes heavy. Maintenance is easier than rescue work. Brass agrees. Your elbows agree even more.
Should Brass Be Disinfected?
For everyday home use, cleaning high-touch brass with soap and water is often enough to remove dirt, oils, and many germs from the surface. If someone in the household is sick or you need to disinfect a high-touch item, choose a disinfectant that is compatible with the surface and follow the label instructions carefully.
Do not spray disinfectant directly into locks, hinges, or hardware mechanisms. Apply it to a cloth, wipe the surface, allow the required contact time if the label calls for it, then dry the brass if the product directions allow. Avoid bleach on brass because it can damage the finish and cause discoloration.
How to Keep Brass Shiny Longer
The secret to shiny brass is not heroic scrubbing. It is prevention. Keep brass dry, handle it with clean hands, dust it regularly, and wipe away fingerprints before they settle in. Moisture and skin oils speed up tarnish, so a quick wipe after use can save a lot of future polishing.
Store brass items in a dry place. For seasonal decor, wrap pieces in soft cloth rather than tossing them into a box with other metal objects. If you live in a humid climate, consider moisture absorbers in storage areas. For display pieces, dust weekly with a microfiber cloth.
Common Brass Cleaning Mistakes
Mistake 1: Polishing Before Washing
Polish works better on a clean surface. If you skip soap and water, you may rub dust, grease, and grime into the brass. Always clean first, polish second.
Mistake 2: Scrubbing Too Hard
Pressure does not equal progress. Gentle repeated passes are safer than one aggressive scrub. This is especially important for engraved brass, antique brass, and plated hardware.
Mistake 3: Forgetting to Rinse
Acidic ingredients and polish residue should not stay on brass. Rinse or wipe clean according to the method you use, then dry thoroughly.
Mistake 4: Treating Patina Like Dirt
Patina can be desirable, especially on unlacquered brass. Before removing it, decide whether you want a new-looking shine or a warm aged finish. Once polished away, patina takes time to return.
Experience Notes: What Cleaning Brass Teaches You in Real Life
Cleaning brass sounds like a small household task until you actually do it. Then you realize it is part cleaning project, part chemistry lesson, and part personality test. The first time many people clean brass, they make the same mistake: they go in too strong. They grab the toughest cleaner, the roughest sponge, and the confidence of someone who has watched exactly one cleaning video online. Five minutes later, they discover that brass rewards patience, not panic.
In real homes, the best brass-cleaning results usually come from slowing down. A dusty candlestick may not need polish at all. A cabinet knob darkened by fingerprints may only need dish soap, warm water, and a dry cloth. A brass tray with years of tarnish may need a paste and several gentle rounds. The trick is to let the condition of the piece guide the method instead of treating every object like it has personally offended you.
One practical experience that stands out is cleaning old brass cabinet pulls. At first glance, they often look ruined: dark around the edges, sticky near the screws, and dull in the center where hands touch them daily. But after removing them, washing them in warm soapy water, drying them well, and applying a small amount of lemon-baking soda paste, the transformation can be dramatic. The raised areas brighten first, the grooves take more time, and suddenly the hardware looks intentional again. Not brand-new, necessarily, but cared for.
Another lesson comes from brass-plated pieces. They teach humility. A magnet test can save you from scrubbing through the finish. When brass plating is thin, gentle cleaning is the whole strategy. You may not get a flawless shine, but you preserve what is there. That is often better than chasing perfection and ending up with patchy exposed metal.
Bathroom brass offers a different lesson: daily drying beats occasional deep cleaning. A faucet wiped dry after use stays better-looking than one attacked once a month with a dramatic amount of cleaner. Water spots, soap film, and toothpaste flecks are much easier to remove when they are fresh. This is not glamorous advice, but neither is spending Saturday morning polishing around a faucet base with a toothbrush.
Cleaning antique brass teaches the most restraint. Sometimes the darkened areas are not dirt; they are history. Over-polishing can erase the depth that makes an old piece beautiful. For heirlooms, valuable antiques, or anything with emotional value, the safest “experience-based” rule is to clean lightly, test first, and stop sooner than your inner perfectionist wants to.
The most satisfying part of cleaning brass is the final buff. After the paste is rinsed away and the surface is dry, a soft cloth can bring back a warm glow that feels almost magical. It is not magic, of course. It is chemistry, friction, and good timing. But when a dull brass candlestick catches the light again, you are allowed to feel like a domestic wizard.
Ultimately, the best way to clean brass is not one single recipe. It is a decision-making process: identify the finish, start mild, treat tarnish carefully, rinse completely, dry immediately, and protect the surface when needed. That approach works in real homes because it respects the material. Brass does not need to be bullied into beauty. It just needs the right touch, a little patience, and maybe a lemon that never expected to have such an important career.
Conclusion
The best way to clean brass, according to cleaning pros, is to begin with the least aggressive method and work up only when needed. First, determine whether the piece is solid brass, brass-plated, lacquered, or unlacquered. Then clean with mild soap and warm water, dry thoroughly, and use a gentle tarnish remover only on finishes that can handle it.
For solid unlacquered brass, lemon juice and baking soda, lemon and salt, vinegar-salt-flour paste, ketchup, or a quality commercial brass polish can restore shine. For lacquered or plated brass, keep it simple and gentle. The biggest rule is this: do not over-clean. Brass has charm because it changes, glows, and ages. Treat it well, and it will keep making your home look just a little more elegant than your junk drawer would suggest.