A puffy fluffy coffee filter wreath is one of those magical DIY projects that makes you pause, squint, and say, “Wait… that came from the kitchen aisle?” Yes. The same humble coffee filters that normally catch your morning brew can become a soft, cloud-like wreath that looks like ruffled linen, paper hydrangeas, snowy petals, or a boutique home-decor piece with a suspiciously expensive personality.
The best part? This wreath is beginner-friendly, budget-friendly, and wonderfully forgiving. If one coffee filter folds a little crooked, nobody will know. The wreath simply becomes “textured.” If the color comes out uneven, congratulationsyou have created “artisan shading.” This is the rare craft where imperfection does not ruin the project; it gives the wreath its charm.
In this guide, we will walk through how to make a full, soft, dimensional coffee filter wreath, how to dye or style it for different seasons, how to avoid common mistakes, and how to display it so it stays pretty instead of turning into sad paper lettuce. Whether you want a snowy winter wreath, a blush spring accent, a farmhouse-neutral wall piece, or a playful holiday decoration, the puffy fluffy coffee filter wreath is an easy win.
What Is a Puffy Fluffy Coffee Filter Wreath?
A puffy fluffy coffee filter wreath is a decorative wreath made by folding, twisting, bunching, or scrunching paper coffee filters and attaching them closely together to a wreath base. When hundreds of filters are packed side by side, they create a soft ruffled texture that looks surprisingly elegant.
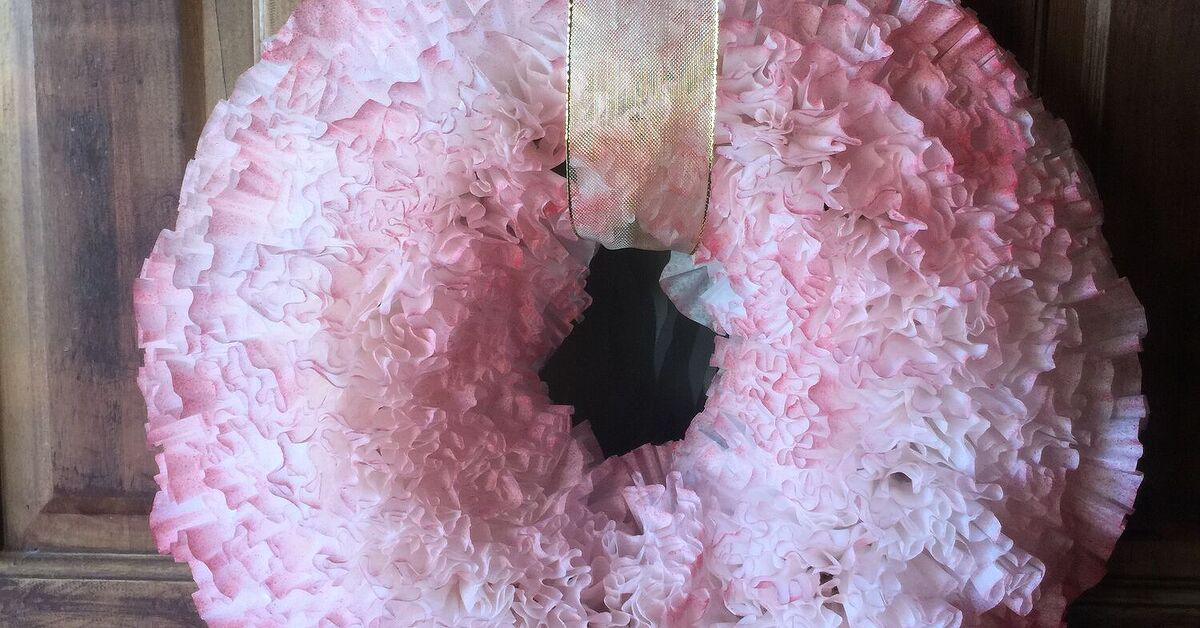
The wreath can be made with a foam wreath form, wire frame, cardboard base, pool noodle form, or even a heart-shaped base for Valentine’s Day. White coffee filters give a snowy, romantic look. Natural brown filters create a warm vintage tone. Dyed filters can become pink, blue, lavender, green, peach, or tea-stained beige. Add ribbon, faux greenery, dried orange slices, small ornaments, paper flowers, or metallic touches, and suddenly your coffee filter wreath is dressed for the season like it has its own tiny wardrobe.
Why Coffee Filters Work So Well for Wreath Making
Coffee filters are lightweight, flexible, absorbent, inexpensive, and easy to shape. Their thin paper edges create beautiful ruffles when folded or fluffed. Because they are already circular, they naturally form petal-like layers without needing fancy cutting or complicated templates.
They also take color well. You can tint them with food coloring, diluted acrylic paint, watercolor, coffee, tea, or fabric dye. Once dried, the filters hold soft color variations that make the wreath look fuller and more handcrafted. In other words, coffee filters are basically undercover craft royalty. They have been living in the pantry this whole time, waiting for their big home-decor debut.
Supplies You Will Need
Before you begin, gather your materials. This project does not require expensive tools, but it does require patience. A full wreath may use anywhere from 150 to 500 coffee filters depending on the size of the base and how dense you want the final look.
Basic Supplies
- White or natural basket-style coffee filters
- Foam wreath form, wire wreath frame, cardboard ring, or pool noodle wreath base
- Hot glue gun with glue sticks
- Pencil, marker, chopstick, or wooden dowel for shaping filters
- Ribbon, twine, or wire for hanging
- Scissors
- Cardboard, parchment paper, or a craft mat to protect your table
Optional Decorating Supplies
- Food coloring or watercolor paint for dyeing filters
- Acrylic paint for dry brushing edges
- Faux berries, greenery, mini ornaments, dried flowers, or dried citrus slices
- Burlap ribbon, velvet ribbon, satin ribbon, or gingham ribbon
- Floral wire or pipe cleaners
- Felt to cover the back of the wreath
If you plan to dye the filters, prepare a drying area ahead of time. Coffee filters dry best when spread out in a single layer or separated into small stacks. If you leave them in a soggy pile, they may dry into one stubborn paper pancake, which is not the aesthetic we are chasing.
How Many Coffee Filters Do You Need?
The number depends on your wreath size, your folding method, and your desired fullness. A small 10-inch wreath may need about 150 to 250 filters. A 14-inch wreath may need 250 to 400 filters. A large 16-inch wreath can use 400 to 600 filters if you want it extremely dense and dramatic.
If you are aiming for the classic puffy fluffy look, buy more filters than you think you need. Coffee filters are inexpensive, and running out when you are three-quarters finished is the crafting version of a cliffhanger. Extra filters can always be saved for flowers, garlands, gift wrapping, or emergency coffee situations.
Step-by-Step: How to Make a Puffy Fluffy Coffee Filter Wreath
Step 1: Prepare the Wreath Base
Start with your wreath form. Foam forms are easiest for beginners because the filters can be glued directly onto the surface. Wire frames create a lighter wreath but may require tying, wrapping, or gluing the filters more carefully. Cardboard is the most budget-friendly option, especially for heart shapes or custom sizes.
If your wreath base is dark and you are using white filters, consider wrapping the form with white ribbon, paper, or extra filters first. This prevents the base from showing through small gaps. It does not need to be perfect; the fluffy filters will hide most of the evidence. Crafting is generous like that.
Step 2: Fold or Shape the Coffee Filters
There are several ways to shape the filters. For the puffiest look, place a pencil or marker in the center of one coffee filter, wrap the filter around the pencil, and twist the bottom slightly to form a cone-like point. The top will flare out like a ruffled flower.
Another method is to fold each filter in half, then in half again, and once more if you want a tighter ruffle. Pinch the pointed end and fluff the rounded edges. This creates a petal cluster that can be glued to the wreath form. You can also scrunch each filter from the center and twist the bottom, which gives a loose, cloud-like texture.
For best results, make a batch of shaped filters before gluing. This keeps the rhythm going and prevents the classic craft-table problem of holding a glue gun in one hand, a limp filter in the other, and wondering how you became a human octopus.
Step 3: Attach the Filters Close Together
Add a small dab of hot glue to the twisted or pointed end of the filter. Press it firmly onto the wreath base and hold it for a few seconds. Continue adding filters side by side, working in rows around the wreath.
The secret to a full wreath is spacing. Place the filters close enough that the base disappears. If you want a dense, snowy, luxury look, pack them tightly. If you want a looser, airy look, leave slightly more space between clusters. Rotate the direction of the filters as you work so the ruffles look natural rather than lined up like soldiers at a very soft parade.
Step 4: Cover the Front and Sides
Attach filters to the front first, then fill in the inner and outer sides. Avoid gluing filters to the back if you want the wreath to hang flat against a wall or door. If the back looks messy, you can glue a ring of felt or paper over it later for a cleaner finish.
Once the wreath is full, hold it up and inspect it from different angles. If you see gaps, add more filters. If one area looks too flat, fluff the filters with your fingers. Coffee filter wreaths are delightfully adjustable, which is another way of saying they let you fix things without drama.
Step 5: Add a Hanger
Loop ribbon, twine, or floral wire around the top of the wreath. You can also attach a ribbon to the back with hot glue if the wreath is lightweight. Make sure the hanger is secure before displaying the wreath. A puffy wreath falling off the wall is not dangerous, but it is emotionally rude.
How to Dye Coffee Filters for a Custom Wreath
Dyeing coffee filters is simple and gives the wreath a more personalized look. Add water to a bowl, then mix in a few drops of food coloring, watercolor paint, or diluted acrylic paint. Dip the filters into the mixture, squeeze out excess liquid gently, and spread them out to dry.
For a soft ombré effect, dip only the edges of the filters. For deeper color, let the filters soak longer or use more pigment. For a vintage cream tone, dip filters in brewed tea or diluted coffee. For a romantic blush wreath, use pale pink dye. For a coastal look, try soft blue or sea-glass green. For fall, combine tan, caramel, rust, and muted orange.
Let the filters dry completely before gluing. Damp filters tear more easily, and hot glue on wet paper can become messy. If you are impatient, you can separate the filters into smaller stacks, lay them on baking racks, or use a fan to speed drying. Do not put them near an open flame or high heat. They are paper, not tiny fireproof miracles.
Seasonal Styling Ideas
Winter Coffee Filter Wreath
Use white filters and a wide velvet ribbon in red, navy, emerald, or burgundy. Add mini ornaments, faux pine sprigs, silver bells, or dried orange slices. The white ruffles look like soft snow, but without the part where your fingers go numb.
Spring Coffee Filter Wreath
Dye filters in pale pink, lavender, butter yellow, or mint green. Add a gingham ribbon and tuck in faux blossoms or small paper butterflies. The result feels fresh, cheerful, and slightly smug about surviving winter.
Farmhouse Neutral Wreath
Use natural brown coffee filters or lightly tea-stained white filters. Pair them with burlap ribbon, cotton stems, eucalyptus, or wood beads. This version works beautifully in entryways, kitchens, bedrooms, and living rooms.
Valentine Heart Wreath
Cut a heart shape from cardboard and cover it with pink, red, or white filters. Mix several shades for depth. Add a small ribbon bow and hang it on a mirror, pantry door, or gallery wall.
Fall Coffee Filter Wreath
Dye filters in warm neutrals, copper, cinnamon, mustard, and soft brown. Add faux leaves, tiny pumpkins, acorns, or a plaid ribbon. This creates a cozy autumn wreath without needing to wrestle real leaves into submission.
Design Tips for a Fuller, Prettier Wreath
For the fluffiest result, vary the height and angle of each filter. Do not flatten the ruffles too much while gluing. If your wreath looks uneven, that is usually a sign you need more filters, not a sign you have failed. Add clusters where the base shows and fluff the edges outward.
Use smaller filters for a tighter, more delicate texture and larger filters for a dramatic, cloud-like appearance. Basket-style filters usually work better than cone filters because they open into round, petal-like shapes. However, cone filters can still be used if you fold and layer them creatively.
If you want a more polished wreath, create a consistent color palette before you begin. For example, use all white filters with one statement ribbon, or blend three shades of dyed filters in the same color family. Too many unrelated colors can make the wreath look busy. The goal is fluffy elegance, not a confetti explosion at a coffee shop.
Common Mistakes to Avoid
Using Too Few Filters
A sparse coffee filter wreath can look unfinished. Pack the filters close together so the wreath base disappears. When in doubt, add more ruffles.
Skipping the Drying Time
If you dye the filters, let them dry fully before attaching them. Wet filters tear, wrinkle heavily, and may not hold their shape.
Using Too Much Glue
A small dab of hot glue is enough. Too much glue can make the base lumpy and may soak through thin paper.
Decorating with Heavy Items
Coffee filter wreaths are lightweight. Heavy ornaments or large embellishments can pull the wreath out of shape. Use lightweight decorations and attach them carefully.
Hanging It Outdoors in Bad Weather
This wreath is made of paper. It should be displayed indoors or in a very protected covered area. Rain, humidity, strong sun, and wind can damage it quickly. A coffee filter wreath on an uncovered front door during a storm is basically a craft sacrifice.
Where to Display a Coffee Filter Wreath
A puffy fluffy coffee filter wreath works beautifully on interior doors, above mantels, on gallery walls, over mirrors, in nurseries, craft rooms, bedrooms, dining rooms, and cozy reading corners. It also makes a charming party decoration for showers, birthdays, brunches, weddings, and seasonal gatherings.
If you hang it on an exterior door, choose a door protected by a covered porch and avoid direct rain or strong sunlight. Paper can yellow over time, especially in bright light. Store the wreath in a box or wreath bag when not in use, and avoid crushing the ruffles. If a few filters flatten in storage, gently fluff them with your fingers before displaying again.
Budget-Friendly Variations
One reason this project is popular is its low cost. A pack of coffee filters, a simple wreath form, and glue can create a surprisingly impressive decoration. For an ultra-budget version, cut a wreath ring from sturdy cardboard and use filters you already have at home. For a larger wreath, tape a pool noodle into a circle and cover it with filters.
You can also reuse ribbon from gift wrapping, add leftover faux greenery, or make paper flowers from extra filters. The project is flexible enough to match what you already own, which is excellent news for anyone whose craft drawer looks like a tiny craft store had a dramatic sneeze.
Extra Experience Notes: What It Feels Like to Actually Make One
Making a puffy fluffy coffee filter wreath is not difficult, but it is wonderfully repetitive. That might sound like a warning, but it is actually part of the appeal. Once you learn the motionwrap, twist, glue, press, fluffyou can settle into the process. Put on music, a podcast, or a comfort movie you have seen so many times you can quote the furniture. This is the kind of craft that lets your hands stay busy while your brain wanders around in slippers.
The first ten filters may look unimpressive. Do not panic. At the beginning, the wreath often looks like a strange science project involving paper mushrooms. Keep going. Around the first quarter of the wreath, the texture begins to make sense. Around halfway, you start to see the volume. By the end, the wreath transforms into a ruffled cloud, and you will probably hold it at arm’s length and say something deeply professional like, “Oh wow, I made a fancy thing.”
One helpful experience tip is to prepare more filters than you think you need before turning on the glue gun. If you shape filters one by one while gluing, the project feels slower. If you fold or twist a large stack first, assembly becomes much smoother. You can even divide the filters into small piles: outer edge, inner edge, front fill, and extra gap fillers. This is not required, but it makes the process feel organized instead of chaotic.
Another lesson: protect your table. Hot glue has a sneaky way of creating little strings across everything. A piece of cardboard underneath the wreath catches drips and makes cleanup easier. Keep your fingers away from fresh glue, especially if you are pressing filters into a foam form. A low-temperature glue gun is more comfortable for this project, particularly because you will be gluing many pieces in a row.
If you are dyeing filters, test a small batch first. Colors usually dry lighter than they look when wet. A bowl of pink dye may look dramatic, then dry into the gentlest blush. That can be beautiful, but if you want stronger color, you may need more pigment or a second dip. Uneven color is not a problem; it often gives the wreath depth. The best dyed wreaths usually have slight variations, like real petals.
When styling the finished wreath, start simple. A plain white coffee filter wreath with a beautiful ribbon can look elegant on its own. Add decorations gradually. Too many extras can hide the ruffled texture, which is the whole reason this craft is so charming. Think of embellishments as accessories, not a disguise. The wreath is already wearing its big fluffy outfit.
Storage is another real-life detail worth mentioning. Do not toss the wreath into a closet and hope for the best. The filters can crush easily. Store it in a shallow box, wreath container, or large paper bag with enough space around the edges. If it becomes dusty, use a cool hair dryer on a low setting from a distance, or gently shake it outside in a protected area. Do not wipe it with a damp cloth. Again: paper. Paper has feelings.
The greatest joy of this project is how customizable it becomes after you understand the basic method. You can make one for winter, one for spring, one for a baby shower, one for a bedroom wall, or one for a craft night with friends. It is inexpensive enough to experiment with and pretty enough to display proudly. That combination is rare. Many crafts are either cheap and suspicious-looking or beautiful and financially rude. This one manages to be both affordable and genuinely lovely.
Most importantly, a coffee filter wreath proves that good decorating does not always need expensive supplies. Sometimes it begins with a pack of filters, a wreath form, and the optimistic belief that a pile of paper can become something charming. And in this case, it absolutely can.
Conclusion
A puffy fluffy coffee filter wreath is a simple DIY project with a big visual payoff. It uses basic supplies, welcomes beginners, and can be styled for nearly any season or room. With enough filters, careful spacing, and a little patience, you can create a wreath that looks soft, full, and beautifully textured.
Keep it indoors or protected from weather, avoid heavy decorations, and do not be afraid to experiment with dye, ribbon, and seasonal accents. Whether you love farmhouse neutrals, snowy holiday decor, pastel spring crafts, or budget-friendly handmade home accents, this wreath earns its place on the wall. It is proof that sometimes the prettiest decor starts right next to the coffee maker.